Connect the CAST Imaging MCP Server to Gemini Enterprise
Overview
This page explains how to make the MCP Server for CAST Imaging available to your users in Google Gemini Enterprise, so that they can query applications, architecture, transactions and code quality from the Gemini Enterprise chat. It is intended for the administrator who manages both Keycloak in CAST Imaging and the Gemini Enterprise configuration in the Google Cloud console.
Unlike the AI clients described in Connect your AI client, Gemini Enterprise is configured once by an administrator, then used by everyone with access to the Gemini Enterprise app. Each user signs in to CAST Imaging through Keycloak the first time they use the connector, so tool calls carry that user’s roles and permissions. No CAST Imaging API key is involved.
Custom MCP server support in Gemini Enterprise is a Preview (Pre-GA) feature from Google. Console screens, field names and behavior can change without notice. Where this page differs from the Google documentation, follow the Google documentation - see Set up a custom MCP server data store .
Requirements
- CAST Imaging 3.6.9-funcrel or later, with the MCP Server for CAST Imaging 3.1.0-funcrel or later installed
- a CAST Imaging URL that Google Cloud can reach over HTTPS: Gemini Enterprise calls the MCP Server and Keycloak from Google’s infrastructure, not from the user’s machine - see HTTPS configuration. This page refers to it as
<CAST_URL>, the URL you use to open CAST Imaging, i.e. the machine on which theimaging-servicescomponent is installed, for examplehttps://imaging.example.com - access to the Keycloak admin UI at
<CAST_URL>/authwith thekcadminaccount - see Keycloak accounts and passwords - in Google Cloud:
- a Gemini Enterprise subscription
- the Discovery Engine Editor role (
roles/discoveryengine.editor) to create the data store - an Organization Policy Administrator to override the organization policy constraint that blocks custom MCP data stores by default - without this override, creating the data store is refused
Step 1 - Create the OAuth client in Keycloak
Gemini Enterprise signs in to CAST Imaging through a dedicated confidential OAuth client. Create it once:
-
Log in to the Keycloak admin UI, for example
<CAST_URL>/auth, and use the realm selector to switch to theaip-realmrealm. -
Navigate to Clients > Create client.
-
In General settings, set Client type to
OpenID Connectand enter a Client ID, for examplegemini-client, then click Next.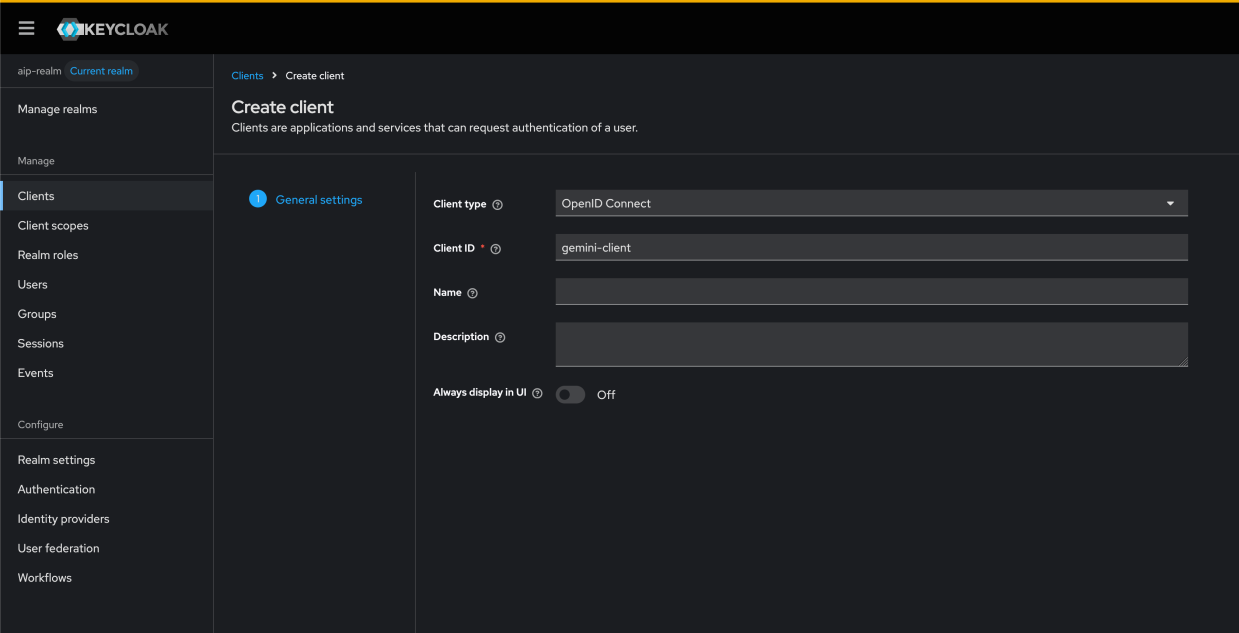
-
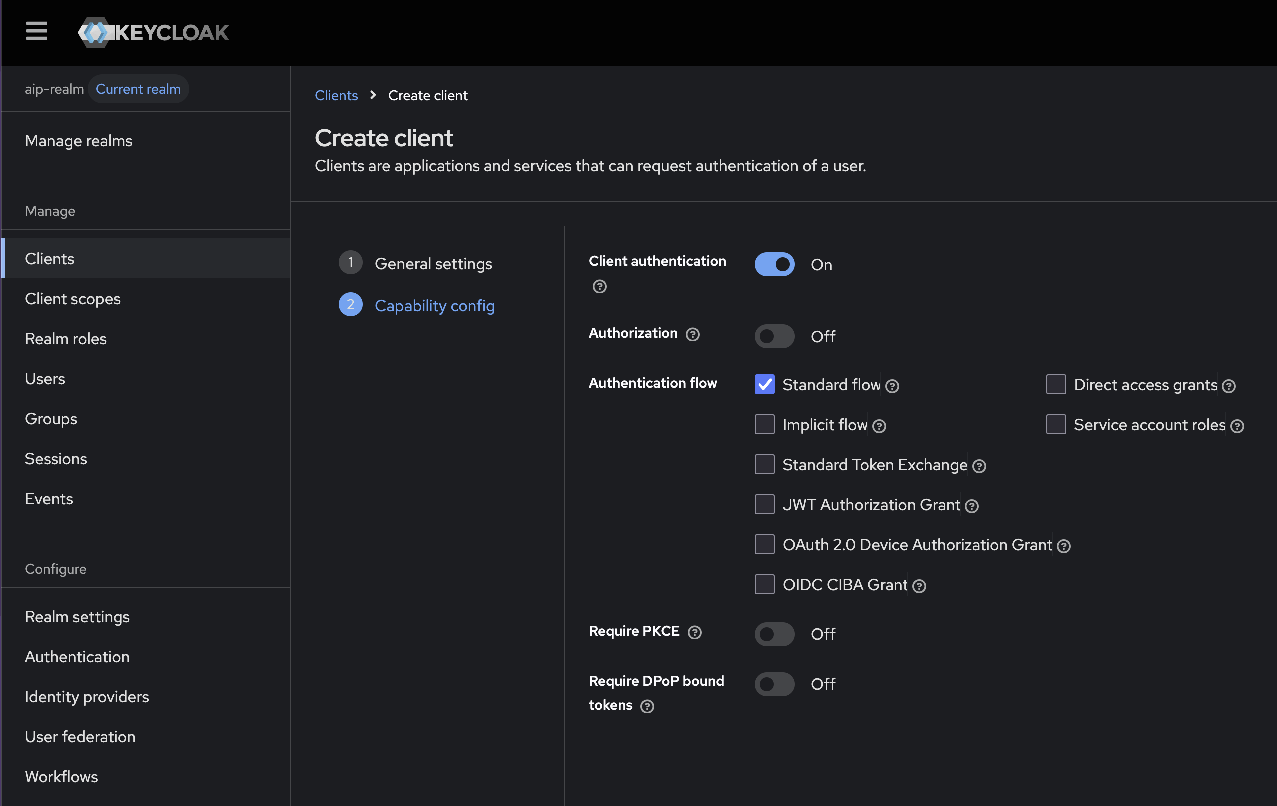
In Capability config, turn Client authentication ON so that Keycloak generates a client secret, and select Standard flow. Leave Direct access grants unselected, then click Next.
-
In Login settings, enter the following values, then click Save:
Field Value Valid redirect URIs https://vertexaisearch.cloud.google.com/oauth-redirectWeb origins https://vertexaisearch.cloud.google.com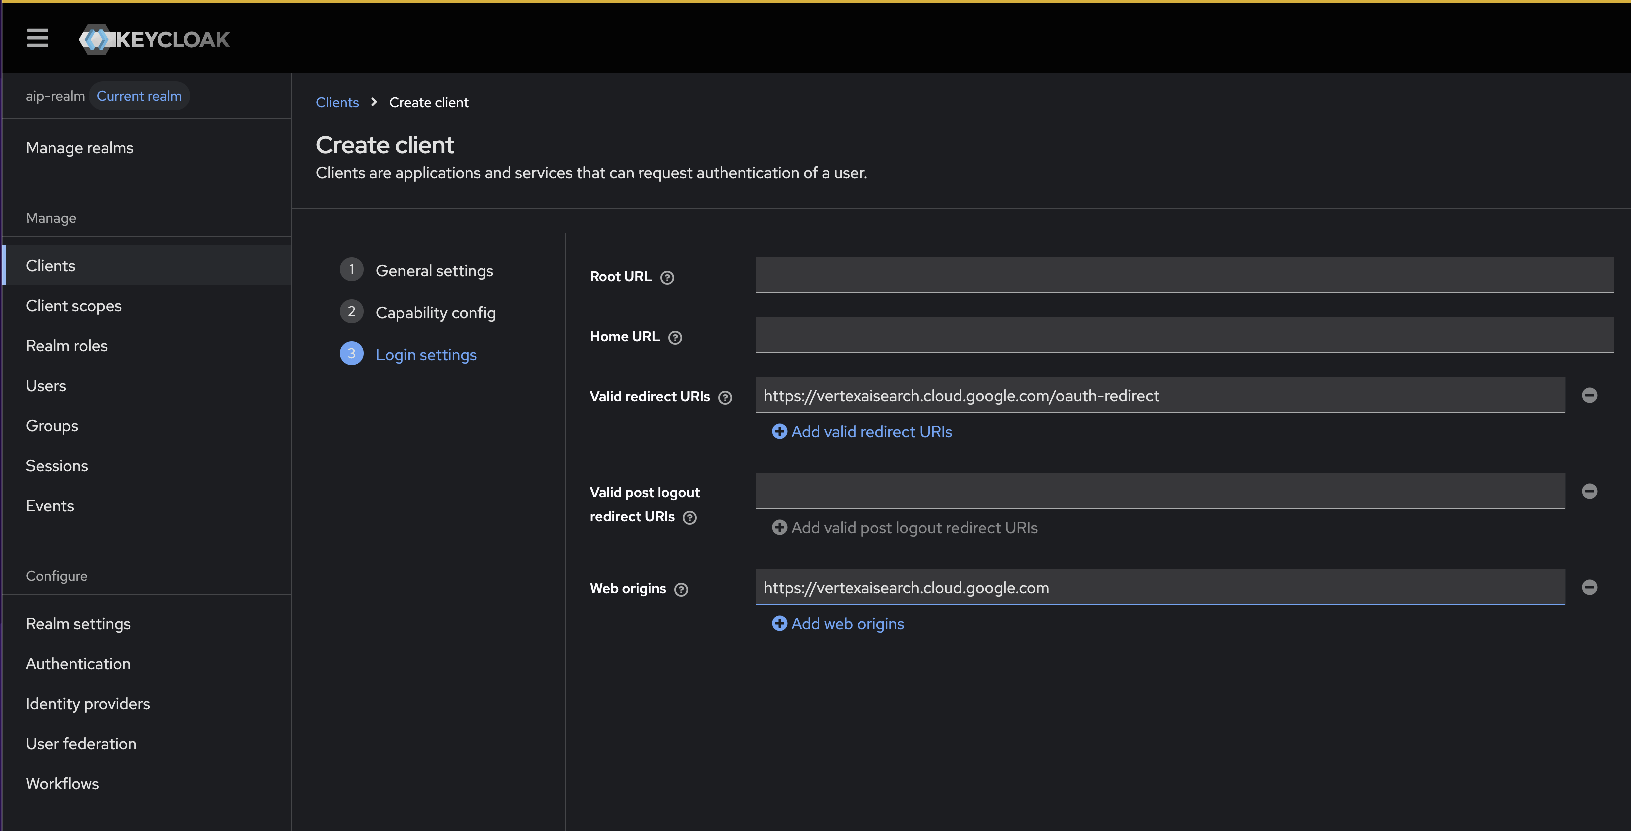
-
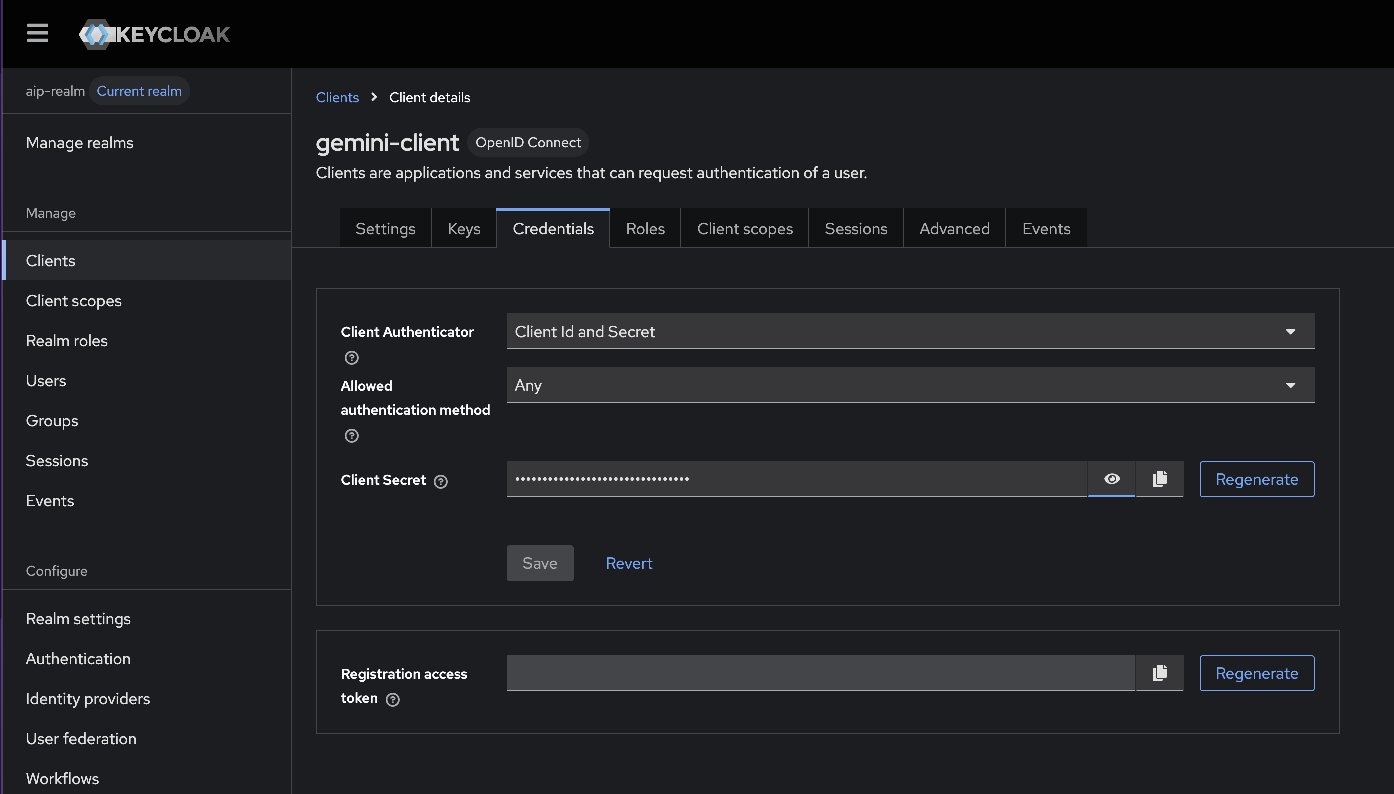
Open the Credentials tab of the new client and copy the Client Secret. Share it only through a secure channel.
-
Open the Client scopes tab and check that
offline_access,profileandemailare assigned. They are assigned by default.
Step 2 - Gather the connection details
Collect the following values, where <CAST_URL> is the CAST Imaging URL defined in Requirements:
| Field | Value |
|---|---|
| MCP Server URL | <CAST_URL>/mcp |
| Authorization URL | <CAST_URL>/auth/realms/aip-realm/protocol/openid-connect/auth |
| Token URL | <CAST_URL>/auth/realms/aip-realm/protocol/openid-connect/token |
| Client ID | the Client ID created in Step 1, for example gemini-client |
| Client Secret | the secret copied from the Credentials tab in Step 1 |
| Scopes | openid profile email offline_access |
The offline_access scope lets Gemini Enterprise hold a refresh token: Keycloak access tokens expire after a few minutes, and without it users would be asked to sign in repeatedly.
Step 3 - Create the custom MCP server data store
In the Google Cloud console:
-
Navigate to Gemini Enterprise > Data stores > Create data store.
-
Search for
Custom MCP Server, then click Add MCP server. -
On MCP Server Configuration, fill in each field with the values from Step 2.
-
Click Login and sign in with your CAST Imaging account to authorize the connection.
-
Expand Advanced options and paste a server description and agent instructions. Use the examples below as a starting point and adapt the wording and terminology to the way your users ask questions.
MCP Server Description
CAST Imaging MCP Server - software intelligence over this organization's application
portfolio. It exposes CAST Imaging's analysis of real codebases: the onboarded
applications, their architecture (layers, components, packages), end-to-end transactions
and call paths, data call graphs and data flows, inter-application dependencies, and code
quality and security insights (CVE vulnerabilities, ISO-5055 violations, structural flaws,
cloud readiness, and green deficiencies). It drills from the whole portfolio down to a
single application and to individual code objects (classes, methods, tables, functions).
Use this whenever the user mentions CAST or CAST Imaging, or asks about application or
system architecture, code structure, transactions, data flows, dependencies, technical
debt, or code quality and security of onboarded applications.
MCP Agent Instructions
You are an agent for CAST Imaging software intelligence. Whenever the user mentions "CAST" or "CAST Imaging", or asks about an application's architecture, transactions, data graphs or flows, dependencies, code objects, or quality and security (CVEs, ISO-5055, structural flaws, cloud, green), answer by calling the CAST Imaging tools - never from prior knowledge or web search. Workflow: 1. If you do not already know the application names, call `applications` first; always pass the exact name in later calls. 2. Work coarse to fine: portfolio tools (all applications) -> application tools (one application) -> object tools (a class, method, table or function). 3. "my apps", "our apps" and "all apps" all map to `applications`. 4. For quality and security, pick the insight type: cve, iso-5055, structural-flaws, cloud, green. 5. Results are paginated - request more pages when needed. 6. Read-only tools run freely; tools that write to CAST Imaging (for example manage_view_document) modify data, so confirm first. -
In Configure your data connector, choose a Multi-region location. Use
Globalunless data residency rules require a specific geography: the location cannot be changed later. -
Name the data store, for example
CAST Imaging, then click Create. Users see this name in the Connectors menu of the chat and type it in their prompts, so choose a clear one. -
Wait until the state of the data store changes from Creating to Active.
Step 4 - Connect the data store to an app
- Navigate to Gemini Enterprise > Apps, then open an existing app or click Create app and enter an App name and an App ID. The App ID cannot be changed later.
- Connect the CAST Imaging data store to the app. An app can hold several data stores, but a dedicated app gives the most predictable tool routing.
Step 5 - Enable the tools
All actions are disabled by default: until you enable them, the assistant has no access to any CAST Imaging tool.
- Open the CAST Imaging data store, then navigate to Actions and click Reload custom actions to load the tool list.
- Select the actions to enable. A good starting set is
applications,stats,architectural_graph,transactions,transaction_details,data_graphs,quality_insights,quality_insight_violations,objects,object_details,source_filesandtransactions_using_object. For the full list, see Tools reference. - Click Enable actions.
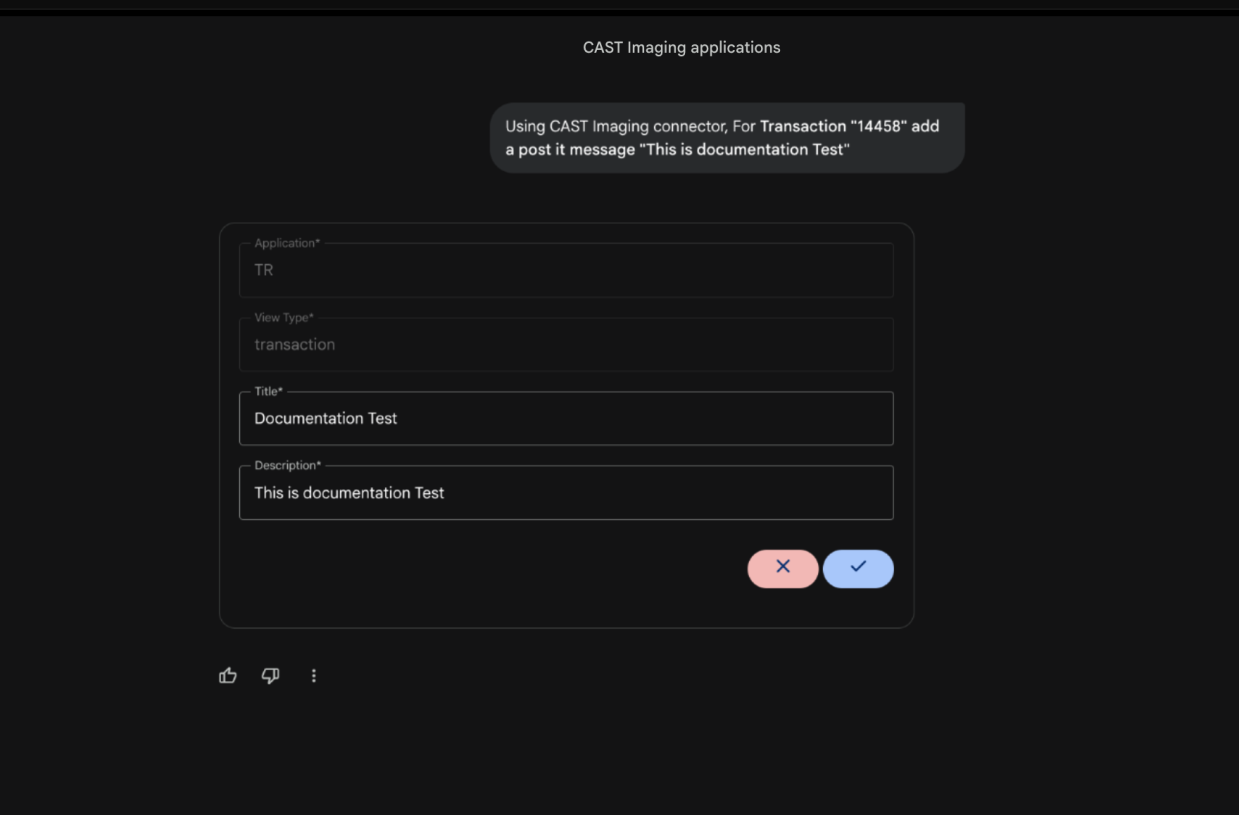
Read-only tools run without a confirmation prompt. Tools that change data in CAST Imaging, such as manage_view_document, ask the user to confirm before running.
Step 6 - Configure the assistant (optional)
In the app Configurations, you can set Enable web grounding to ON with Default Web Search State set to OFF, and paste the system instructions below, to reduce the number of answers taken from the web instead of from CAST Imaging. These settings help but do not guarantee that the CAST Imaging tools are called - see Name the connector in each prompt. Assistant customizations require a qualifying Gemini Enterprise license tier and may not apply on the Standard tier; the connector itself works on all tiers.
You are CAST Imaging Assistant, expert on this organization's software portfolio, backed
by CAST Imaging.

MANDATORY TOOL ROUTING:
- For any question about applications, the portfolio, software or system architecture,
  transactions, call paths, data graphs or flows, inter-application dependencies, code
  objects (classes, methods, tables, functions), source code, or code quality and security
  (CVEs, ISO-5055, structural flaws, cloud readiness, green) - you must call the CAST
  Imaging tools.
- Never answer these from prior knowledge or web search. "CAST Highlight" and "CAST
  Imaging" are product names, not the answer - the answer is the user's onboarded
  applications returned by the tools. CAST Imaging is the only authoritative source.
- "applications in CAST", "my apps", "our apps" and "all apps" all mean: call
  `applications`.
- If the target application is unclear, call `applications` first, then continue.

Workflow: applications (discover) -> application-level tools -> object-level tools.
Paginate when needed. Read-only tools run without confirmation; tools that modify CAST
Imaging data (for example manage_view_document) require explicit confirmation.

Only use general knowledge or the web for requests clearly unrelated to software, code,
or CAST.
Step 7 - Share the app with your users
Share the link to the Gemini Enterprise app with your users, together with the instructions below.
Sign in and enable the connector
- Open the Gemini Enterprise app and click New chat.
- The first time you use the CAST Imaging connector, sign in to CAST Imaging when prompted. You are not asked again in later chats.
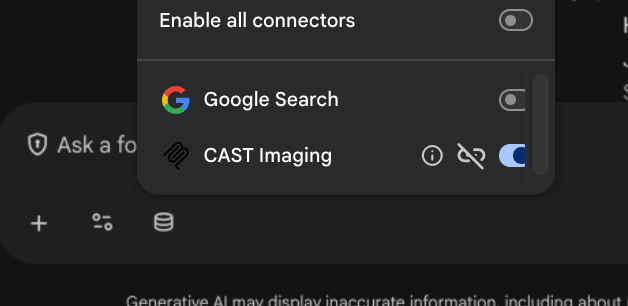
- Click Connectors in the message box, check that CAST Imaging is ON and turn Google Search OFF.
Name the connector in each prompt
The built-in Gemini Enterprise assistant does not reliably select the CAST Imaging connector on its own, and largely ignores custom system instructions for tool routing. A prompt such as list applications in CAST may be answered from the model’s own knowledge instead of from CAST Imaging. Start each prompt with the name of the connector:
Using CAST Imaging connector, <your question>
Use the data store name exactly as it appears in the Connectors menu, not the app name. For example, if the data store is named CAST Code Intelligence, start with Using CAST Code Intelligence connector,.
Step 8 - Verify
In a new chat, with CAST Imaging ON in Connectors, try the following prompts:
| Prompt | Expected result |
|---|---|
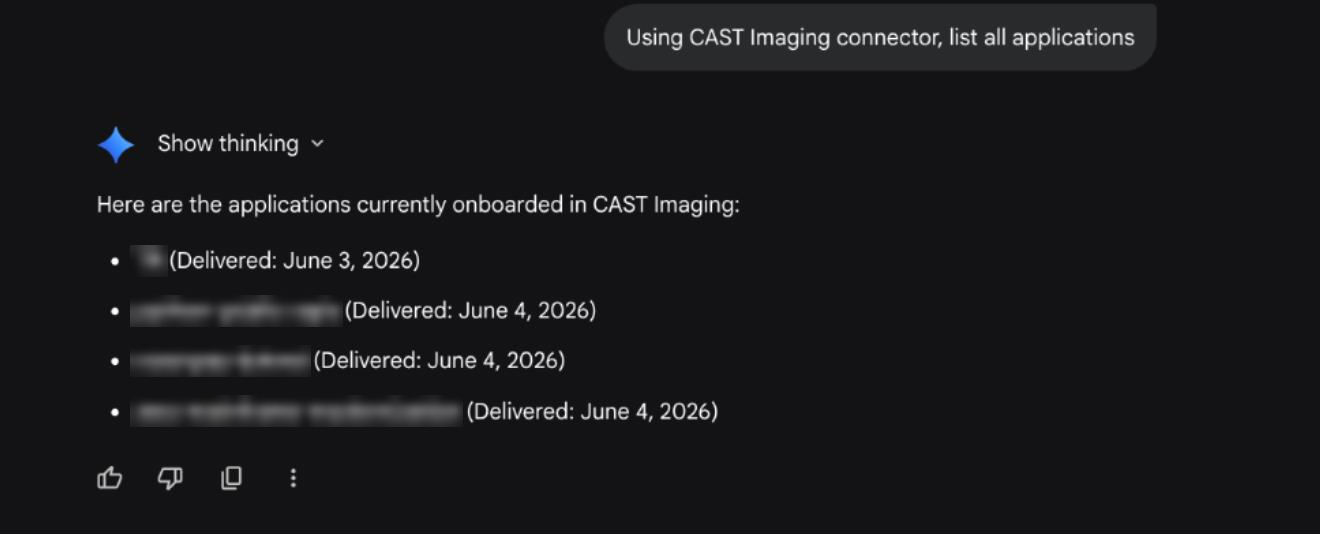
Using CAST Imaging connector, list all applications |
the applications onboarded in CAST Imaging that you have access to |
Using CAST Imaging connector, show the architecture of <APP_NAME> |
the architecture of the application |
Using CAST Imaging connector, list vulnerabilities in <APP_NAME> |
CVE and quality data for the application |
A prompt that changes data, for example adding a post-it to a transaction, displays a form that you must confirm before the tool runs:
Troubleshooting
Sign-in fails with "Invalid parameter: redirect_uri"
The Valid redirect URIs of the Keycloak client does not contain https://vertexaisearch.cloud.google.com/oauth-redirect exactly. Correct the value in the client Settings tab - see Step 1.
The assistant answers without calling CAST Imaging
Check that CAST Imaging is ON in the Connectors menu, that the prompt starts with Using <connector name> connector,, and that the actions are enabled on the data store - see Step 5.
Creating the data store is refused
The organization policy constraint that blocks custom MCP data stores has not been overridden - see Requirements.