Neo4j on a dedicated machine (Docker)
Overview
In a standard installation, the Neo4j database runs in a container alongside the other imaging-viewer services on the same machine. From 3.6.4-funcrel you can instead split the imaging-viewer component so that Neo4j runs on its own dedicated machine, separate from other imaging-viewer services.
When to use this:
- Performance isolation - running Neo4j on a dedicated machine removes its resource demands from the machine hosting the other services.
- Independent lifecycle - because Neo4j is deployed separately, you can update CAST Imaging without being forced to update Neo4j at the same time. Neo4j is treated like an independent database instance.
This option applies only to deployment scenarios that include imaging-viewer - S1 (All Components), S2 (Viewer Only) and S3 (Viewer + Analysis). It is not relevant to S4 and S5, where the imaging-viewer component is not installed.
The split is performed using the per-component install.sh (Docker) / install-podman.sh (Podman) script located in the cast-imaging-viewer folder of the unzipped installation package. The flag syntax and behaviour are identical between the two scripts - use the one that matches your container runtime.
When Neo4j is deployed on a separate instance, the global cast-imaging-install.sh / cast-imaging-install-podman.sh script cannot be used to install the imaging-viewer component in one operation. Use the global script only for the other components (imaging-services, analysis-node, dashboards), and use the dedicated install.sh / install-podman.sh script described below to install Neo4j and the other imaging-viewer services separately.
Requirements
Read and understand the following before starting:
You will need two machines for the split, in addition to the machine(s) hosting the other components:
- a Neo4j machine, and
- a Viewer services machine for the remaining
imaging-viewerservices
The Viewer machine must be able to reach the Neo4j machine on the Bolt port (7687) and HTTP port (7474). Open these ports inbound on the Neo4j machine - see Hardware requirements.
Step 1 - Install the other components
Install imaging-services first (and analysis-node / dashboards if required by your scenario) using the global installer, by following the installation guide for your scenario (use the multi-machine topology where the scenario offers one):
When following the scenario guide, skip the cast-imaging-install.sh imaging-viewer step - the Viewer (Neo4j + Viewer services) is installed separately in Steps 3 and 4 below. imaging-services must be fully running before you install the Viewer (Neo4j + Viewer services) services.
Step 2 - Download the installation media (Neo4j and Viewer machines)
Perform the following on both the Neo4j machine and the Viewer machine.
Download the installer using curl:
$ curl -# -O -J "https://extend.castsoftware.com/api/package/download/com.castsoftware.imaging.all.docker/<version>?platform=linux_x64" \
  -H "x-nuget-apikey: <api-key>" \
  -H "accept: application/octet-stream"
Where:
<version>: uselatestfor the most recent release, or a specific version such as3.6.0-funcrel<api-key>: your CAST Extend API key (obtain from https://extend.castsoftware.com/#/profile/settings )
Example for latest release:
$ curl -# -O -J "https://extend.castsoftware.com/api/package/download/com.castsoftware.imaging.all.docker/latest?platform=linux_x64" \
  -H "x-nuget-apikey: a9999a9a-c999-999d-999b" \
  -H "accept: application/octet-stream"
Unzip the resulting ZIP file anywhere on your local disk:
$ unzip /path/to/<installer>.zip -d /path/to/folder
Where:
-d /path/to/folder: tells the unzip utility to unzip to a specific folder (omitting the option will unzip to the current folder)
The following files and folders will be created:
cast-imaging-dashboards/(folder)cast-imaging-node/(folder)cast-imaging-services/(folder)cast-imaging-viewer/(folder)tools/(folder)cast-imaging-install.shcast-imaging-install-podman.shcast-imaging-update.shconfiguration.conf
Ensure the installer is executable:
$ chmod +x cast-imaging-viewer/install.sh
Step 3 - Install Neo4j (Neo4j machine)
Perform the following on the machine that will host Neo4j.
Ensure the imaging-viewer version in configuration.conf (located one level above the installer, at the root of the unzipped package) is set to the current release you are installing (this should already be the case):
IMAGING_VIEWER_VERSION=<version>
Set the following variables in cast-imaging-viewer/.env:
| Variable | Set to |
|---|---|
SERVICE_HOST |
FQDN or static IP of this (the Neo4j) machine |
NEO4J_PASSWORD |
The password to set for Neo4j |
NEO4J_HTTP_PORT |
7474 (default) |
NEO4J_BOLT_PORT |
7687 (default) |
SERVICE_HOST=<Neo4j-instance-IP-or-FQDN>
NEO4J_PASSWORD=<your_password>
NEO4J_HTTP_PORT=7474
NEO4J_BOLT_PORT=7687
Run the installer from the cast-imaging-viewer folder, passing your installation directory and the --neo4j flag:
$ ./install.sh /opt/cast/imaging --neo4j
For air-gapped machines, first load all required Neo4j images (see Air-gapped installation for the image list and the docker save / docker load procedure), then append offline:
$ ./install.sh /opt/cast/imaging --neo4j offline
Verify Neo4j is running and note this machine’s IP/FQDN for Step 4:
$ docker ps
$ docker logs neo4j
Step 4 - Install the Viewer services (Viewer machine)
Perform the following on the machine that will host the remaining imaging-viewer services (Server, ETL, AI Manager, CAST Imaging APIs).
Neo4j must already be installed, running and reachable on its Bolt port (7687) before you proceed with the installation.
Ensure the imaging-viewer version in configuration.conf (located one level above the installer, at the root of the unzipped package) is set to the current release you are installing (this should already be the case):
IMAGING_VIEWER_VERSION=<version>
Set the following variables in cast-imaging-viewer/.env:
| Variable | Set to |
|---|---|
SERVICE_HOST |
FQDN or static IP of this (the Viewer) machine |
EUREKA_HOST |
FQDN or static IP of the imaging-services machine |
EUREKA_PORT |
8098 (default) |
NEO4J_PASSWORD |
The same password set on the Neo4j machine |
SERVICE_HOST=<Viewer-instance-IP-or-FQDN>
EUREKA_HOST=<main-services-instance-IP-or-FQDN>
EUREKA_PORT=8098
NEO4J_PASSWORD=<same_password_as_Neo4j_instance>
You do not need to edit the Bolt endpoint manually: passing --viewer <neo4j-host> to the installer (see below) automatically sets NEO4J_BOLT_ENDPOINT=bolt://<neo4j-host>:7687 in .env.
Run the installer, passing the Neo4j machine’s IP/FQDN to the --viewer flag:
$ ./install.sh /opt/cast/imaging --viewer <neo4j-host>
For air-gapped machines, first load all required Viewer images, then append offline:
$ ./install.sh /opt/cast/imaging --viewer <neo4j-host> offline
Verify all Viewer services are running:
$ docker ps
Step 5 - Initial startup configuration
Browse to:
http://<IMAGING_SERVICES_HOSTNAME>:8090
Log in using the default credentials: admin / admin
Available from 3.6.5-funcrel: on your first login after a fresh installation, if the admin account is still using the default password, you are redirected to a mandatory password change screen. After setting a new password, you must complete your user profile (first name, last name, and email address) before you can access CAST Imaging.
Configure the Licensing strategy. Choose one of:
Named Application- each onboarded application requires its own dedicated license keyContributing Developers- a global license key based on the number of contributing developers
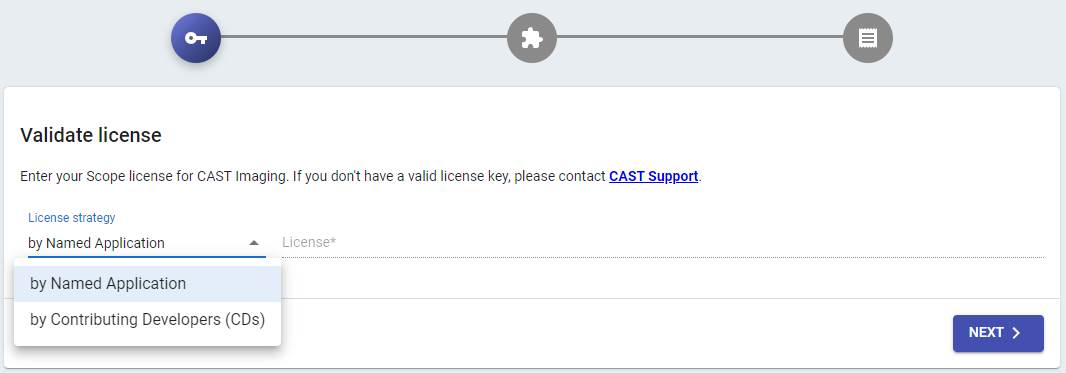
You can switch license key strategy after onboarding applications. See Manage your license keys.
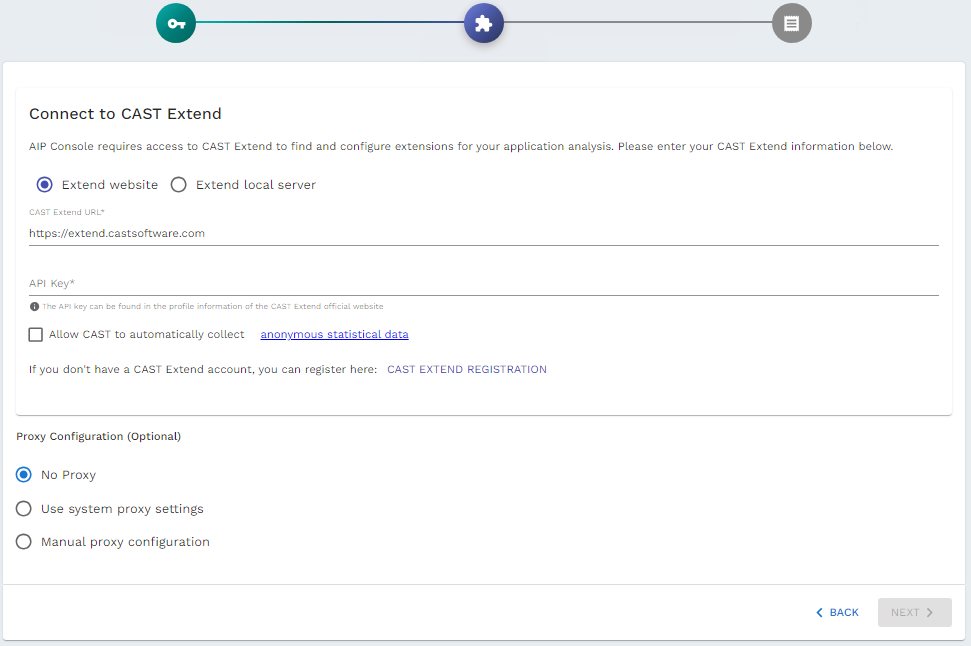
Configure CAST Extend settings and Proxy settings:
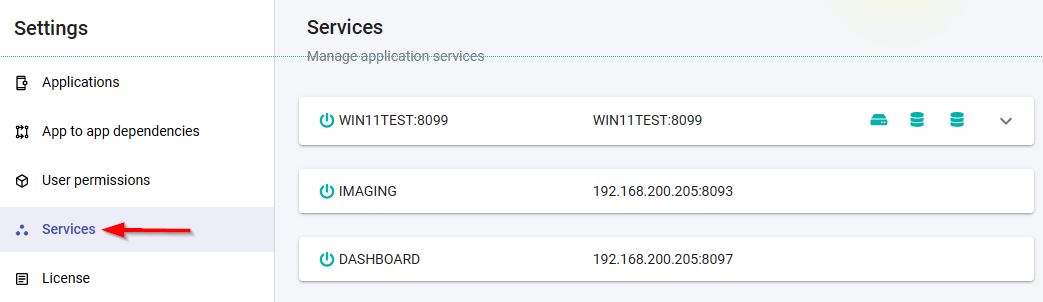
Verify that all components are available:
http://<IMAGING_SERVICES_HOSTNAME>:8090/admin/services
Step 6 - Configure authentication
Out-of-the-box, CAST Imaging uses Local Authentication (admin/admin) managed by Keycloak.
CAST recommends switching to your enterprise authentication system (LDAP or SAML) before onboarding applications. Access the Keycloak UI using the kcadmin account (or the value of KEYCLOAK_LOGIN_ADMIN_USER if customized during installation). See Authentication for full instructions.
Updating
Split-mode updates are planned for 3.6.5-funcrel. In 3.6.4-funcrel the split installation described above is supported, but the update steps below are not yet available.
From 3.6.5-funcrel, the per-component update.sh (Docker) / update-podman.sh (Podman) script supports updating each instance independently:
--neo4j- updates Neo4j only, on the Neo4j instance--viewer- updates the Viewer services only, on the Viewer instance
The existing -t <version> flag specifies the target image tag:
$ ./update.sh -t 3.6.5 /opt/cast/imaging --neo4j
$ ./update.sh -t 3.6.5 /opt/cast/imaging --viewer
At install time a .install-mode marker file (neo4j, viewer or full) is written to the installation directory. The update script reads this marker, so running update.sh --neo4j on a Viewer instance (or vice versa) fails immediately with a clear error pointing to the correct instance.
Connect AI tools to your results
Optional. Expose this deployment’s results to AI clients such as GitHub Copilot, Claude Desktop and Cursor via the MCP Server for CAST Imaging - a standalone component, installed separately, that lets you query application architecture, transactions, quality insights and code objects in natural language. See Getting started with CAST Imaging MCP Server.