CAST MCP Server for Gatekeeper installation on Microsoft Windows
Overview
This guide covers the installation of the CAST MCP Server for Gatekeeper on Microsoft Windows. It’s intended for:
- Direct installation on Microsoft Windows
- new installations (i.e. from scratch)
- in-place updates to a new release
The installation package com.castsoftware.gatekeeper.mcpserver includes an installation script (.bat file), various configuration files and the binaries themselves.
What’s new?
See the release notes.
How it works
The MCP Server sits between an AI client and the CAST Imaging for Gatekeeper REST API:
- A user types a natural-language query in their AI assistant (e.g., “Show me security violations for MyApp”).
- The AI client (Claude / Copilot) identifies the right MCP Tool to call.
- The MCP Server receives the structured tool call, validates inputs, and forwards the request to the API.
- The response is normalised and returned to the AI, which presents a human-readable summary.
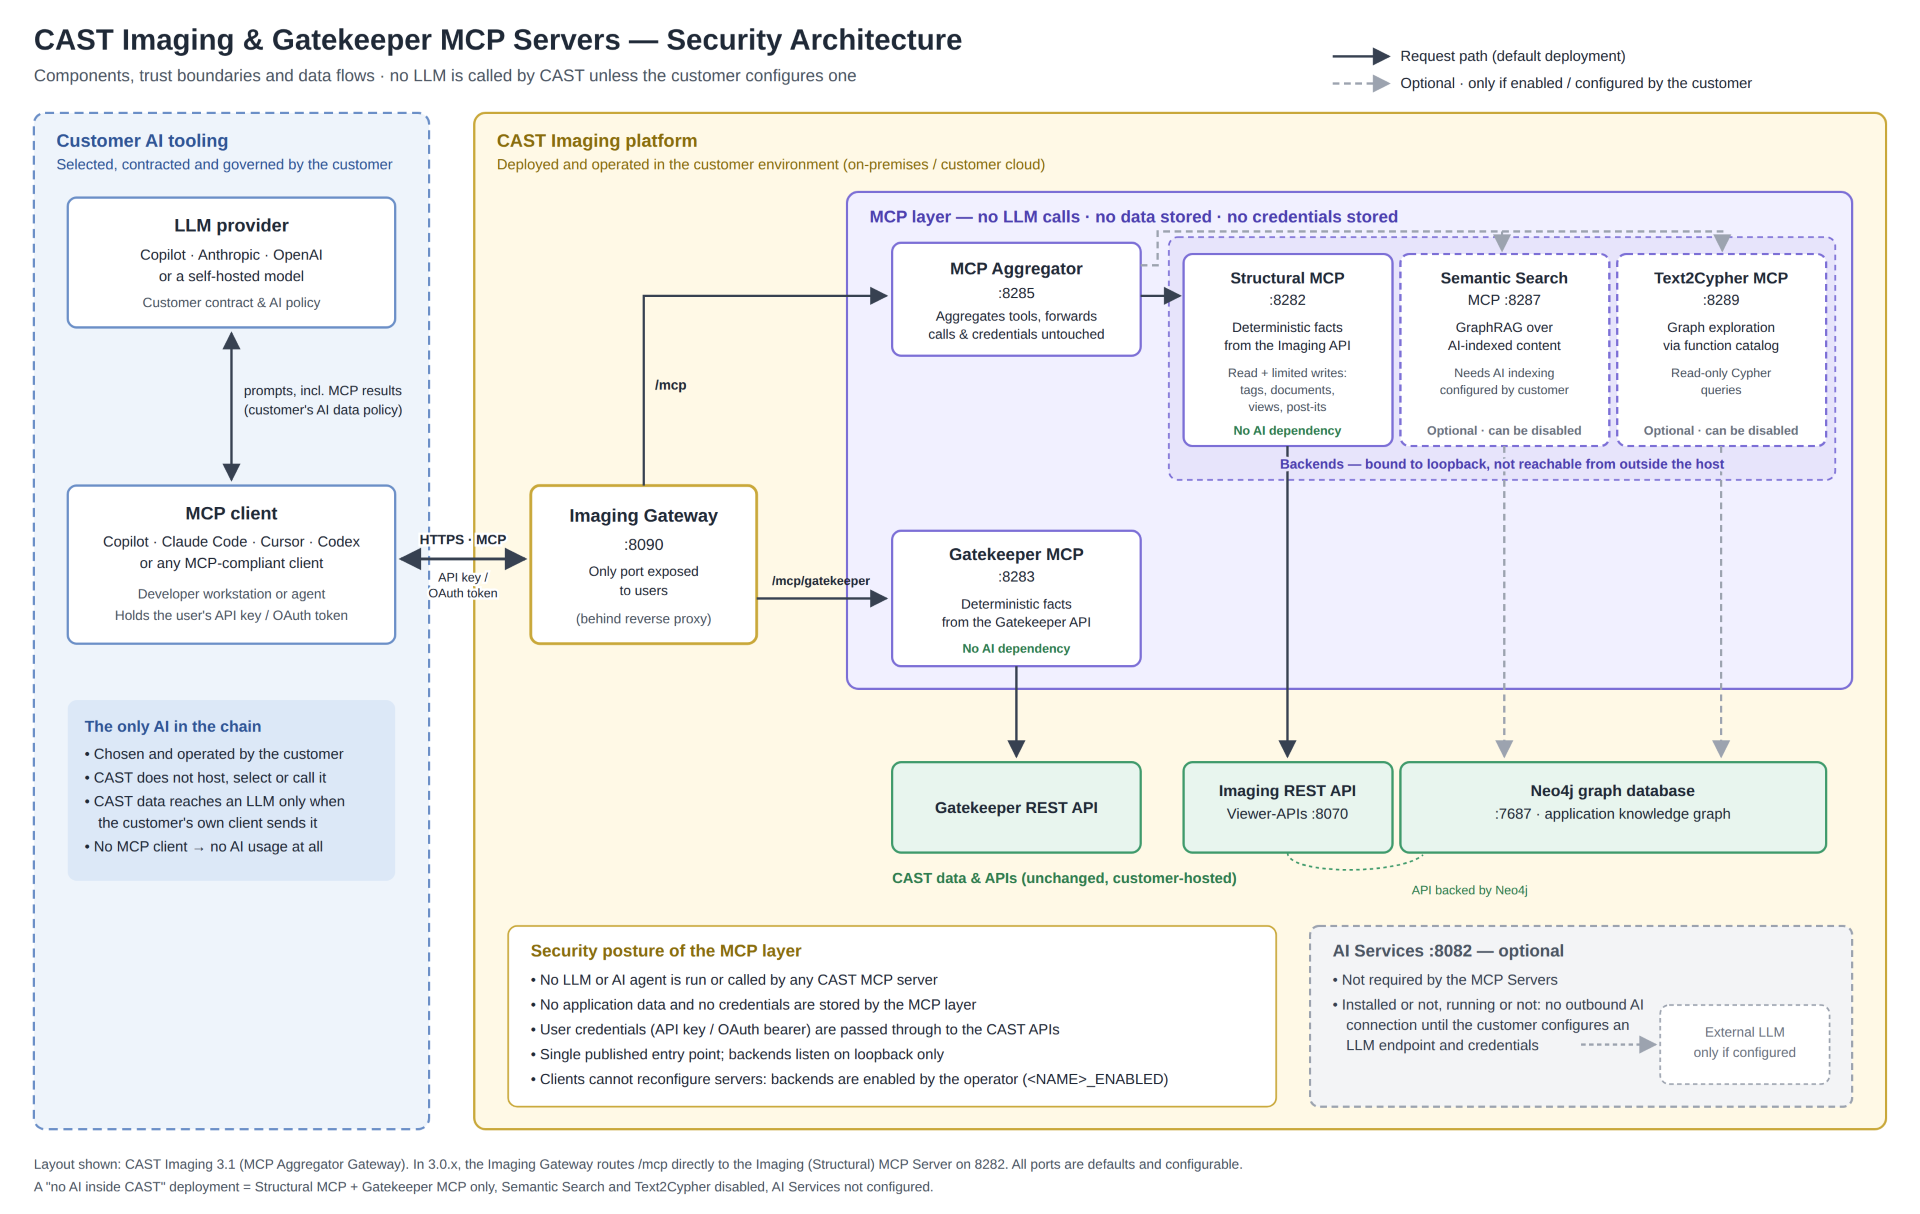
The diagram below shows where the MCP Server for Gatekeeper sits in the CAST Imaging platform, and the trust boundaries between your AI tooling and CAST. Your MCP-aware client reaches it through the CAST Imaging public gateway on the /mcp/gatekeeper route, and it reads from the Gatekeeper REST API only. The diagram also shows the CAST Imaging MCP Server, which can be installed alongside it.
Requirements
The CAST MCP Server for Gatekeeper is a standalone component and can be installed wherever convenient in your environment, e.g. on a dedicated machine, or on a machine already used by other CAST Imaging components.
When using a dedicated machine, CAST recommends following the general hardware and software requirements but note that the component does not require:
- a Java JRE/JDK
Other requirements:
- MCP Server runs as a Microsoft Windows service on TCP port 8283 (configurable). You may need to adjust firewall rules to allow incoming connections to this port.
- see software requirements for more information about supported Microsoft Windows OS versions
- a minimum of 2GB free disk space
- An MCP-aware client such as GitHub Copilot (Visual Studio Code), Claude Desktop, or Cursor
- a functioning release of CAST Imaging for Gatekeeper (Dashboards) installed (MCP Server interacts with the
imaging-servicescomponent) in your network (see CAST Imaging compatibility below) - a CAST Imaging API key, see Generating an API key. Available in ≥ 3.6.6-funcrelAlternatively, Claude Code and Visual Studio Code can sign in through the browser using OAuth - see Authenticate MCP clients with OAuth
CAST Imaging compatibility
| MCP Server release | Required API version/CAST Imaging release |
|---|---|
| ≥ 3.0.0-funcrel | ≥ 3.6.4-funcrel |
| ≥ 3.0.0-beta1 | ≥ 3.6.2-funcrel |
Starting release 3.0.0-funcrel, you can check the current Gatekeeper MCP Server version, the connected CAST Imaging version, and the minimum required CAST Imaging version by asking “What is the version of my MCP server? Is it compatible with my CAST Imaging installation?"
MCP-aware client connection routing
MCP-aware clients connect directly to CAST Imaging via its public gateway - instead of direct to the MCP Server. As a result, CAST Imaging 3.6.2-funcrel or later is required as the target installation to ensure proper routing back to the MCP Server. This integration ensures all query requests are routed through CAST Imaging.
HTTPS
If you require a secure HTTPS connection between your MCP-aware client and the MCP Server, you must enable HTTPS on the CAST Imaging gateway - see HTTPS configuration.
- If the CAST Imaging gateway is configured in HTTPS mode, then the
CONTROL_PANEL_SSL_ENABLEDoption must be set to true in the MCP Server itself (see Step 3 - Configure your installation). - If the CAST Imaging gateway is configured in HTTPS mode with self-signed or private certificate authority SSL/TLS certificates, then you will need to ALSO define the path to the self-signed certificate chain once the installation has completed. See below.
Installation process
Step 1 - Verify connection to CAST Imaging
Before proceeding, ensure you can access CAST Imaging (the imaging-services component) from the machine where you intend to install MCP Server by running the following (tailored to your own environment):
$ curl -H "x-api-key: <your-imaging-api-key>" http://<your_imaging_public_URL>:8090/dashboards/rest/
The expected output is at least one entry similar to:
[
  {
    "href": "55c46218-c3f3-44ad-9042-7e1791ec7cbf",
    "name": "55c46218-c3f3-44ad-9042-7e1791ec7cbf",
    "dbType": "ADG",
    "version": "8.4.10",
    "schema": "app1_central",
    "dbmsVersion": "PostgreSQL",
    "componentsIndexStatus": "upToDate",
    "violationsIndexStatus": "toCreate",
    "systems": {
      "href": "55c46218-c3f3-44ad-9042-7e1791ec7cbf/systems",
      "name": "All Systems. A system represents a portfolio of applications."
    },
    "applications": {
      "href": "55c46218-c3f3-44ad-9042-7e1791ec7cbf/applications",
      "name": "All Applications. An application represents ..."
    },
    "nbOfApplications": 1,
    "configurations": {
      "href": "55c46218-c3f3-44ad-9042-7e1791ec7cbf/configuration/snapshots",
      "name": "All configuration snapshots ..."
    },
    "results": {
      "href": "55c46218-c3f3-44ad-9042-7e1791ec7cbf/results",
      "name": "Results by snapshots, by systems, by ..."
    },
    "commonCategories": null,
    "tags": null
  }
]
Step 2 - Download the installation media
Download the latest release of the installer (com.castsoftware.gatekeeper.mcpserver ) and unzip it anywhere on your local disk. The following files/folders will be created:
com.castsoftware.gatekeeper.mcpserver.<version>/
├── gatekeeper-mcpserver
├── tools
├── configuration.conf
├── copilot-instructions.md
├── mcp-server-installer.bat
└── README.md
Step 3 - Configure your installation
Locate the configuration.conf file at the root of the unzipped installation media. Open the file with a text editor and update the installation variables to match your environment:
HOST_CONTROL_PANEL=<imaging-services-machine>                # Required: IP address/hostname/FQDN of the machine on which the "imaging-services" component is installed. The use of "localhost" is not supported.
PORT_CONTROL_PANEL=8098                                      # Default port on which the CAST Imaging Control Panel service (part of the "imaging-services" component) is running - unless you have changed this during the CAST Imaging installation, leave it as is
MCP_SERVER_PORT=8283                                         # Default MCP server listening port, default is 8283 if not specified
SERVICE_NAME="GatekeeperMCPServer"                           # Default service name for MCP Server
SERVICE_HOST=""                                              # Required: IP address/hostname/FQDN of the machine on which the MCP Server will be installed (i.e. the current machine). Do not set as "localhost".
CONTROL_PANEL_SSL_ENABLED=false                              # When set to true, allows communication with a CAST Imaging instance which is configured to use HTTPS.
SSL_CA_BUNDLE=                                    # Sets the path to a self-signed certificate chain exported to file, typically in **Base-64 PEM** format. Only necessary where CAST Imaging is configured in HTTPS mode with SSL/TLS certificates issued by a **private** or **self-signed certificate authority** (CA).
The use of localhost for the HOST_CONTROL_PANEL variable is not supported, even if the imaging-services component is installed on the same machine as MCP Server for Gatekeeper. Use an IP address/hostname/FQDN instead.
Step 4 - Run the installation
Open a CMD window with elevated permissions (right click, Run as administrator) and execute the following command from the root of the unzipped files:
mcp-server-installer.bat --install configuration.conf
Wait for the installation process to complete. On completion, check that a Microsoft Windows service named GatekeeperMCPServer has been created and is up and running.
Files are installed to the following locations:
%PROGRAMFILES%\CAST\Gatekeeper-MCP-Server%PROGRAMDATA%\CAST\Gatekeeper-MCP-Server
Verify the health endpoint of the MCP Server:
$ curl http://<mcp-server>:8283/mcp/healthcheck
Expected response:
{
  "status": "healthy",
  "service": "mcp-server",
  "details": {
    "dashboard_client": "available",
    "dashboard_api": "configured"
  }
}
Step 5 - Configure your MCP-aware client
The instructions below use a CAST Imaging API key. With CAST Imaging 3.6.6-funcrel or later, Claude Code and Visual Studio Code can sign in through the browser using OAuth instead - see Authenticate MCP clients with OAuth.
All MCP-aware clients must be configured to connect directly to CAST Imaging, i.e. the machine on which the imaging-services component is installed. You should use:
- either
httporhttpsdepending on whether HTTPS configuration has been enabled - the machine’s fully qualified domain name, such as
imaging.corp.mycompany.com, or its IP address - the user access port for CAST Imaging, either
8090(http) or443(https) - note that whenhttpsis running on port443, it is not necessary to define the port /mcp/gatekeepershould always be appended
Examples:
http://imaging.corp.mycompany.com:8090/mcp/gatekeeper >>> unsecured URL on port 8090

https://imaging.corp.mycompany.com/mcp/gatekeeper >>> TLS/SSL secured URL on port 443

https://imaging.corp.mycompany.com:8443/mcp/gatekeeper >>> TLS/SSL secured URL on custom port 8443
VS Code with GitHub Copilot
Create .vscode/mcp.json in your project root and update to match your environment:
{
  "inputs": [
    {
      "id": "dashboard-key",
      "type": "promptString",
      "description": "CAST Imaging API Key"
    }
  ],
  "servers": {
    "gatekeeper": {
      "type": "http",
      "url": "http[s]://<fqdn-or-IP-address-imaging-services-machine:[port]>/mcp/gatekeeper",
      "headers": {
        "x-api-key": "${input:dashboard-key}"
      }
    }
  }
}
VS Code will prompt for the API key when you first use the MCP server. Credentials are stored securely in VS Code’s secret storage.
Claude Desktop
A local installation of Node.js is required when using Claude Desktop.
Edit %APPDATA%\Claude\claude_desktop_config.json and update to match your environment:
{
  "mcpServers": {
    "gatekeeper": {
      "command": "npx",
      "args": [
        "mcp-remote",
        "http[s]://<fqdn-or-IP-address-imaging-services-machine:[port]>/mcp/gatekeeper",
        "--header",
        "x-api-key:your-api-key",
        "--allow-http"
      ]
    }
  }
}
Cursor
Start the MCP Server first, then create .cursor/mcp.json and update to match your environment:
{
  "mcpServers": {
    "gatekeeper": {
      "type": "http",
      "url": "http[s]://<fqdn-or-IP-address-imaging-services-machine:[port]>/mcp/gatekeeper",
      "headers": {
        "x-api-key": "your-api-key"
      }
    }
  }
}
Cursor uses HTTP transport only - the MCP server must be running before you start Cursor.
Instruction files for AI clients
The installation media provides a set of instruction files at its root. These files are not part of the MCP Server installation: they are intended to be copied into the repository you are working with, so that your AI client receives guidance tailored to CAST Gatekeeper. The additional information is not displayed in the chat, but is available to the client to allow it to generate higher quality responses.
The instructions explain when to use the Gatekeeper tools (compliance status, technical debt, violations, objects, action plans and exclusions), describe the parameters each tool accepts, and provide example prompts.
All the files contain the same instructions - they are shipped under several filenames so that each client loads them automatically using its own convention. Copy the file matching your client:
| Client | File | Location in your repository |
|---|---|---|
| GitHub Copilot (VS Code) | copilot-instructions.md |
.github/copilot-instructions.md |
| Claude Code | CLAUDE.md |
Repository root |
| Gemini CLI / Gemini Code Assist | GEMINI.md |
Repository root |
| Cursor | cursor-rules.mdc |
.cursor/rules/ |
Claude Desktop does not use an instruction file - it is configured entirely through its connector settings.
Step 6 - Test your MCP-aware client
- Launch your MCP-aware client
- Enter your CAST Imaging API key when/if prompted
- Run a test query, for example:
Show me the compliance status for <YourApp>
How many days of technical debt does <YourApp> have?
List the top 10 security violations for <YourApp>
Success indicators
✅ Connection successful if you receive:
- Compliance or quality metrics
- Violation details
❌ Check configuration if you see:
- Connection errors
- Authentication failures
- Empty application lists
Example prompts
Prompts are pre-configured workflow templates. They instruct the AI agent which tools to call, in what order, and how to format the output. Unlike tools, prompts do not call the API directly - they return instructional messages that guide the AI.
| Prompt Name | Parameters | What it does |
|---|---|---|
assess_iso5055_compliance |
application_name |
Full ISO-5055 compliance assessment: fetch ISO-5055 compliance status, retrieve critical violations, produce executive summary with criteria breakdown and remediation priority list |
identify_security_violations |
application_name, snapshot? |
Security violation scan (criterion 60016): retrieve all security violations, separate critical violations, rank by propagation risk, produce remediation recommendations with file paths |
calculate_technical_debt |
application_name, snapshot? |
Technical debt assessment: fetch debt metrics across all health factors, break down by criterion, fetch top-criterion violations, build sprint-based remediation roadmap |
analyze_quality_trends |
application_name, snapshots? |
Quality trend analysis: fetch compliance for multiple snapshots, compute violation deltas per criterion, classify as Improving / Stable / Degrading / Regressing, highlight regressions with added violations |
get_violations_guided |
application_name, snapshot? |
Guided violations workflow: fetch available business criteria, ask user all 8 filter parameters at once, call get_violations with collected inputs, display paginated results in a table |
Example natural-language queries
Assess ISO-5055 compliance for MyApp
Identify security violations in MyApp snapshot 6
Calculate technical debt for MyApp
Show quality trends for MyApp across the last 3 snapshots
List violations for MyApp — guide me through the filters
Available tools
Tools are functions the AI agent can call directly. Each tool maps to one or more Dashboard REST API call.
list_applications
List all applications the current user has access to and where at least one snapshot has been generated for a given application:
Example:
- “Get application list for Gatekeeper MCP server”
get_mcp_info
Check the Gatekeeper MCP Server’s version and confirm it is compatible with your connected CAST Imaging installation. Reports the running MCP Server version, the connected CAST Imaging version, and the minimum required version.
Example natural-language queries:
- “What version of the MCP server am I running?”
- “Check if my Console is compatible with this MCP server”
- “Show me the server info”
get_compliance_status
Get compliance status - quality indicators, violation counts, and health factors for an application.
| Parameter | Type | Required | Description |
|---|---|---|---|
application_name |
string | Yes | Exact application name in Dashboard |
quality_indicators |
string | No | Comma-separated criterion IDs e.g. "60016,60013". Omit for all criteria. |
snapshot |
string | No | See Snapshot Syntax below. Default = latest. |
technologies |
string | No | e.g. "JEE,HTML5" or "$all" |
include_technical_criteria |
boolean | No | Set true to drill into individual criteria |
Example natural-language queries:
- “Show me the compliance status for MyApp”
- “Compare security violations between snapshot 5 and 6 for MyApp”
- “Get quality indicators for MyApp filtered by JEE technology”
get_technical_debt
Get technical debt metrics - remediation effort in minutes and equivalent 8-hour work days.
| Parameter | Type | Required | Description |
|---|---|---|---|
application_name |
string | Yes | Application name |
snapshot |
string | No | Snapshot selector |
quality_indicators |
string | No | Criterion ID to drill into (e.g. "60016") |
include_technical_criteria |
boolean | No | Return technical criteria debt breakdown |
technologies |
string | No | Technology filter |
Example natural-language queries:
- “How many days of technical debt does MyApp have?”
- “Show technical debt breakdown by health factor for MyApp”
- “What is the security-related debt for MyApp in the last 3 months?”
get_violations
Get detailed violations with file paths, line numbers, rule details, and remedial actions. Supports pagination.
| Parameter | Type | Required | Description |
|---|---|---|---|
application_name |
string | Yes | Application name |
snapshot |
string | No | Snapshot selector |
business_criterion |
string | No | Criterion ID or name (e.g. "60016" or "Security"). Default: Total Quality Index (60017). |
rule_pattern |
string | No | "ISO-5055", "CISQ", a rule ID, or "none" to skip |
status |
string | No | "added", "updated", "unchanged", or "none" (all) |
technologies |
string | No | Technology filter |
nb_rows |
int / string | No | Violations per page: 10–1000 or "$all" |
start_row |
int | No | Pagination offset. Default: 1 |
include_findings |
boolean | No | Fetch source code locations and rule details (slower - triggers extra API calls) |
object_fullname |
string | No | Filter to a specific component by full name (e.g. “com.myapp.MyClass”). Supports substring match. |
Example natural-language queries:
- “List the top 50 security violations added in the latest snapshot of MyApp”
- “Show me ISO-5055 violations for MyApp with source code locations”
- “Get all unchanged Robustness violations for MyApp in JEE technology”
get_objects
Get objects (classes, methods, files, etc.) for an application snapshot, sorted by name, with their violated rules.
| Parameter | Type | Required | Description |
|---|---|---|---|
application_name |
string | Yes | Application name |
snapshot |
string | Yes | Snapshot to query. See Snapshot Syntax below. |
limit |
int | No | Max objects per page. Default: 25 |
skip |
int | No | Objects to skip (pagination) |
standard |
string | No | Quality standard filter (e.g. "ISO-5055", "CISQ"); takes precedence over business_criterion |
business_criterion |
string | No | Criterion ID to filter objects with at least one violation under it. Default: 60017 |
name |
string | No | Filter by object name (comma-separated for multiple) |
fullname |
string | No | Filter by full name including package/namespace |
filepath |
string | No | Filter by source file path |
object_type |
string | No | Filter by object type (comma-separated, e.g. "Java Method,Java Field") |
operator |
string | No | Match strategy: "contains" (default), "equals", "startswith", "endswith" |
Example natural-language queries:
- “List objects in MyApp’s latest snapshot”
- “List Java methods in MyApp’s latest snapshot with a name starting with "get"”
- “Show objects in MyApp snapshot 6 with at least one Security violation”
- “Find objects in MyApp whose file path contains "controllers"”
- “List ISO-5055 objects in MyApp, sorted by name, 50 per page”
- “Show the next page of objects, skipping the first 50”
manage_action_plan
Get, add, edit, or delete action plan issues for an application. Adding, editing, or deleting requires the QUALITY_MANAGER role.
| Parameter | Type | Required | Description |
|---|---|---|---|
application_name |
string | Yes | Application name |
operation |
string | Yes | "get", "add", "edit", or "delete" |
snapshot |
string | No | (get only) Snapshot selector. Default: latest |
status |
string | No | (get only) "added", "pending", or "solved" |
tag |
string | No | Remedial priority tag (e.g. "high"). Filter for get; value to set for add/edit |
nb_rows / start_row |
int | No | (get only) Pagination |
component_href |
string | Cond. | component.href from the target violation. Required for add/edit/delete |
rule_pattern_href |
string | Cond. | rulePattern.href from the target violation. Required for add/edit/delete |
comment |
string | No | (add/edit only) Remedial action comment |
To convert an exclusion into an action plan item, call the tool with operation="add" directly. Do not delete the exclusion first - the backend automatically removes the matching exclusion.
Example natural-language queries:
- “Show me the action plan for MyApp”
- “List pending action plan items for MyApp in snapshot 6”
- “Show high-priority action plan issues for MyApp that are still unsolved”
- “Add MyApp’s violation on component X, rule Y to the action plan with high priority and comment "fix in next sprint"”
- “Change the priority of that action plan item to medium and update the comment to "scheduled for Q3"”
- “Remove the action plan entry for component X, rule Y in MyApp”
- “Move MyApp’s excluded violation on component X, rule Y into the action plan instead”
manage_exclusion
Get, add, edit, or delete exclusion requests for an application. Adding, editing, or deleting requires the EXCLUSION_MANAGER role.
| Parameter | Type | Required | Description |
|---|---|---|---|
application_name |
string | Yes | Application name |
operation |
string | Yes | "get", "add", "edit", or "delete" |
exclusion_type |
string | No | (get only) "active" (effectively excluded), "scheduled" (pending, default), or "both" |
snapshot |
string | No | (get only) Snapshot selector. Default: latest |
status |
string | No | (get, scheduled only) "to-add", "to-remove", or "$all" |
nb_rows / start_row |
int | No | (get only) Pagination |
component_href |
string | Cond. | component.href from the target violation. Required for add/edit/delete |
rule_pattern_href |
string | Cond. | rulePattern.href from the target violation. Required for add/edit/delete |
comment |
string | Cond. | Exclusion justification. Required for add, optional for edit |
Example natural-language queries:
- “Show all active exclusions for MyApp”
- “Show scheduled exclusions for MyApp that are pending removal”
- “List every exclusion, active and scheduled, for MyApp in snapshot 6”
- “Exclude MyApp’s violation on component X, rule Y with comment "false positive, confirmed by security team"”
- “Update the exclusion comment for component X, rule Y to "re-confirmed after code review"”
- “Remove the exclusion request for component X, rule Y in MyApp”
Snapshot Syntax Reference
All tools that accept a snapshot parameter support the same flexible syntax:
| Input | Meaning |
|---|---|
(omitted) / "latest" |
Most recent snapshot |
"6" |
Snapshot number 6 |
"5,6" |
Compare snapshots 5 and 6 in one call |
ISO-5055 support
Mention “ISO-5055” in your question and the AI agent will answer using the standard’s terminology.
Terminology
| CAST term | ISO-5055 term |
|---|---|
| Quality Indicator | ISO-5055 Characteristic |
| Quality Rule | ISO-5055 Detection Pattern |
| violation (instance in code) | ISO-5055 Occurrence |
| violation (general issue type) | ISO-5055 Weakness (not available yet) |
Prompts to try
- “Get ISO-5055 compliance status for MyApp”
- “Show me MyApp’s ISO-5055 occurrences for the Security characteristic”
- “Get ISO-5055 violations for MyApp in snapshot 6”
- “Get ISO-5055 technical debt for MyApp, broken down by detection pattern”
- “Assess MyApp’s ISO-5055 compliance”
Troubleshooting
Common checks:
- Verify the Windows service GatekeeperMCPServer is running - restart it if required.
- Check the MCP Server health endpoint:
http://<mcp-server>:8283/mcp/healthcheck - Check logs at
%PROGRAMDATA%\CAST\Gatekeeper-MCP-Server\logs\mcp_gatekeeper.log - Test connectivity to the API:
$ curl -H "x-api-key: <your-imaging-api-key>" http://<your_imaging_public_URL>:8090/dashboards/rest/
- If you see
"DashboardClient cannot be initialized", the Control Panel is likely using HTTPS - setCONTROL_PANEL_SSL_ENABLED=true.
CAST Imaging configured in HTTPS mode with self-signed or private certificate authority SSL/TLS certificates
If your CAST Imaging instance is configured in HTTPS mode with SSL/TLS certificates issued by a private or self-signed certificate authority (CA) - not required when you are using an authoritative CA - then you must configure the MCP Server (via the SSL_CA_BUNDLE) variable available in the app.config file with the path to the self-signed certificate chain exported to file, typically in Base-64 PEM format. To do so see the instructions below:
Creating the PEM file
Export the CA certificates from your browser
In Google Chrome, click the padlock on your CAST Imaging URL → Connection is secure → Certificate is valid → Details tab. You will see a certificate hierarchy with up to three levels (root, intermediate, server). Export each CA certificate (root and intermediate - the server certificate is not required) individually, choosing Base64-encoded ASCII format and saving with a .crt extension.
Combine into a single PEM file
If you have both a root and intermediate certificate, combine them into a single PEM file. If you only have a root certificate, simply rename it with a .pem extension.
CMD:
copy /b root.crt + intermediate.crt my_cert.pem
PowerShell:
Get-Content root.crt, intermediate.crt | Set-Content my_cert.pem
Verify the PEM file
Open the file in a text editor and confirm it contains one or more blocks in this format:
-----BEGIN CERTIFICATE-----
(Base64 encoded data)
-----END CERTIFICATE-----
Move the PEM file
Place the PEM file inside a certificates folder at the root of the installation (the same directory as run.sh). The folder is created automatically during the installation; if not, create it manually:
%PROGRAMDATA%\CAST\Gatekeeper-MCP-Server\certificates\my_cert.pem
Configure and restart MCP Server
Open %PROGRAMDATA%\CAST\Gatekeeper-MCP-Server\setup-config\app.config and add the following line pointing to the .pem file created earlier:
SSL_CA_BUNDLE=C:\ProgramData\CAST\Gatekeeper-MCP-Server\certificates\my_cert.pem
Restart the MCP Server using the Windows Service manager to ensure the setting is taken into account.
Updating configuration after installation
To change a configuration option (for example CONTROL_PANEL_SSL_ENABLED or PORT_CONTROL_PANEL) on an already-installed instance, you do not need to re-run the installer:
- Open the deployed configuration file with a text editor:
%PROGRAMDATA%\CAST\Gatekeeper-MCP-Server\setup-config\app.config
- Change the required setting(s) and save the file.
- Restart the GatekeeperMCPServer Windows service (using the Windows Service manager) for the change to be taken into account.
Update process
To update to a new release of CAST Gatekeeper MCP Server:
- Download the installation media for the target release
- Unzip the installation media
- Open a Command Prompt with administrative privileges (right click,
Run as administrator) - Navigate to the extracted directory of the newly downloaded installer, and run:
mcp-server-installer.bat --update
Wait for the update to complete.
Uninstall process
Open a Command Prompt with administrative privileges (right click, Run as administrator), navigate to the extracted installer directory, and run:
mcp-server-installer.bat --uninstall