Authentication - OpenID Connect
Enabling and configuring a new authentication mode will NOT disable any existing authentication modes you may have configured or that may have been provided out of the box.
Overview
This section describes how to set up and configure CAST Imaging to allow authentication using an OpenID Connect (OIDC) compliant identity provider, such as Microsoft Entra ID, Okta or Auth0. The configuration is performed in parallel on two sides: your identity provider, where CAST Imaging is registered as a client application, and the Keycloak authentication system provided with CAST Imaging, where the identity provider is declared and its claims are mapped onto CAST Imaging groups.
The Keycloak side of the configuration is identical whichever identity provider you use. Only the screens in your identity provider’s own administration console differ, therefore where this page refers to “your identity provider”, substitute the provider you are integrating.
Requirements
- Access to CAST Imaging via HTTPS must already be set up and configured.
- You need administrator access to your identity provider, in order to register a client application, and to Keycloak, using the
kcadminaccount (see Keycloak accounts and passwords). - The clock on the machine hosting the
imaging-servicescomponent must be accurate and synchronized, for example via NTP. Token validation is time sensitive, and the token exchange between Keycloak and your identity provider is a direct server-to-server call rather than a browser redirect.
- Only SP-initiated single sign-on (the OIDC Authorization Code flow) is supported, in other words the sign-in must begin from CAST Imaging. IdP-initiated single sign-on is not supported, although you can achieve the same end result by publishing a bookmark or tile in your identity provider's portal that points at the CAST Imaging login URL.
- Where your identity provider emits several role or group values for one user, the user is granted a CAST Imaging profile for each group they match, and the most permissive permission takes priority - see How multiple profiles combine.
Step 1 - Choose an alias and determine the redirect URI
The alias identifies the identity provider within Keycloak and forms part of the redirect URI that your identity provider will need, therefore choose it before you register anything:
- Choose a short, lowercase, hyphenated alias, for example
my-idp. Avoid spaces and special characters. - Determine the redirect URI that this alias produces:
https://<imaging-fqdn>/auth/realms/aip-realm/broker/<idp-alias>/endpoint
Treat the alias as fixed once the redirect URI has been sent to your identity provider administrator. Renaming the alias produces a different redirect URI and the client application will have to be re-registered in your identity provider.
Step 2 - Register CAST Imaging in your identity provider
Ask your identity provider administrator to register CAST Imaging as a client application. The exact terminology varies between providers - the registration screen may be called App registration, OIDC integration, Applications or Add client - but the requirements do not:
- The application must be registered as a confidential or web application, not as a public or single-page application. Keycloak authenticates itself using a secret rather than a client identifier alone.
- The redirect URI determined in Step 1 must be entered into the Redirect URI or Callback URL field, character for character.
- A client secret must be generated. Most administration consoles display the value only once, so it must be copied at the point of creation.
Three items are required from this step:
| Item | Description |
|---|---|
| Client ID | The client identifier assigned to CAST Imaging by your identity provider |
| Client secret | The secret generated alongside the client identifier |
| Discovery endpoint | The .well-known/openid-configuration URL published by your identity provider. Where no discovery endpoint is published, the authorization, token, UserInfo and JWKS endpoint URLs are required instead |
Treat the client secret as a password and transfer it over a secure channel. A mismatch between the redirect URI registered here and the one configured in Keycloak is not reported at configuration time: it surfaces as a generic redirect_uri_mismatch error at the first login attempt.
Step 3 - Confirm the claims your identity provider will send
CAST Imaging requires the email, given_name and family_name claims to populate the user profile. These standard claims are emitted by most identity providers as soon as the profile and email scopes are enabled on the client application, and Keycloak imports them automatically - unlike a SAML configuration, no attribute mapper is needed for them.
Role and group information is not emitted by default. If you intend to grant CAST Imaging permissions to groups rather than to individual users (this is recommended), ask your identity provider administrator to:
- Configure the mechanism that emits a role or group value. Each provider implements this differently, for example as an application role feature, an authorization server claims rule, or a raw group membership claim.
- Enable any additional scope that the provider requires before it will include that claim in the token.
- Confirm the exact name of the claim, for example
roles,groupsormemberOf, and the exact values it will carry.
Confirm the claim name and its values from a decoded token rather than assuming them - see Users are authenticated but belong to no group. A mismatch causes users to authenticate successfully but receive no permissions.
Step 4 - Configure the identity provider in Keycloak
Log in to the authentication management system provided with CAST Imaging as described in Authentication. Then:
- Ensure you are working in the
aip-realmrealm - Click the Identity providers option on the left
- Then click OpenID Connect v1.0
- Complete the configuration as follows:
| Field | Value |
|---|---|
| Alias | The alias chosen in Step 1 |
| Discovery endpoint | The discovery URL obtained in Step 2. Move the focus out of the field once it is entered and Keycloak validates the document and populates the authorization, token, UserInfo and JWKS URLs automatically. Where no discovery endpoint is published, switch off discovery and enter the four URLs manually |
| Client ID | The client identifier obtained in Step 2 |
| Client Secret | The client secret obtained in Step 2 |
| Client authentication | The method your identity provider expects - see below |
| Scopes | openid email profile as a minimum, plus any additional scope required to emit the role or group claim identified in Step 3 |
Four client authentication methods are available:
| Option | Protocol value | How the secret is sent |
|---|---|---|
| Client secret sent as post | client_secret_post |
As a field in the body of the token request. This is the most widely supported option |
| Client secret sent as basic auth | client_secret_basic |
Base64 encoded in an HTTP Authorization: Basic header |
| Client secret as jwt | client_secret_jwt |
As a JWT assertion signed with the client secret |
| JWT signed with private key | private_key_jwt |
As a JWT assertion signed with an asymmetric private key, with no shared secret transmitted |
Where your identity provider’s documentation does not specify a method, use Client secret sent as post.
Two optional settings are worth considering: enable Trust Email where your identity provider already verifies email addresses, and set Allowed clock skew to a few seconds to absorb minor time differences between the two hosts.
Click Add to save the configuration. Keycloak then displays the Redirect URI for the saved provider: check that it is identical to the URI registered in Step 2.
Step 5 - Create groups in Keycloak
Group import is not supported: every group that you would like to apply permissions to in CAST Imaging must be created within Keycloak, and a mapper then matches the claim value coming from your identity provider to the Keycloak group. To create the groups:
- Ensure you are working in the
aip-realmrealm - Navigate to Groups in the left menu
- Click Create group
- In the Name field, enter the exact value that the role or group claim will carry for this entitlement level, identified in Step 3
- Click Create and repeat for each group you require
The group name must match the value that the mapper in Step 6 looks for, character for character, including case and without leading or trailing spaces. A mismatch here is the most common reason for a user to authenticate successfully but end up in no group.
Step 6 - Add group mappers
For each group created in Step 5, configure a mapper to match the incoming claim value to the Keycloak group. To do so:
- Click the Identity providers option on the left, then select your OpenID Connect provider
- Click the Mappers tab, then click Add mapper
- Configure the mapper as follows:
| Field | Value |
|---|---|
| Name | A descriptive name, for example role-architect |
| Sync mode override | Force - syncs the group on every login (recommended) |
| Mapper type | Claim to Group |
| Claim | The exact claim name identified in Step 3, for example roles |
| Claim Value | The single value this mapper matches |
| Group | The group created in Step 5 that is the target for this mapper |
- Click Save and repeat for each remaining group
Where the claim carries an array of values rather than a single string, switch Regex Attribute Values on and anchor the pattern, for example ^architect$, instead of entering a plain value.
Do not add mappers for the email, given_name or family_name claims: Keycloak imports these automatically and mapping them again is redundant.
Step 7 - Assign admin permissions to at least one OIDC user
By default, OIDC users will not have any permissions assigned to them, so although users can login to CAST Imaging, they will not be able to make any changes. Therefore at least one user will need to be granted the ADMIN profile. CAST recommends using the local authentication mechanism to do so. This mechanism will still be active and therefore you can log in to CAST Imaging using the default admin / admin credentials and assign the ADMIN profile to an OIDC user using the User Permissions option.
Finally test that the OIDC user can successfully log in to CAST Imaging using their company email address and that they have permission to access the administration settings in CAST Imaging:
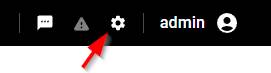
Step 8 - Assign permissions to groups and other users
All further permission configuration should always be actioned in CAST Imaging itself, using the User Permissions option:
- Log in to CAST Imaging with a user that has the
ADMINprofile - Click the settings icon, then click User permissions
- Open the Users tab - users and groups are synchronized from Keycloak automatically on a schedule, therefore click Refresh to force a synchronization and list the groups created in Step 5 immediately
- Click the edit icon for a group and select the CAST Imaging profile it should be granted
- Save, and repeat for each remaining group
Step 9 - Test the login
Ensure that you can login to CAST Imaging using your identity provider. Use a private browsing window so that an existing session does not mask a configuration problem.
If you are prompted to enter a first name or last name manually during the login, the standard claims are not arriving from your identity provider - see Troubleshooting below.
Step 10 - Disable all existing authentication methods
CAST highly recommends that you now disable all existing authentication methods to prevent users accessing CAST Imaging via a “back door” log in. In most cases this will involve disabling or deleting the Local Authentication users/groups provided out of the box and any that you have created yourself.
To do so:
- temporarily disable the OpenID Connect authentication mechanism (this is necessary otherwise “local” users/groups will not be visible)
- disable or delete the local users/groups to prevent them being used:
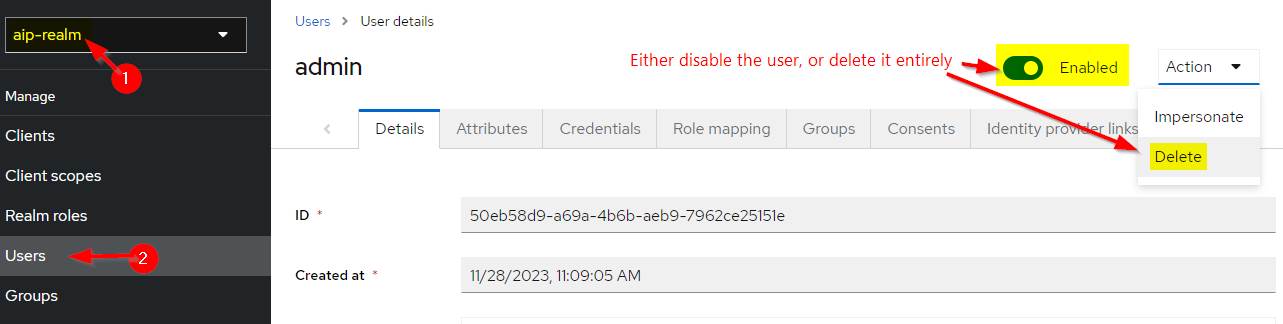
- finally re-enable the OpenID Connect authentication mechanism.
Troubleshooting
Identity provider is not displayed on login
If you do not see the option to login to CAST Imaging with your identity provider, you will need to change the theme as follows:
- Ensure you are working in the
aip-realmrealm - Click the Realm settings option on the left
- Then click Themes
- Choose
keycloakfor the Login theme:
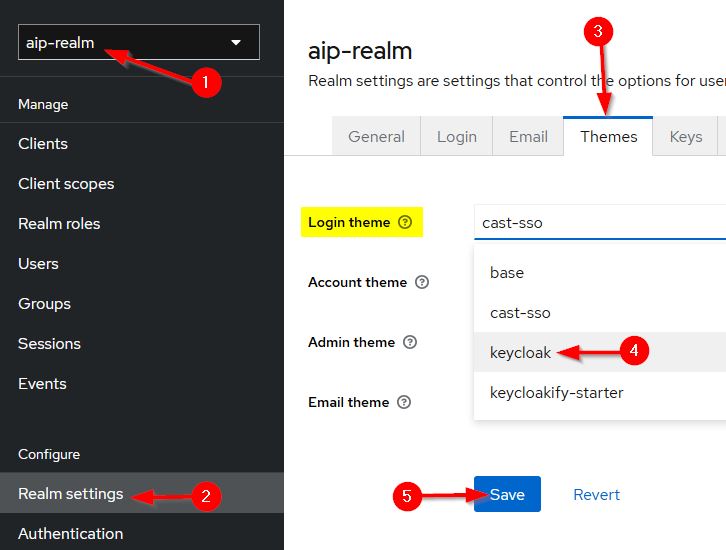
Check the contents of the token
Most configuration problems are visible in the token issued by your identity provider. Open your browser DevTools (F12), go to the Network tab, tick Preserve log, then log in. Inspect the token response and decode the ID token, then confirm that email, given_name, family_name and the role or group claim identified in Step 3 are all present with the values you expect.
Where the role or group claim is missing, the configuration on your identity provider is at fault and nothing configured in Keycloak will correct it.
Users are authenticated but belong to no group
Log in to Keycloak, ensure you are working in the aip-realm realm, then navigate to Users, select the test user and open the Groups tab. Where the user is not a member of the expected group, the claim name or the claim value configured in the mapper in Step 6 does not match the token. Decode the token as described above and compare both values, including case.
The login fails with an invalid or expired token
An invalid or expired token error reported by Keycloak is frequently caused by clock drift rather than by a genuine expiry. Check that time synchronization is accurate on the machine hosting the imaging-services component.
Keycloak cannot retrieve the discovery document or the signing keys
Keycloak contacts the discovery and JWKS endpoints directly, server to server. A failure to retrieve either usually means that the host cannot reach your identity provider over the network, for example because of a firewall or proxy, rather than a problem with the URLs themselves.