CAST MCP Server for Gatekeeper installation on Linux via Docker
Overview
This guide covers the installation of the CAST MCP Server for Gatekeeper on Linux via Docker. It’s intended for:
- Direct installation on Linux, via Docker
- new installations (i.e. from scratch)
- in-place updates to a new release
The installation package com.castsoftware.gatekeeper.mcpserver.docker includes an installation script (run.sh) and configuration files. All Docker images are pulled direct from Docker Hub during the installation.
What’s new?
See the release notes.
How it works
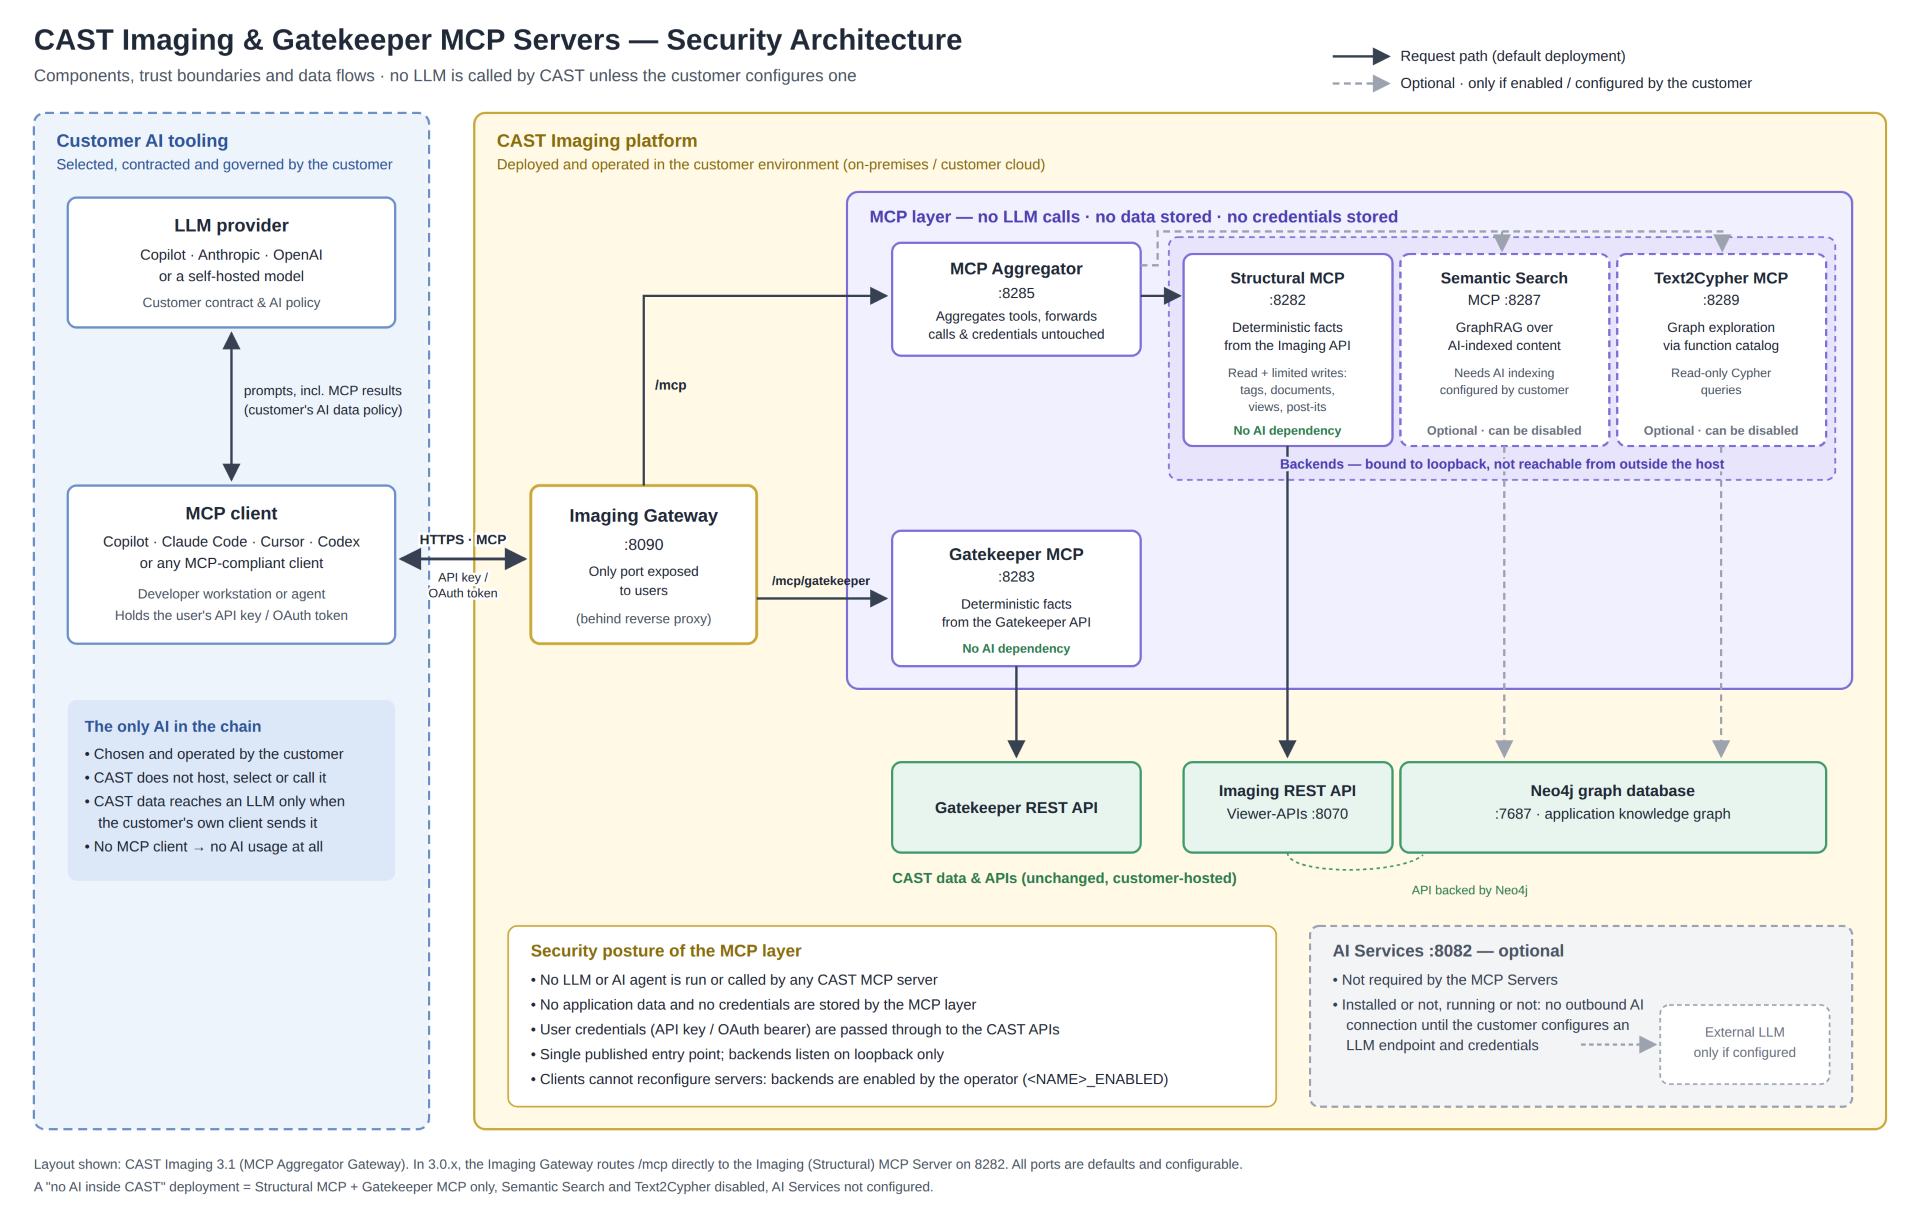
The MCP Server sits between an AI client and the CAST Imaging for Gatekeeper REST API:
- A user types a natural-language query in their AI assistant (e.g., “Show me security violations for MyApp”).
- The AI client (Claude / Copilot) identifies the right MCP Tool to call.
- The MCP Server receives the structured tool call, validates inputs, and forwards the request to the API.
- The response is normalised and returned to the AI, which presents a human-readable summary.
The diagram below shows where the MCP Server for Gatekeeper sits in the CAST Imaging platform, and the trust boundaries between your AI tooling and CAST. Your MCP-aware client reaches it through the CAST Imaging public gateway on the /mcp/gatekeeper route, and it reads from the Gatekeeper REST API only. The diagram also shows the CAST Imaging MCP Server, which can be installed alongside it.
Requirements
The CAST MCP Server for Gatekeeper is a standalone component and can therefore be installed wherever convenient in your local environment, e.g. on a dedicated machine, or on a machine already used by other CAST Imaging components.
When using a dedicated machine, CAST recommends following the general hardware and software requirements but note that the component does not require:
- a Java JRE/JDK
Other requirements:
- MCP Server runs as a Docker container on TCP port 8283 although you can change this in the
.envfile (see below). You may therefore need to adjust firewall rules to allow incoming connections to this port - see software requirements for more information about supported Linux OS, Docker Engine and Docker Compose
- a minimum of 2GB free disk space
- An MCP-aware client such as GitHub Copilot (Visual Studio Code), Claude Desktop, or Cursor
- a functioning release of CAST Imaging for Gatekeeper (Dashboards) installed (MCP Server interacts with the
imaging-servicescomponent) in your network (see CAST Imaging compatibility below) - a CAST Imaging API key, see Generating an API key. Available in ≥ 3.6.6-funcrelAlternatively, Claude Code and Visual Studio Code can sign in through the browser using OAuth - see Authenticate MCP clients with OAuth
CAST Imaging compatibility
| MCP Server release | Required API version/CAST Imaging release |
|---|---|
| ≥ 3.0.0-funcrel | ≥ 3.6.4-funcrel |
| ≥ 3.0.0-beta1 | ≥ 3.6.2-funcrel |
Starting release 3.0.0-funcrel, you can check the current Gatekeeper MCP Server version, the connected CAST Imaging version, and the minimum required CAST Imaging version by asking “What is the version of my MCP server? Is it compatible with my CAST Imaging installation?"
MCP-aware client connection routing
MCP-aware clients connect directly to CAST Imaging via its public gateway - instead of direct to the MCP Server. As a result, CAST Imaging 3.6.2-funcrel or later is required as the target installation to ensure proper routing back to the MCP Server. This integration ensures all query requests are routed through CAST Imaging.
HTTPS
If you require a secure HTTPS connection between your MCP-aware client and the MCP Server, you must enable HTTPS on the CAST Imaging gateway - see HTTPS configuration.
- If the CAST Imaging gateway is configured in HTTPS mode, then the
CONTROL_PANEL_SSL_ENABLEDoption must be set to true in the MCP Server itself (see Step 3 - Configure your installation). - If the CAST Imaging gateway is configured in HTTPS mode with self-signed or private certificate authority SSL/TLS certificates, then you will need to ALSO define the path to the certificate chain with
SSL_CA_BUNDLE. See HTTPS with self-signed or private CA certificates.
Installation process
Step 1 - Verify connection to CAST Imaging
Before proceeding, ensure you can access CAST Imaging (the imaging-services component) from the machine where you intend to install MCP Server by running the following (tailored to your own environment):
$ curl -H "x-api-key: <your-imaging-api-key>" http://<your_imaging_public_URL>:8090/dashboards/rest/server
The expected output is at least one entry similar to:
[
  {
    "href": "55c46218-c3f3-44ad-9042-7e1791ec7cbf",
    "name": "55c46218-c3f3-44ad-9042-7e1791ec7cbf",
    "dbType": "ADG",
    "version": "8.4.10",
    "schema": "app1_central",
    "dbmsVersion": "PostgreSQL",
    "componentsIndexStatus": "upToDate",
    "violationsIndexStatus": "toCreate",
    "systems": {
      "href": "55c46218-c3f3-44ad-9042-7e1791ec7cbf/systems",
      "name": "All Systems. A system represents a portfolio of applications."
    },
    "applications": {
      "href": "55c46218-c3f3-44ad-9042-7e1791ec7cbf/applications",
      "name": "All Applications. An application represents ..."
    },
    "nbOfApplications": 1,
    "configurations": {
      "href": "55c46218-c3f3-44ad-9042-7e1791ec7cbf/configuration/snapshots",
      "name": "All configuration snapshots ..."
    },
    "results": {
      "href": "55c46218-c3f3-44ad-9042-7e1791ec7cbf/results",
      "name": "Results by snapshots, by systems, by ..."
    },
    "commonCategories": null,
    "tags": null
  }
]
Step 2 - Download the installation media
Download the installer using curl:
$ curl -# -O -J "https://extend.castsoftware.com/api/package/download/com.castsoftware.gatekeeper.mcpserver.docker/<version>?platform=linux_x64" -H "x-nuget-apikey: <api-key>" -H "accept: application/octet-stream"
Where:
-#: enables a download progress bar.-O: (--remote-name) ensures the file is downloaded and saved to the current folder using the same name as the remote file.-J: (--remote-header-name) ensures the-Ooption uses the server-specified Content-Disposition filename instead of extracting a filename from the URL. If the server-provided filename contains a path, that is stripped off before the filename is used.<version>: uselatestto download the most recent release, or specify the specific release, e.g.,1.0.1-funcrel.-H: (--header) defines the additional header to include in information sent.<api-key>: your CAST Extend API key (obtain this from your CAST Extend profile settings )
Example for latest release:
$ curl -# -O -J "https://extend.castsoftware.com/api/package/download/com.castsoftware.gatekeeper.mcpserver.docker/latest?platform=linux_x64" -H "x-nuget-apikey: a9999a9a-c999-999d-999b" -H "accept: application/octet-stream"
Unzip the resulting ZIP file anywhere on your local disk. The following files/folders will be created:
com.castsoftware.gatekeeper.mcpserver.docker.<version>/
├── config/
│   └── app.config
├── CLAUDE.md
├── copilot-instructions.md
├── cursor-rules.mdc
├── docker-compose.yml
├── GEMINI.md
├── init.sh
├── README.md
├── run.sh
└── .env                        # Hidden file (use `ls -a` to view)
Step 3 - Configure your installation
app.config
Locate the config/app.config file at the root of the unzipped installation media. Open the file with a text editor and update the following settings to match your environment - the other settings can be left at their defaults:
HOST_CONTROL_PANEL=<imaging-services-machine>
PORT_CONTROL_PANEL=8098
MCP_SERVER_PORT=8283
SERVICE_NAME="GatekeeperMCPServer"
SERVICE_HOST="<mcp-server-machine>"
CONTROL_PANEL_SSL_ENABLED=false
TELEMETRY_ENABLED=true
TELEMETRY_LOCAL_FILE=/app/logs/telemetry/telemetry.jsonl
TELEMETRY_PUSH_ENABLED=true
TELEMETRY_PUSH_INTERVAL_MINUTES=120
SSL_CA_BUNDLE=
Do not add comments at the end of a line: the container start-up script reads everything after the = sign as the value. Place comments on their own line, starting with #. Each setting must appear only once - if a key is repeated, only its first occurrence is used.
| Setting | Description |
|---|---|
HOST_CONTROL_PANEL |
Required: IP address/hostname/FQDN of the machine on which the CAST Imaging imaging-services component is installed. The use of localhost is not supported. |
PORT_CONTROL_PANEL |
Port on which the CAST Imaging Control Panel service (part of the imaging-services component) is running - unless you have changed it during the CAST Imaging installation, leave it as is. |
MCP_SERVER_PORT |
MCP Server listening port, 8283 by default. The value in the .env file at the root of the installer takes priority over this one: to change the port, edit .env. |
SERVICE_NAME |
Name under which the MCP Server registers with the CAST Imaging Control Panel. Do not change it. |
SERVICE_HOST |
Required: IP address/hostname/FQDN of the machine on which the MCP Server will be installed (i.e. the current machine). Do not set as localhost. |
CONTROL_PANEL_SSL_ENABLED |
Set to true to communicate with a CAST Imaging instance configured to use HTTPS. |
TELEMETRY_ENABLED |
Records MCP tool calls in a local telemetry log, true by default. |
TELEMETRY_LOCAL_FILE |
Location of the local telemetry log. |
TELEMETRY_PUSH_ENABLED |
Periodically pushes the local telemetry log to CAST, true by default. |
TELEMETRY_PUSH_INTERVAL_MINUTES |
Interval between two pushes, 120 minutes by default. |
SSL_CA_BUNDLE |
In-container path to a certificate chain in Base-64 PEM format. The certificate must be mounted into the container - see the HTTPS link. Only necessary where CAST Imaging is configured in HTTPS mode with SSL/TLS certificates issued by a private or self-signed certificate authority (CA) - see HTTPS with self-signed or private CA certificates. |
The use of localhost for the HOST_CONTROL_PANEL variable is not supported, even if the imaging-services component is installed on the same machine as MCP Server for Gatekeeper. Use an IP address/hostname/FQDN instead.
Step 4 - Run the installation
Run the following commands:
$ chmod +x run.sh    # makes the installation script executable
$ ./run.sh           # runs the installation and makes the current folder the installation path
Verify the installation by checking Docker containers (you should see one Docker container named gatekeeper-mcp-server, running the castimaging/gatekeeper-mcp-server image):
$ docker ps
Verify the health endpoint of the MCP Server:
$ curl http://<mcp-server>:8283/mcp/healthcheck
Expected response:
{"status": "healthy", "service": "GatekeeperMCPServer"}
Check logs if needed:
$ docker logs gatekeeper-mcp-server
Step 5 - Connect your AI client
Configure each AI client to connect through CAST Imaging, not to the MCP Server directly - see Connect your AI client. It covers GitHub Copilot, Claude Code, Cursor, OpenAI Codex, Gemini CLI and Claude Desktop, with API key or OAuth sign-in.
Step 6 - Test the connection
From an AI client, ask Show me the compliance status for <APP_NAME>. If you get an answer, the MCP Server is working. Otherwise, see Test your connection and Update and troubleshoot.
Next steps
- Connect your AI client - client configuration for your developers
- Update and troubleshoot - update, reconfigure, uninstall and troubleshoot the MCP Server
- Frequently Asked Questions