Step 2 - Migrate your data
Overview
This step involves migrating the following data to your CAST Imaging v3 installation, i.e.:
- data backed up in Step 1 - Backup your data from CAST Imaging Viewer v2 and CAST Console v2 enterprise
- data in-situ from CAST Console v2 standalone
All migration actions are performed on machines where CAST Imaging v3 components are installed.
Requirements
See Requirements.
You should also ensure that you have completed Step 1 - Backup your data.
When you are migrating to a v3 distributed/enterprise deployment where the CAST Imaging v3 components are on dedicated / separate machines, it is mandatory to run the migration actions in a specific order, i.e.: the migration of CAST Imaging Viewer v2 data must ALWAYS be actioned BEFORE the migration of CAST Console v2 data. In other words, the first action should be performed on the machine where the CAST Imaging v3 imaging-viewer component is installed using the option=Neo4j in the migration.conf / migration_linux.conf file, and the next action should be performed on a machine where the CAST Imaging v3 analysis-node component is installed (any node can be used) using the option=Console in the migration.conf / migration_linux.conf file.
Process
Step 1 - Download and unzip the migration tool
Starting release 1.2.0-funcrel, the migration tool extension has two different variants:
- one for migrating to CAST Imaging v3 installed on Microsoft Windows
- one for migrating to a Linux based CAST Imaging v3 installation
Download and unzip the com.castsoftware.imaging.migrationtool extension on the machine(s) where the migration will be run:
- the machine where the CAST Imaging v3
imaging-viewercomponent is installed - for a v2 CAST Console enterprise/distributed migration, a machine where the CAST Imaging v3
analysis-nodecomponent is installed (any node can be used) - for a v2 CAST Console standalone migration, the machine where all CAST Imaging v3 components are installed
- for a migration to Linux/Kubernetes, the machine on which the migration tool will be run must have kubectl installed and configured to connect to the cluster. Ensure that
kubectlis also configured on thePATHby runningkubectl versionin terminal
Use one of the following download methods based on your target CAST Imaging v3 platform:
- Microsoft Windows: download from the CAST Extend portal .
- Linux: run the following
curlcommand:
$ curl -# -O -J "https://extend.castsoftware.com/api/package/download/com.castsoftware.imaging.migrationtool/<version>?platform=linux_x64" -H "x-nuget-apikey: <api-key>" -H "accept: application/octet-stream"
Where:
<version>: uselatestfor the most recent release, or specify a version such as1.2.0-funcrel.<api-key>: your CAST Extend API key — obtain from your CAST Extend profile settings .-#: shows a download progress bar.-O(--remote-name): saves the file to the current folder using the server-provided filename.-J(--remote-header-name): uses the filename from the server’sContent-Dispositionheader instead of the URL.-H(--header): passes an additional HTTP header with the request.
Step 2 - Set-up the migration configuration file
The migration process is run via a batch file which refers to a configuration file containing various options that determine how the migration is actioned. Therefore, you now need to set-up this configuration file: you can find it at the root of the unzipped migration tool extension:
- For CAST Imaging V3 installed on Microsoft Windows:
migration.conf - For CAST Imaging V3 installed on Linux (Docker/Podman/Kubernetes):
migration_linux.conf
The configuration file contains various distinct sections, described below:
General options
| Option | Description | migration.conf | migration_linux.conf |
|---|---|---|---|
option= |
Choose one of the following - all options should ONLY be run once: - All: migrate both CAST Imaging Viewer v2 and Console v2, i.e. for a standalone/single machine deployment of CAST Imaging v3 where imaging-viewer, imaging-services and analysis-node components are all installed on the SAME machine.- Neo4j: migrate only CAST Imaging Viewer v2, must be run on the machine where the CAST Imaging v3 imaging-viewer component is installed. This option must be run BEFORE the Console option.- Console: migrate only CAST Console v2, must be run on a machine where a CAST Imaging v3 analysis-node component is installed. This option must be run AFTER the Neo4j option. When using ≥ 1.2.0-funcrel, you must also set noviewer=Yes (you may need to uncomment this option). |
✅ | ✅ |
log= |
A local folder for storing the migration log files. For Microsoft Windows use a standard Microsoft Windows path with back slashes, e.g.: C:\temp\logs. For Linux, use forward slashes, e.g.: /tmp/migration/logs. The tool will attempt to create this folder if it cannot be found. |
✅ | ✅ |
apikey= |
A CAST Imaging v3 API key - you can obtain this by clicking the user icon in the top right corner of the screen and selecting Profile: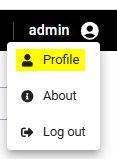  |
✅ | ✅ |
GATEWAY_HOMEPAGE_URL= |
The “public access URL” of your CAST Imaging v3 installation (defined during the installation), relative to the machine on which you are running the migration action. For example if all your v2 and v3 components are installed on one machine, you can leave this set to the default http://localhost:8090. Otherwise, set this URL to match the location of the imaging-services component in your network. |
✅ | ✅ |
noviewer= |
Available in ≥ 1.2.0-funcrel
Commented by default. Uncomment and set to Yes when using option=Console (i.e. if you do not use CAST Imaging Viewer v2, or when CAST Imaging Viewer V2 is installed on a separate machine.) By default the tool performs checks on the CAST Imaging Viewer Service before proceeding - this option bypasses those checks. Do not use with option=All or option=Neo4j. |
✅ | ✅ |
install_path= |
Available in ≥ 1.2.0-funcrel
Path to your CAST Imaging V3 installation for Docker/Podman if using a non standard path. Set by default to /opt/cast. |
❌ | ✅ |
Neo4j options
These options define the CAST Imaging Viewer v2 migration:
| Option | Description | migration.conf | migration_linux.conf |
|---|---|---|---|
imaging_viewer_path= |
Available in ≥ 1.2.0-funcrel
Path to your CAST Imaging V3 installation. Unless you have customized this location, use the default path (using standard Microsoft Windows back slashes): C:\Program Files\Cast\Imaging\CAST-Imaging-Viewer\. |
✅ | ❌ |
neo4j_adminpath= |
Not used in ≥ 1.2.0-funcrel. Path to the Neo4j administration tool neo4j-admin in your CAST Imaging v3 installation. Unless you have customized this location, use the default path (using standard Microsoft Windows back slashes): C:\Program Files\Cast\Imaging\CAST-Imaging-Viewer\neo4j\bin. |
✅ | ❌ |
neo4j_backupdir= |
Path (For Microsoft Windows, use back slashes, for Linux, use forward slashes) to the local folder containing the backup generated from CAST Imaging Viewer v2, as described in Step 1 - Backup your data. | ✅ | ✅ |
neo4j_host=, neo4j_port=, neo4j_database=, neo4j_user=, neo4j_password=, neo4j_scheme= |
The details of your Neo4j instance, i.e. as installed with CAST Imaging v3. Unless you have customized this, use the default options provided in the configuration file. | ✅ | ❌ |
Console options
These options define the CAST Console v2 migration:
| Option | Description | migration.conf | migration_linux.conf |
|---|---|---|---|
console= |
Choose one of the following depending on your migration strategy: - Standalone- Enterprise |
✅ | ✅ |
process= |
Determines the type of migration: use All unless directed to use a different option by CAST Support. |
✅ | ✅ |
legacy=Yes |
This option is commented by default and when uncommented allows you to migrate specifically to CAST Imaging 3.2.x-funcrel only (where there are two persistence schemas). If you are migrating to a more recent release of CAST Imaging v3, leave this option commented. This option functions with v3admincenter= and v3nodeschema=. |
✅ | ❌ |
v3admincenter= |
This option is commented by default and allows you to migrate specifically to CAST Imaging 3.2.x-funcrel only (where there are two persistence schemas), i.e. it functions with legacy=Yes. The option defines the name of the v3 admin_center persistence schema - if this schema name has NOT been customised you do not need to uncomment it. |
✅ | ❌ |
v3nodeschema= |
This option is commented by default and allows you to migrate specifically to CAST Imaging 3.2.x-funcrel only (where there are two persistence schemas), i.e. it functions with legacy=Yes. The option defines the name of the v3 analysis_node persistence schema - if this schema name has NOT been customised you do not need to uncomment it. |
✅ | ❌ |
v3controlpanel= |
This option is commented by default and allows you to migrate specifically to CAST Imaging ≥ 3.3.x-funcrel where you have defined a custom name for the the v3 control_panel persistence schema - if this schema name has NOT been customised you do not need to uncomment it. |
✅ | ✅ |
cast84homedir= |
Path (using standard Microsoft Windows back slashes) to the CAST Imaging Core 8.4 installation folder, e.g.: C:\Program Files\CAST\8.4. Replaces casthomedir= available in older releases of the tool. |
✅ | ❌ |
v2aipnodedatadir= |
Only valid for a standalone migration: CAST Console v2 data folder containing the application-standalone.yml file, e.g.: C:\ProgramData\CAST\AIP-Console-Standalone. Will be ignored when console=Enterprise. |
✅ | ❌ |
sharedrootmapping= |
Available in ≥ 1.2.0-funcrel
The path to the “shared” folder accessed by the various containers. Set by default to /opt/cast/shared. |
❌ | ✅ |
zipfile= |
Only valid for an enterprise migration: path (for Microsoft Windows, use back slashes, for Linux, use forward slashes) to the ZIP file containing the backup generated from CAST Console v2 enterprise as described in Step 1 - Backup your data. Will be ignored when console=Standalone. |
✅ | ✅ |
css_user= |
Username used to connect to database instance defined by css_host= (default: operator). |
✅ | ✅ |
css_host= |
Hostname/IP address of the database instance where the CAST Imaging v3 control_panel (admin_center and analysis_node in older releases) schemas are stored. (default: localhost). For a standalone migration, the v2 node_standalone schema must also exist on this instance. |
✅ | ✅ |
css_port= |
Port for database instance defined by css_host (default: 2284). |
✅ | ✅ |
css_database= |
Name of the database in which the CAST Imaging v3 control_panel (admin_center and analysis_node in older releases) is stored on the database instance (default: postgres). For a standalone migration, the V2 node_standalone schema must also exist in this database. |
✅ | ✅ |
workingdir= |
Path (for Microsoft Windows, use back slashes, for Linux, use forward slashes) to a temporary processing location on disk., e.g.: C:\Temp\WorkDir or /tmp/migration/work. The installer will attempt to create this folder if it cannot be found. |
✅ | ✅ |
psqldir= |
Optional: path (using standard Microsoft Windows back slashes) to psql.exe file. By default psql.exe provided in CAST Imaging Core is used when no value is provided for this option. |
✅ | ❌ |
backup= |
Determines whether you want to backup the CAST Imaging v3 control_panel schema (analysis_node and admin_center in older releases) before the v2 data is migrated in. By default this is set to Yes, set to No to skip this backup. |
✅ | ✅ |
backupdir= |
Determines the path (for Microsoft Windows, use back slashes, for Linux, use forward slashes) to a local folder where the schema backups generated by the backup= option are stored. E.g.: C:\temp\backups or /tmp/migration/cssbackups. |
✅ | ✅ |
usehttps= |
Available in ≥ 1.0.2-funcrel
Set this to yes if you have configured HTTPS on your target CAST Imaging v3 installation. By default this is set to No. |
✅ | ✅ |
validationreport= |
Available in ≥ 1.1.0-funcrel
Sets the path for the validation report which is generated each time the batch is run. |
✅ | ❌ |
restoretriplets= |
Available in ≥ 1.2.0-funcrel
Set to Yes by default. Restores the backed-up application schemas from CAST Console V2 on to the PostgreSQL instance defined in CAST Imaging V3. This option (set to Yes) is mandatory when migrating to CAST Imaging V3 installed on Kubernetes, since CAST Imaging V3 cannot reach the CAST Console v2 PostgreSQL instance from inside the Kubernetes cluster. |
✅ | ✅ |
copysources= |
Available in ≥ 1.2.0-funcrel
Set to Yes by default. Restores the backed-up contents of the CAST Console V2 source folder location. Note: if this option is set to Yes, a source folder location must be defined in Console v3 settings (see Source Folder Location) and you must have also set copysources=Yes in the backup.conf file configured in Step 1 - Backup your data. Setting the option to No will not restore any backed up source code. |
✅ | ✅ |
copyextensions= |
Available in ≥ 1.2.0-funcrel
Set to Yes by default. Restores backed up CAST Console V2 extensions present in the output ZIP. Note:* if this option is set to Yes, you must have also set copyextensions=Yes in the backup.conf file configured in Step 1 - Backup your data. Setting the option to No will not restore any backed up extensions. |
✅ | ✅ |
cssmapfile= |
Commented by default. Works in conjunction with the restoretriplets= option. Defines a specific configuration file called cssmappings.conf (located at the root of the migration tool when unzipped) which defines various rules about how the restored application schemas should be distributed amongst the available PostgreSQL instances defined in the CAST Imaging V3 installation. Recommended for use if you have defined more than one PostgreSQL instance in CAST Imaging V3 (see Database Connection List) and want to define how the application schemas are restored. Leaving the option uncommented will use the internal algorithm and an attempt will be made to match V2 database instances with V3 database instances. |
✅ | ✅ |
Container options
These options define options used when migrating specifically to a containerized platform on Linux (Docker/Podman/Kubernetes):
| Option | Description | migration.conf | migration_linux.conf |
|---|---|---|---|
containerplatform= |
Choose one of docker (default), podman, kubernetes according to your target CAST Imaging V3 deployment. |
❌ | ✅ |
kub_mapping_port_css=, kub_mapping_port_eureka=, kub_mapping_port_node=, kub_mapping_port_viewer=, kub_mapping_port_gateway= |
Commented by default. In order to access the CAST Imaging services inside the Kubernetes cluster, the migration tool will need to open some temporary ports on the host machine (the machine running the tool) and will therefore map these temporary ports to the CAST Imaging V3 services. These ports have the default values shown in the configuration file and they ALL must be available. If some are not available, modify the configuration to choose another port. | ❌ | ✅ |
namespace= |
Must be defined where containerplatform=kubernetes. Set by default to castk8s-migv3-ns. |
❌ | ✅ |
Step 3 - Run the migration
To run the migration:
- Connect to your chosen CAST Imaging v3 machine, depending on the migration options you have configured in the
migration.conf / migration_linux.conffile. - Depending on your target infrastructure:
- On Microsoft Windows, open a brand new CMD window (do NOT re-use any existing CMD windows that you may have used to perform other actions) with elevated permissions (right click,
Run as administrator) and navigate to the root of the unzipped migration tool extension. - On Linux for Docker/Podman/Kubernetes, navigate to the root of the unzipped migration tool extension in terminal.
- On Microsoft Windows, open a brand new CMD window (do NOT re-use any existing CMD windows that you may have used to perform other actions) with elevated permissions (right click,
- Execute the following command to set the password for the database user defined by the option
css_user=in themigration.conf / migration_linux.conffile (otherwise you will be prompted to enter this during the migration):
Microsoft Windows
SET CSSPASSWORD=CastAIP

Linux
$ export CSSPASSWORD=CastAIP
- Now execute the script file provided at the root of the unzipped migration tool extension with the option
reportonly:
Microsoft Windows
Cast_Imaging_V3_Migration.bat reportonly

Linux
$ ./Cast_Imaging_V3_Migration.sh reportonly
- This will run the migration in test mode only: no migration actions will be performed, instead checks are performed and a report will be generated and output to the path defined by the option
validationreport=in themigration.conf / migration_linux.conffile. The report contains information about each application and its suitability for migration and you should check it before proceeding. See Compatibility/validation reports for more information.
The ability to run the migration in reportonly mode is available only in ≥ 1.1.0-funcrel of com.castsoftware.imaging.migrationtool.
- If all checks have passed you can now proceed with the “real” migration by running:
Microsoft Windows
Cast_Imaging_V3_Migration.bat

Linux
$ ./Cast_Imaging_V3_Migration.sh
Step 4 - Check the migration log
On completion, check the log file (defined by the option log= in the migration.conf / migration_linux.conf file).
Do not proceed to Step 3 - Application update and re-scan before thoroughly checking the migration log: do a systematic search for ERROR and WARN and contact CAST Support if any are found.
Step 5 - Check CAST Imaging v3
Connect to CAST Imaging v3 and login with a user that has the default Admin profile or a custom profile with the Administrator role - see User Permissions. Check that all your applications are visible in CAST Imaging v3.
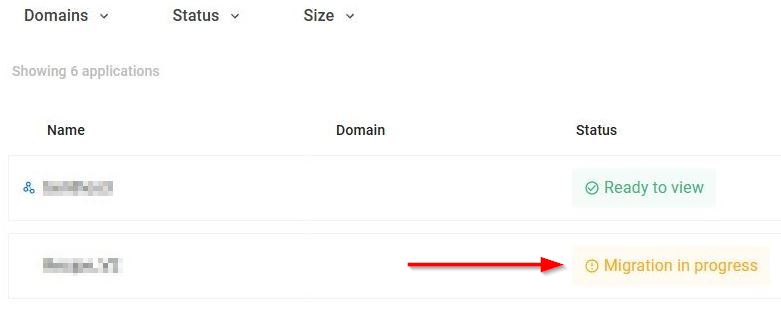
Successfully migrated applications will show the following:
The status Migration in process in the Application landing page - you can still view their results if required by clicking the status, but you will be informed that to finalize the migration, you will need to complete additional steps - see What’s next?:
- For an application that has “imaging-viewer” results (i.e. data in the Neo4j database):

- For an application that has no “imaging-viewer” results:
- The status Migration in process will be displayed until all additional steps are completed.
- Applications whose results were originally "imported" into v2 from
.csvwill show as Ready to view and can be consulted immediately (click the status).
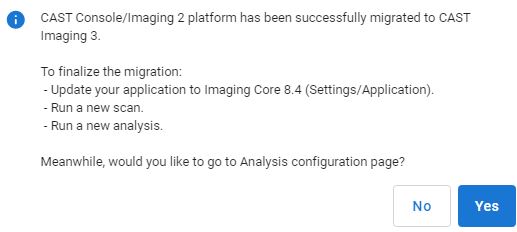
In addition, a banner in the Application analysis configuration - Overview panel informing you about the need to perform Step 3 - Perform the application schema update and re-analysis in CAST Imaging v3 - note that some features in this panel will be disabled until this step is fully completed.

Step 6 - Check the migration report
As part of the migration process, a status report will be generated and stored on disk in text format: this report will contain key information regarding the migration status, details about each migrated application, the technologies they contain, the extensions that require an update, and advice about what to do next. This report must be consulted BEFORE you proceed with Step 3 - Application update and re-analysis as it will tell you whether you should complete this step or not.
The migration report is located at the root of the unzipped migration tool extension (along side the Cast_Imaging_V3_Migration.bat / Cast_Imaging_V3_Migration.sh file), called MigrationReport.csv. The report contains the following information:
| Column name | Description |
|---|---|
| MIGRATED APPLICATION | This column lists the name of each application that has been migrated during the process. It provides a clear overview of which applications were processed and migrated successfully. |
| STATUS | This column shows the status of the migration for each application. The possible values for the STATUS column are:
|
| YOUR NEXT ACTION | This column provides instructions or recommendations (explained above) for the next steps you should take for each migrated application. It aligns with the STATUS column and highlights any necessary actions, such as upgrading the application, rescanning, or addressing unsupported technologies. |
| NON SUPPORTED TECHNOLOGIES | This column lists any technologies or features used by the application that are not supported in CAST Imaging v3. It will help you identify any technologies that might need special attention or alternative solutions after migration. |
| EXTENSIONS THAT WILL BE UPDATED AFTER RESCAN | This column shows any extensions that will be updated to the latest compatible release after a subsequent rescan of the application. |
Example report for hypothetical applications that fall into each STATUS category described previously:
| MIGRATED APPLICATION | STATUS | YOUR NEXT ACTION | NON SUPPORTED TECHNOLOGIES | EXTENSIONS THAT WILL BE UPDATED AFTER RESCAN |
|---|---|---|---|---|
| App1 | Application migrated to CAST Imaging V3 - all technologies of your application are supported. | Everything is fine. Upgrade your application to Imaging Core 8.4. No need to rescan. | ||
| App2 | Application migrated to CAST Imaging V3 - none of its technologies are supported yet. | None of the technologies in your source code are supported yet and therefore it is not possible to upgrade and rescan your application. Once a technology is supported, you will be able to upgrade your application, and rescan your source code. | PowerBuilder | |
| App3 | Application migrated to CAST Imaging V3 - all technologies of your application are supported. | Upgrade your application to Imaging Core 8.4 then rescan and analyze your source code to complete the migration. | com.castsoftware.jee com.castfotware.dotnet |
|
| App4 | Application migrated to CAST Imaging V3 - some technologies are not supported yet. | You can upgrade the application to Imaging Core 8.4, then rescan and analyze the source code to complete the migration. Note that for technologies that are not supported yet, the corresponding results will be removed. | Power Builder Visual Basic |
What’s next?
You must now perform the application update and re-scan as described in Step 3 - Perform the application update and re-scan in CAST Imaging v3.