S2 - Viewer Only, Multi-Machine (Windows)
Overview
This guide covers installing CAST Imaging in Viewer Only mode on multiple Microsoft Windows machines. This is a read-only deployment: users can browse previously analyzed application data but no analysis is performed locally.
What is installed:
| Install command | Component | Config file | Machines |
|---|---|---|---|
imaging-services |
Front-end services | config-imaging-services.conf |
One machine (install first) |
imaging-viewer |
Results viewer | config-imaging-viewer.conf |
One machine |
When to use: Environments where analysis is performed on a separate CAST Imaging installation and users only need to view results through the Viewer interface.
- See Standalone deployment workflow for more information about this deployment mode.
- The database instance is not included in the Windows installer. A PostgreSQL database must be installed separately (on the same or another machine) before proceeding. See Database server install.
- It is not possible to add additional components to this deployment after installation.
- Certain settings and options in the CAST Imaging UI are not available in read-only mode.
- CAST Imaging Core is NOT required for this scenario.
imaging-servicesandimaging-viewermust each be installed only once across your network.imaging-servicesmust always be installed first, and must be fully running before any other component is installed.- In offline environments, Extend Local Server must be deployed alongside this installation to pass through the initial Extend initialization settings despite the fact that no analysis is performed. See Extend Local Server install.
CAST does not support cross-platform installations, i.e. some CAST Imaging components on Linux/Docker and other components on Microsoft Windows, except where a PostgreSQL instance installed on Linux/Docker is being used with CAST Imaging installed on Microsoft Windows.
Requirements
Read and understand the following before starting:
CAST recommends disabling Quick Edit mode in your CMD window before running the install script. If Quick Edit is enabled, a mouse click will pause the script until a key is pressed.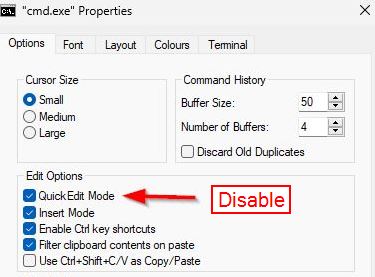
Before you start
-
Install the database: Install PostgreSQL on a dedicated machine (or reuse an existing instance) accessible from all component machines. See Database server install for instructions.
-
Extend Local Server: If your environment does not permit access to CAST Extend over the internet, you will need to install the Extend Local Server separately before completing this guide.
-
Network connectivity: All machines must be able to communicate with each other over the network. Before starting, confirm:
- All machines can reach the
imaging-servicesmachine - All machines can reach the database instance
- All required ports listed in Hardware requirements are open inbound on each machine
- All machines can reach the
Step 1 - Download the installation media on each machine
On each machine where you will install a component download the latest release of com.castsoftware.imaging.console from CAST Extend and unzip it anywhere on the local disk.
The folder path for the unzipped files must not contain any of the following characters: (, ), or !. The installer will fail if the path contains these characters.
The following files and folders will be created:
tools/(folder)cast-imaging-install.batcast-imaging-remove.batcast-imaging-update.batcomponents-installers.zipconfig-all.confconfig-imaging-services.confconfig-analysis-node.confconfig-imaging-viewer.confconfig-dashboards.conf
Step 2 - Configure the installation on each machine
On each machine, open the appropriate *.conf file and update the installation variables. Shared variable values must be consistent across all machines.
Hostname variables
Each *.conf file contains hostname variables that must point to the correct machines. Use the FQDN or static IP address of each machine (not localhost or simple hostnames).
| Variable | Value | Required in |
|---|---|---|
IMAGING_SERVICES_HOSTNAME |
FQDN/IP of the imaging-services machine |
Both *.conf files on both machines |
IMAGING_VIEWER_HOSTNAME |
FQDN/IP of the imaging-viewer machine |
config-imaging-viewer.conf |
Open all required ports from Hardware requirements inbound on each machine.
LICENSE_KEY and EXTEND_API_KEY (optional)
To avoid being prompted for the global license key and CAST Extend API key on first login, you can pre-configure these variables in config-imaging-services.conf:
LICENSE_KEY=<your-license-key>
EXTEND_API_KEY=<your-extend-api-key>
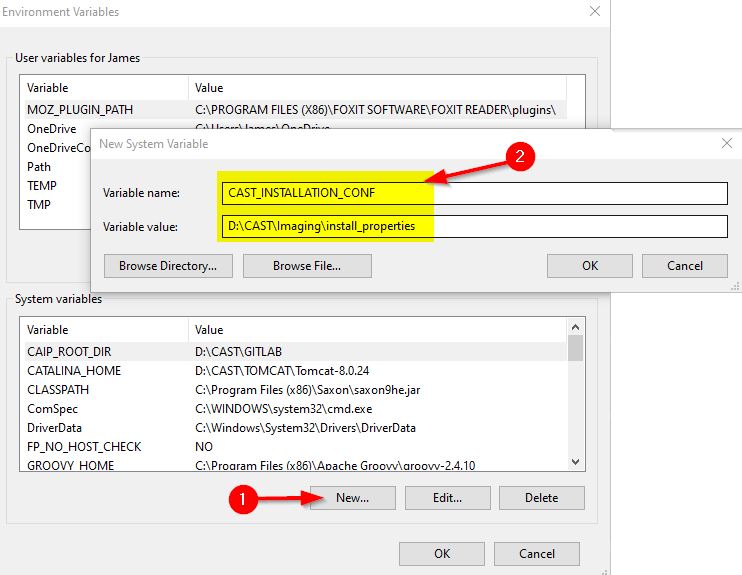
CAST_INSTALLATION_CONF (optional)
By default, the installer stores installation properties in:
%PROGRAMDATA%\CAST\CAST\.install
To use a different location, set the CAST_INSTALLATION_CONF Windows system environment variable to your preferred folder path on each machine before running the installer.
Domain mapping (optional, imaging-services machine)
To isolate imaging-viewer results per domain in dedicated Neo4j databases, you can enable the domain/tenant mapping feature. CAST strongly recommends enabling this now, before any applications are onboarded - enabling it later in an existing installation causes irreversible loss of customizations (tags, saved views, post-it notes, custom objects).
Before running the installer (on the imaging-services machine for multi-machine deployments), create a Windows system environment variable:
- Variable name:
IMAGING_DOMAIN_SYNCHRO_ENABLED - Variable value:
true
See Domain/tenant mapping feature for full details and prerequisites.
Firewall ports
Open all ports listed in Hardware requirements inbound on each machine to ensure:
- Users can access all CAST Imaging resources in their browser
- CAST Imaging components can communicate with each other correctly
Step 3 - Run the installation (in order)
On each machine, open a CMD window with elevated permissions (right-click, Run as administrator) and run the appropriate command from the root of the unzipped files. Install in the following order, waiting for each component to be fully running before proceeding.
On the imaging-services machine - install first:
cast-imaging-install.bat package=imaging-services
On the imaging-viewer machine:
cast-imaging-install.bat package=imaging-viewer
Step 4 - Verify the installation
On each machine, check that the expected Windows Services are running:
| Machine | Expected services |
|---|---|
imaging-services |
5 |
imaging-viewer |
6 |
The full list of services installed:
| Component | Service name | Port(s) |
|---|---|---|
imaging-services |
CAST Imaging Authentication | 8092 |
imaging-services |
CAST Imaging Console Service | 8091 |
imaging-services |
CAST Imaging Control Panel | 2381, 8098 |
imaging-services |
CAST Imaging Gateway Service | 8090 |
imaging-services |
CAST Imaging SSO Service | 8096, 9002 |
imaging-viewer |
CAST Imaging Viewer AI Manager | 8094 |
imaging-viewer |
CAST Imaging Viewer APIs | 8070 |
imaging-viewer |
CAST Imaging Viewer Frontend | 8093 |
imaging-viewer |
CAST Imaging Viewer ETL | 9011 |
imaging-viewer |
CAST Imaging Viewer Backend | 9010 |
imaging-viewer |
CAST Imaging Neo4j Graph Database | 6372, 7483, 7484, 7697 |
- All services are set to Automatic start. After a reboot, some services may fail to start because a dependent service has not started quickly enough. See Services startup checker for a tool that ensures all services are running.
- All services run as
LocalSystemunless you have configured a dedicated user via theSTART_AS_USER/START_AS_PASSWORDvariables. See Installation variables and Software requirements.
Step 5 - Initial startup configuration
If you pre-configured LICENSE_KEY and EXTEND_API_KEY, this initialization screen will not be shown.
Browse to:
http://<IMAGING_SERVICES_HOSTNAME>:8090
Log in using the default credentials: admin / admin
Configure the Licensing strategy. Choose one of:
Named Application- each onboarded application requires its own dedicated license keyContributing Developers- a global license key based on the number of contributing developers
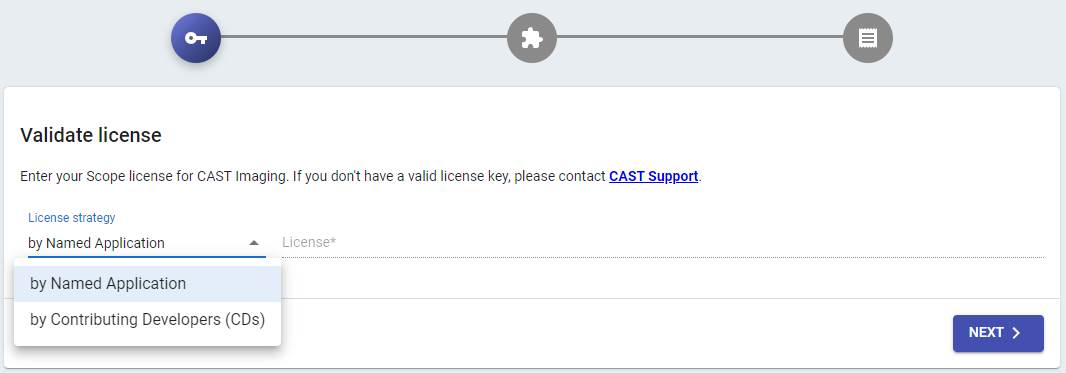
You can switch license key strategy after onboarding applications. See Manage your license keys.
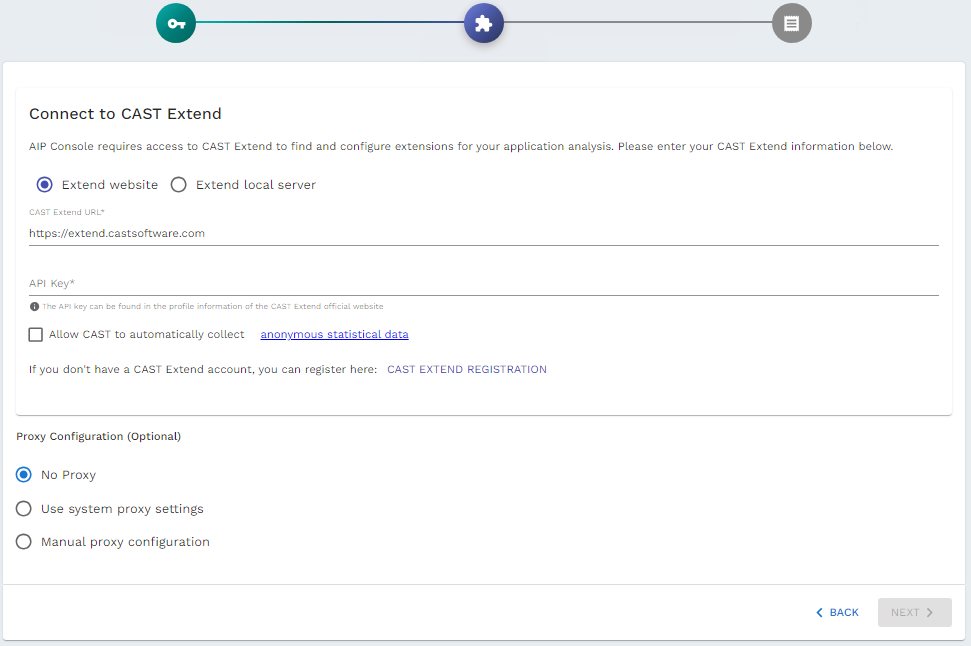
Configure CAST Extend settings and Proxy settings:
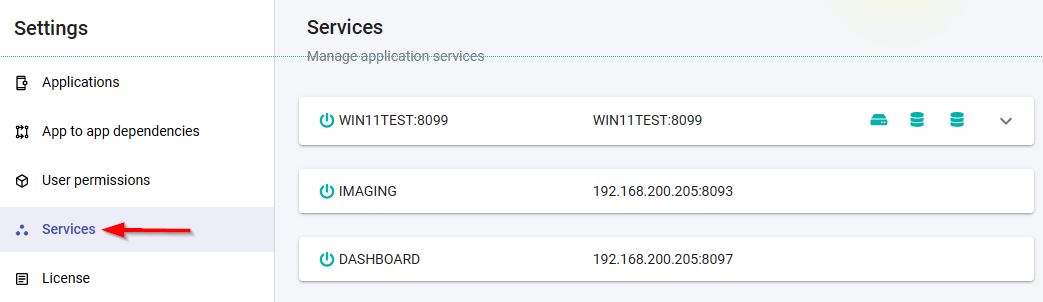
Verify that all components are available:
http://<IMAGING_SERVICES_HOSTNAME>:8090/admin/services
Step 6 - Configure authentication
Out-of-the-box, CAST Imaging uses Local Authentication (admin/admin) managed by Keycloak.
CAST recommends switching to your enterprise authentication system (LDAP or SAML) before onboarding applications. Access the Keycloak UI using the kcadmin account (or the value of KEYCLOAK_LOGIN_ADMIN_USER if customized during installation). See Authentication for full instructions.