Dealing with databases or schemas that move from one Server to another or from one Instance to another
Introduction
When a database/schema is extracted and delivered in V1 from Server A / Instance 1 and is then extracted and delivered in V2 from Server B / Instance 2 the default behavior on re-analysis of the same database/schema on a different Server or Instance will consider that the database/schema is in fact two separate databases/schemas even though they have the same name. This causes “noise” when consulting version comparison data (the database/schema will appear as deleted / added between V1 and V2 snapshots), in violation monitoring (removed / added) and it invalidates the content of the Action Plan.
If you find yourself in this situation, you can use various methods provided by CAST that will automatically modify the V2 database/schema extraction data to contain the same Server / Instance / Schema name as used in V1. In this way, the database/schema will not be considered new in snapshot V2. The tool must be run BEFORE you generate the V2 snapshot. To do so, use one of the following options:
Using the CAST Database Extraction Renaming Tool
The CAST Database Extraction Renaming Tool mentioned previously can also be run on an “ad-hoc basis”, either via the GUI or the CLI:
Note that the tool requires a Java JRE as follows:
- ≤ 8.3.47 - the tool requires a Java JRE to be installed on the workstation. As such the tool can be run from outside the AIP Core installation folder if necessary.
- ≥ 8.3.48 - the tool will use the Java JRE bundled with AIP Core and therefore cannot be run from outside the AIP Core installation folder, however, it is possible to force it to use a specific Java JRE if necessary:
[JRE path]/bin/java.exe -jar CAST-DatabaseExtractionRenamingTool.exe
[JRE path]/bin/java.exe -jar CAST-DatabaseExtractionRenamingTool-CLI.exe [the CLI arguments]
GUI
The tool can be found at the root of the AIP Core installation folder: CAST-DatabaseExtractionRenamingTool.exe. Double click the tool to launch it:
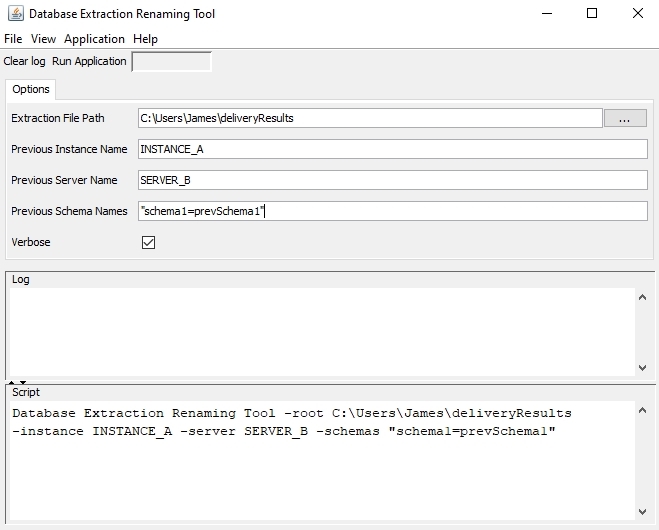
Fill in the various fields as shown in the table below. To start the renaming process, click Application > Run Application on the toolbar.
| Tab | Field | Description |
|---|---|---|
| Options | Extraction File Path | Enter the path to the delivery output from the CAST Database Extractor. |
| Options | Previous Instance Name | Enter the name of the previous instance name that you would like to use in the new extraction data (optional). |
| Options | Previous Server Name | Enter the name of the previous server name that you would like to use in the new extraction data (optional). |
| Options | Previous Schema Names |
Use with caution! This parameter is optional.
Use this option to rename one or multiple schemas in the new extraction data to match the old extraction data. For example if "SchemaOld" in the old extraction data has changed to "SchemaNew" in the new extraction data, enter the following syntax: You can rename multiple schemas if necessary, using the following syntax:
|
| Options | Verbose | By default this option is set to TRUE. When set to true, the log will contain information about the time taken to perform each specific action in milliseconds. This increases the size of the log, but is useful for troubleshooting. |
| Advanced | Log Time | By default this option is set to TRUE. This option prefixes each line in the log (whether an external log file or the log displayed in the Log panel windowl), with the date and time of each transaction during an Extraction or Delivery process. The format used is: YYYY-MM-DD HH:MM:SS.millisecond |
| Advanced | Log File | This option enables you to have transaction and error messages stored in a specific file on a local or network drive, in addition to the log displayed in the Log panel window. Manually enter a log file name and location - or use the Browse button to search for a location. The log file will be a simple text file. |
CLI
The tool can be found at the root of the CAST AIP installation folder: CAST-DatabaseExtractionRenamingTool-CLI.exe. Please modify the following example batch script to suit your needs and environment:
REM ===============================
REM RENAME ACTION
REM ===============================

CAST-DatabaseExtractionRenamingTool-CLI.exe -root <extraction file path> -instance <previous instance name> -server <previous server name> -schemas <Previous Schema Names> -l <path to log file>

REM ===============================
REM EXAMPLE
REM CAST-DatabaseExtractionRenamingTool-CLI.exe -root C:\Users\James\deliveryResults -instance INSTANCE_A -server SERVER_A -schemas "SchemaNew=SchemaOld" -l D:\output\log.txt
REM ===============================

REM ===============================
REM FULL LIST OF OPTIONS
REM ===============================
REM -h <Display Help> [false]:                       displays this help message
REM -root <Extraction File Path> [deliveryResults]:  UAX Folder Path
REM -instance <Previous Instance Name> []:           Previous Instance Name
REM -server <Previous Server Name> []:               Previous Server Name
REM -schemas <Previous Schema Names> []:           Previous Schema Names, syntax: "schema1=previousSchema1,schema2=previousSchema2"; WARNING: use with caution!
REM -v <Verbose> [true]:                             Verbose Listing
REM -logtime <Log Time> [true]:                      Log Time
REM -l <Log File> []:                                Log File Path
Via a Content Enrichment Tool (automated option run before an analysis)
This method is not currently available in AIP Console.
- In the CAST Management Studio, open the Application containing your Oracle schema Analysis Unit.
- Click the Content Enrichment tab:
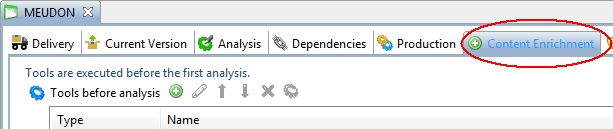
- In the Tools before analysis section, click
the
 button and select Add new
external program:
button and select Add new
external program:

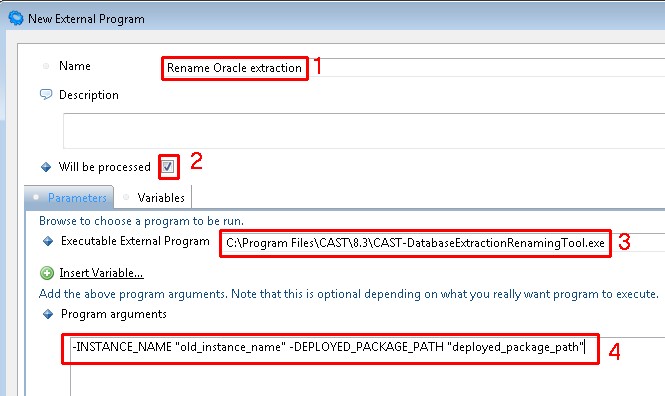
- In the configuration panel, fill in the following fields:
| 1 | Enter a name for the tool "job" - use a name that is easy to distinguish. |
| 2 | Ensure the Will be processed option is selected |
| 3 | Enter the path to the CAST-DatabaseExtractionRenamingTool.exe file which can be found in the root of your CAST AIP installation folder. |
| 4 | Enter the following arguments in the Program arguments field: So, for example if the database/schema in V1 was extracted by the CAST Delivery Manager Tool from Instance "INSTANCE_A" and the database/schema extraction in V2 was deployed to the Deployment path "D:\Deploy\MEUDON\PLSQL_PACKAGE", you would enter the following arguments: This will modify the V2 extraction data in "D:\Deploy\MEUDON\PLSQL_PACKAGE" and ensure that the instance name is changed to the instance used in V1 (INSTANCE_A). |
-
Close the configuration panel. You should now see the tool “job” displayed as follows:
-
Whenever you run the V2 analysis, the tool job will also be run ensuring that the V2 extraction data is modified to match the V1 instance name.
-
Remember to modify the tool “job” in V3 if the schema is being delivered from a new instance in V3.
If a Oracle schema has been moved from one server/instance to another, you should ensure that the original and the new schema are fully identical. Any differences will be picked up by the CAST analyzer. In particular, the Oracle IDs (OIDs) must be maintained: CAST recommends using the impdp parameter transform=OID:y:type to move the schema. This will preserve the original OID values.