Installation on Amazon Web Services via EKS
Overview
This guide covers the installation of CAST Imaging on Amazon Web Services (AWS) Elastic Kubernetes Service (EKS) using Helm charts.
Requirements
- Access to Docker Hub registry - CAST Imaging Docker images are available as listed in the table below
- Setup Elastic File Storage (used by
analysis-nodeandconsole-service) - A clone of the latest release branch from the Git repository containing the Helm chart scripts:
git clone https://github.com/CAST-Extend/com.castsoftware.castimaging-v3.kubernetessetup(to clone an older release, add the “-b x.x.x” flag with the desired release number). - A valid CAST Imaging License
- Optional setup choices:
- Use an external PostgreSQL instance (a PostgreSQL instance is provided as a Docker image and will be used by default)
Docker images
CAST Imaging is provided in a set of Docker images as follows:
Setup Elastic File Storage
While most pods use Amazon Elastic Block Store (EBS) volumes, console-analysis-node StatefulSet and console-service Deployment require EFS (Elastic File Storage using an efs.csi.aws.com driver Storage Class) for the shared-datadir volume.
Prior to running the initial CAST Imaging installation, follow these steps:
-
Create a new EFS file system entry in the AWS Console by clicking Create file system
-
Assign a
Name -
Click Create file system in the bottom right corner
-
OPTIONAL: Access Point creation - In the newly created EFS, click the Access points tab and then Create access point (if you choose not to create it, a default one will be created automatically at deployment time):
- Enter the following configuration settings:
- Details:
- Name:
castimaging-shared-datadir - Root directory path:
/castimaging-shared-datadir
- Name:
- Root directory creation permissions:
- Owner user ID:
10001 - Owner group ID:
10001 - Access point permissions:
0755
- Owner user ID:
- Details:
- Click Create access point in the bottom right corner
- Enter the following configuration settings:
-
Copy the newly created File System ID and Access point ID (if you created one)
-
In
values.yamlfile, update theEFSsystemIDandEFSaccessPointID(if you created one) variables values -
Grant network access from your EKS worker nodes to the EFS file system. You have two options:
Option 1: Edit the existing mount target security group (simplest):
- In the EFS console, open your file system and go to the Network tab
- Note the Security group ID listed for the mount targets (typically the same SG across all mount targets, often the VPC’s
defaultSG on newly created file systems) - Open that security group in the VPC console under Security Groups, then click Edit inbound rules and add a rule with:
- Type:
NFS - Protocol:
TCP - Port range:
2049 - Source: the EKS cluster security group (see “Finding the EKS cluster security group” below)
- Type:
Option 2: Use a dedicated security group (recommended if the current one is the VPC
defaultSG):- In the VPC console, go to Security Groups and click Create security group:
- Name: e.g.
efs-castimaging-sg - VPC: the same VPC as your EKS cluster (visible at the top of the EFS Network tab)
- Inbound rules: add one rule
- Type:
NFS - Protocol:
TCP - Port range:
2049 - Source: the EKS cluster security group (see below)
- Type:
- Outbound rules: leave the default (allow all)
- Click Create security group
- Name: e.g.
- Back in the EFS console Network tab, click Manage in the top right
- For each mount target, click the X next to the existing
defaultsecurity group to remove it, then use the Choose security group dropdown to select your newefs-castimaging-sg - Click Save
Finding the EKS cluster security group:
The EKS cluster security group is named
eks-cluster-sg-<cluster-name>-<id>and is automatically attached to every worker node, so allowing it as the source covers all current and future node groups. You can find its ID in the EKS console under your cluster’s Networking tab (listed as Cluster security group), or by running:
aws eks describe-cluster --name <cluster-name> --query "cluster.resourcesVpcConfig.clusterSecurityGroupId" --output text
Ensure that an EFS mount target exists in every Availability Zone where your worker nodes may run. If a pod is scheduled on a node in an AZ without a mount target, the volume mount will time out.
- Proceed with the CAST Imaging installation
Installation process
Before starting the installation, ensure that your Kubernetes cluster is running, all the CAST Imaging docker images are available in the registry and that helm and kubectl are installed on your system.
Step 1 - EKS environment setup
- Create your EKS environment, see EKS - Cluster Setup
- Retrieve cluster credentials:
aws eks update-kubeconfig --region xx-xxxx-x --name my-cluster
- Install
kubectl, see https://kubernetes.io/docs/tasks/tools/ - Install
helm:- Binary download: https://github.com/helm/helm/releases
- Documentation: https://helm.sh/docs/intro/quickstart
Step 2 - Prepare and run the CAST Imaging installation
- Review and adjust the parameter values in the
values.yamlfile (located at the root of the cloned Git repository branch) in between the section separated with # marks. - Ensure you set the
K8SProvider:option toEKS - Run
helm-install.bat|sh(depending on your base OS) located at the root of the cloned Git repository branch
Keycloak component parameters
CAST Imaging uses the Keycloak system to manage all authentication requirements (see Authentication for more information). You should take note of two parameters that you may wish to customize before running the installation:
KeycloakAdminPassword: <default-password>
KCADMIN_USERNAME: kcadmin
-
KeycloakAdminPassworddefines the password for the Keycloakadmin“service” account used for intra-component communication. By default this password is set to “admin” (encrypted in base64). Update this if you wish to change this password e.g. by runningecho -n "my-new-password" | base64to generate a new encrypted password. This password can also be updated post install (see below). -
KCADMIN_USERNAMEdefines the name of the account (kcadminby default with password “admin”) used to login in to the Keycloak UI to administer authentication. Updatekcadminto your preferred account name. Note that this change can only be done BEFORE a new installation.
Step 3 - Configure network settings for console-gateway (main entrypoint) and extendproxy (optional) services
To access those services from outside, you will need to setup a reverse proxy such as an Ingress Service. On AWS, another option is to use a CloudFront.
Choose one of the four options below (Gateway API, NGINX Ingress, Istio, or CloudFront). The first three options share a common Final steps subsection at the end.
Option A: If you want to use a Gateway API implementation
Modern, vendor-neutral Kubernetes ingress using the Gateway API standard.
The Gateway API is the modern, vendor-neutral successor to the Kubernetes Ingress API. CAST Imaging provides a GatewayAPI.yaml template that creates the Gateway and HTTPRoute resources needed to expose console-gateway-service and (optionally) extendproxy. The template has been tested with NGINX Gateway Fabric (NGF), but the Gateway / HTTPRoute resources are portable to any conformant implementation (Istio, Envoy Gateway, etc.).
- Set
UseGatewayAPI: trueinvalues.yaml:
UseGatewayAPI: true
- Install the Gateway API CRDs on the cluster (if not already installed):
kubectl apply -f https://github.com/kubernetes-sigs/gateway-api/releases/download/v1.5.1/standard-install.yaml
- Install a Gateway controller. For NGINX Gateway Fabric:
helm install ngf oci://ghcr.io/nginx/charts/nginx-gateway-fabric --create-namespace -n nginx-gateway
Verify the installation:
kubectl get gatewayclass
kubectl get pods -n nginx-gateway
-
Configure the
Gatewayresource invalues.yaml. Two options are supported:- Option 1 - Create a new Gateway dedicated to CAST Imaging (default):
Gateway: create: true className: nginx # Use "nginx" for NGF, or the gatewayClassName of your controller- Option 2 - Attach to an existing shared Gateway already deployed on the cluster:
Gateway:
  create: false
  name: my-shared-gateway
  namespace: my-gateway-namespace
When attaching to an existing Gateway, it must already define listeners named
https(andhttps-extendifExtendProxy.enableistruewith a different hostname for the extend proxy). The shared Gateway’s listener must also allow routes from the CAST Imaging namespace (allowedRoutes.namespaces.from: Allor a matchingSelector). -
Create TLS Secret(s) using the certificate files associated to the DNS name(s) you are planning to use. The secrets must be created in the CAST Imaging namespace (Gateway listeners read certificates from the Gateway’s own namespace, unless a
ReferenceGrantis used):
kubectl create secret tls tls-secret-cast --cert=my-cert-folder\myhostname.com\fullchain.pem --key=my-cert-folder\myhostname.com\privkey.pem -n castimaging-v3
# Optional (only needed if you are deploying ExtendProxy):
kubectl create secret tls tls-secret-cast-extend --cert=my-cert-folder\myextendhostname.com\fullchain.pem --key=my-cert-folder\myextendhostname.com\privkey.pem -n castimaging-v3
# (fullchain.pem <=> tls.crt ; privkey.pem <=> tls.key)
If you are deploying ExtendProxy (optional) and want to use the same hostname for both services, just create the 2 secrets using the same certificate files.
The standard Gateway API has no portable equivalent to the NGINX Ingress proxy-body-size annotation. When Gateway.className is nginx or ngf, the chart additionally creates ClientSettingsPolicy resources (an NGF-specific extension) to raise the client body size limit for the main route and the extendproxy route. These policies are applied via Helm post-install / post-upgrade hooks so they reconcile after their target HTTPRoutes. Other Gateway implementations (Istio, Envoy Gateway, etc.) handle body size limits through their own native resources, and these policies are not rendered.
➡️ Continue with the Final steps (Gateway API, Istio or NGINX Ingress) subsection below.
Option B: If you want to use a Kubernetes NGINX Ingress
Traditional Kubernetes Ingress backed by the NGINX Ingress controller.
- Set
CreateIngress: trueinvalues.yaml:
CreateIngress: true
- Install the Ingress driver on the cluster:
helm repo add ingress-nginx https://kubernetes.github.io/ingress-nginx
helm repo update
helm install ingress-nginx ingress-nginx/ingress-nginx --namespace ingress-nginx --create-namespace --set controller.service.annotations."service\.beta\.kubernetes\.io/aws-load-balancer-type"="nlb"
- Create TLS Secret(s) using the certificate files associated to the DNS name(s) you are planning to use:
kubectl create secret tls tls-secret-cast --cert=my-cert-folder\myhostname.com\fullchain.pem --key=my-cert-folder\myhostname.com\privkey.pem -n castimaging-v3
# Optional (only needed if you are deploying ExtendProxy):
kubectl create secret tls tls-secret-cast-extend --cert=my-cert-folder\myextendhostname.com\fullchain.pem --key=my-cert-folder\myextendhostname.com\privkey.pem -n castimaging-v3
# (fullchain.pem <=> tls.crt ; privkey.pem <=> tls.key)
If you are deploying ExtendProxy (optional) and want to use the same hostname for both services, just create the 2 secrets using the same certificate files.
➡️ Continue with the Final steps (Gateway API, Istio or NGINX Ingress) subsection below.
Option C: If you want to use an Istio Ingress Gateway
Service-mesh-based ingress using Istio.
- Set
CreateIstioGateway: trueinvalues.yaml:
CreateIstioGateway: true
Note that Istio may be already installed on your cluster. Please check with your administrator.
- Install Istio on the cluster (Linux/Mac):
curl -L https://istio.io/downloadIstio | sh -
cd istio-*
export PATH=$PWD/bin:$PATH
istioctl install --set profile=default -y
- Install Istio on the cluster (Windows - PowerShell using Chocolatey):
choco install istioctl
istioctl install --set profile=default -y
- Install Istio on the cluster (Windows - PowerShell using manual download and install of a specific version)
$ISTIO_VERSION="1.28.4"  # Check https://github.com/istio/istio/releases for latest
Invoke-WebRequest -Uri "https://github.com/istio/istio/releases/download/$ISTIO_VERSION/istio-$ISTIO_VERSION-win.zip" -OutFile "istio.zip"
Expand-Archive -Path "istio.zip" -DestinationPath "." -Force
cd "istio-$ISTIO_VERSION"
$env:PATH = "$PWD\bin;$env:PATH"
istioctl install --set profile=default -y
- Optional - If you want to use a specific Istio Gateway already deployed on your cluster, set the gateway name in ExistingIstioGatewayName:
UseIstioGateway: true
ExistingIstioGatewayName: "some-namespace/my-gateway"
- Create TLS Secret(s) using the certificate files associated to the DNS name(s) you are planning to use (to be created in the istio-system namespace):
kubectl create secret tls tls-secret-cast --cert=my-cert-folder\myhostname.com\fullchain.pem --key=my-cert-folder\myhostname.com\privkey.pem -n istio-system
# Optional (only needed if you are deploying ExtendProxy):
kubectl create secret tls tls-secret-cast-extend --cert=my-cert-folder\myextendhostname.com\fullchain.pem --key=my-cert-folder\myextendhostname.com\privkey.pem -n istio-system
# (fullchain.pem <=> tls.crt ; privkey.pem <=> tls.key)
If you are deploying ExtendProxy (optional) and want to use the same hostname for both services, just create the 2 secrets using the same certificate files.
➡️ Continue with the Final steps (Gateway API, Istio or NGINX Ingress) subsection below.
Final steps (Gateway API, Istio or NGINX Ingress)
Common steps that apply to Options A, B, and C above. Skip this subsection if you chose CloudFront (Option D).
Optional - When Gateway API, Istio or NGINX Ingress is implemented to access the console-gateway service with a certificate that cannot be verified (e.g., self-signed certificate or internal CA), the certificate will need to be stored in CAST auth-service to avoid certificate validation errors:
- set:
UseCustomTrustStore: trueinvalues.yaml - Insert the encoded certificate:
- directly inside the
auth.caCertificatevariable invalues.yaml - or using
helm upgrade ... --set-file auth.caCertificate=ca.crt ...to override the variable value with theca.crtfile content
- directly inside the
UseCustomTrustStore: true
auth:
  caCertificate: |
    -----BEGIN CERTIFICATE-----
    XXXXXXXXXXXXXXXXXXXXXXXXXXXXXXXXXXXXXXXXXXXXXXXXXXXXXXXXXXXXXXXX
    XXXXXXXXXXXXXXXXXXXXXXXXXXXXXXXXXXXXXXXXXXXXXXXXXXXXXXXXXXXXXXXX
    XXXXXXXXXXXXXXXXXXXXXXXXXXXXXXXXXXXXXXXXXXXXXXXXXXXXXXXXXXXXXXXX
    -----END CERTIFICATE-----
- Set hostnames in values.yaml
FrontEndHost: https://myhostname.com
ExtendProxy
  enable: false
Exposed URLs will be:
https://myhostname.com(orhttps://myhostname.com/mycontextifContextUrlis enabled)
If you are also deploying ExtendProxy (optional), choose one of the two sub-options below:
- Set hostnames in values.yaml - same-hostname-option: use the same hostname for all services
FrontEndHost: https://myhostname.com
ExtendProxy
  enable: true
  exthostname: myhostname.com
Exposed URLs will be:
-
https://myhostname.com(orhttps://myhostname.com/mycontextifContextUrlis enabled) -
https://myhostname.com/extendproxy -
Set hostnames in values.yaml - different-hostname-option: use a different hostname for each service:
FrontEndHost: https://myhostname.com
ExtendProxy
  enable: true
  exthostname: myextendhostname.com
Exposed URLs will be:
-
https://myhostname.com(orhttps://myhostname.com/mycontextifContextUrlis enabled) -
https://myextendhostname.com/extendproxy -
Apply the
helmchart changes by runninghelm-upgrade.bat|sh(depending on your base OS) located at the root of the cloned Git repository branch. -
Create a DNS record pointing at the reverse proxy external IP address. To retrieve the external IP:
# For NGINX Gateway Fabric, use this command:
kubectl get svc -n nginx-gateway
#
# For an NGINX Ingress, use this command:
kubectl get ingress -n castimaging-v3
#
# For an Istio Ingress, use this command:
kubectl get service istio-ingressgateway -n istio-system
Option D: If you want to use a CloudFront
AWS-native distribution using CloudFront in front of the gateway service.
First get the imaging-services “gateway” service external host name by running kubectl get service -n castimaging-v3 console-gateway-service, which will return similar to: a8ec2379b09fexxxxxxxxx-532570000.us-east-2.elb.amazonaws.com.
Create a new CloudFront entry in the AWS Console by clicking Create distribution:
-
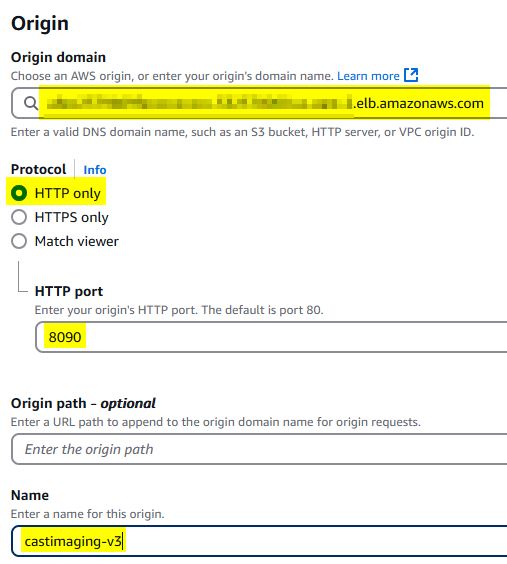
In the Origin block:
- Set the Origin domain value to the
imaging-services“gateway” service external host name, e.g.:_a8ec2379b09fexxxxxxxxx-532570000.us-east-2.elb.amazonaws.com - Set Protocol to
HTTP only - Set HTTP port to
8090 - Set Name to:
castimaging-v3
- Set the Origin domain value to the
-
In the Web Application Firewall (WAF) block, select
Do not enable security protections

-
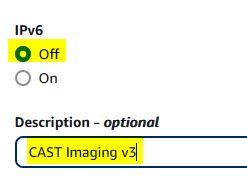
In the Settings block:
- Set IPv6 to
Off - Set Description (optional): free text description
- Set IPv6 to
-
Leave all other settings at their default
-
Click Create distribution button in the bottom right corner to complete the creation process
-
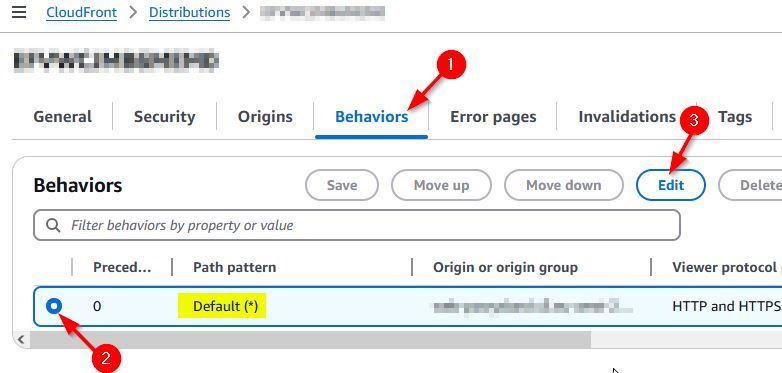
Click the Behaviors tab in the newly created Distribution:
- Select
Default (*)and click Edit:
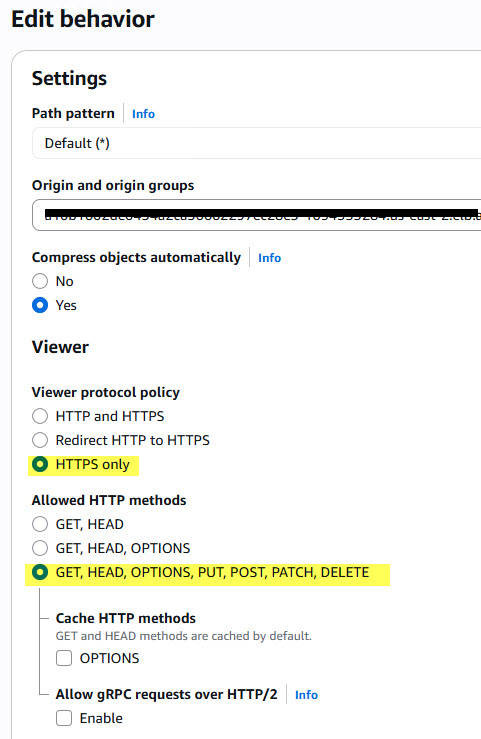
- Select
 - In Viewer protocol policy, select these options:
 - In Cache key and origin requests section, select these options:
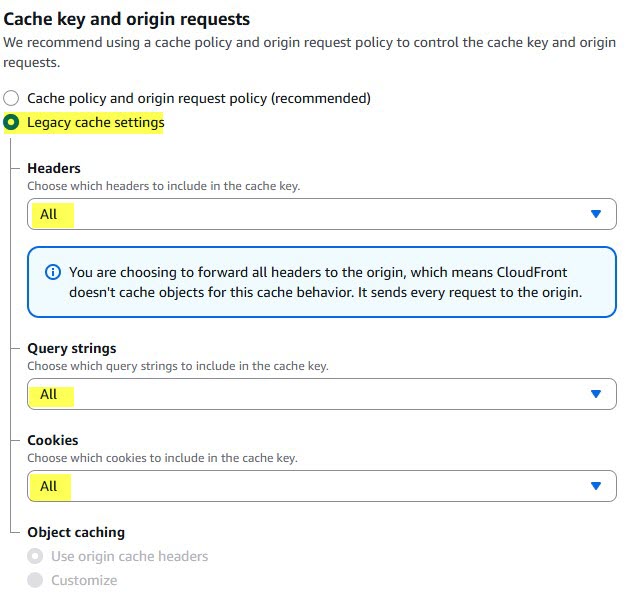 - Save the changes
- In the General tab for the newly created Distribution ensure that you copy the Distribution domain name value:
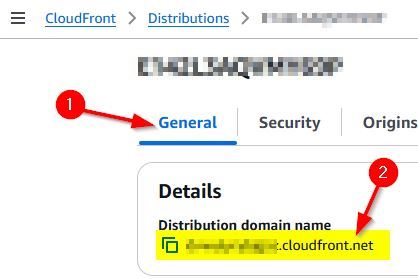
- Now open the
values.yamlfile (located at the root of the cloned Git repository branch) and update theFrontEndHostvariable with the Distribution domain name you copied previously, e.g.https://xxxxxxxxxxx.cloudfront.net - Apply the
helmchart changes by runninghelm-upgrade.bat|sh(depending on your base OS) located at the root of the cloned Git repository branch. CAST Imaging will be available at https://xxxxxxxxxxx.cloudfront.net .
Step 4 - Install Extend Local Server (optional)
To install Extend Local Server:
- In
values.yaml(located at the root of the cloned Git repository branch), setExtendProxy.enabletotrueand update theExtendProxy.exthostnamevariable with the DNS name. In case you want to access it thru its Load Balancer (set “CreateLoadBalancer: true”), use the LoadBalancer external IP address instead or the DNS name (kubectl get service -n castimaging-v3 extendproxyto get the IP):
ExtendProxy:
    enable: true
    exthostname:  myextendhost.com # or LoadBalancer external IP address
- Run
helm-upgrade.bat|sh(depending on your base OS) located at the root of the cloned Git repository branch. - Review the log of the
extendproxypod to find the Extend Local Server administration URL and API key (these are required for managing Extend Local Server and configuring CAST Imaging to use it - you can find out more about this in Extend Local Server). You can get theextendproxypod name by runningkubectl get pods -n castimaging-v3then runkubectl logs -n castimaging-v3 castextend-xxxxxxxxto display the log. - In Console System Settings, use this value for the “CAST Extend URL”: http://extendproxy:8085
Step 5 - Initial start up configuration
License and Extend API key steps can be skipped if values were provided for these helm chart variables:
- ImagingLicenseType
- ImagingLicense
- ExtendApiKey
If not, when the install is complete, browse to the FrontEndHost URL and login using the default local admin/admin credentials. You will be prompted to configure:
- your licensing strategy. Choose either a
Named Applicationstrategy (where each application you onboard requires a dedicated license key entered when you perform the onboarding), or aContributing Developersstrategy (a global license key based on the number of users):
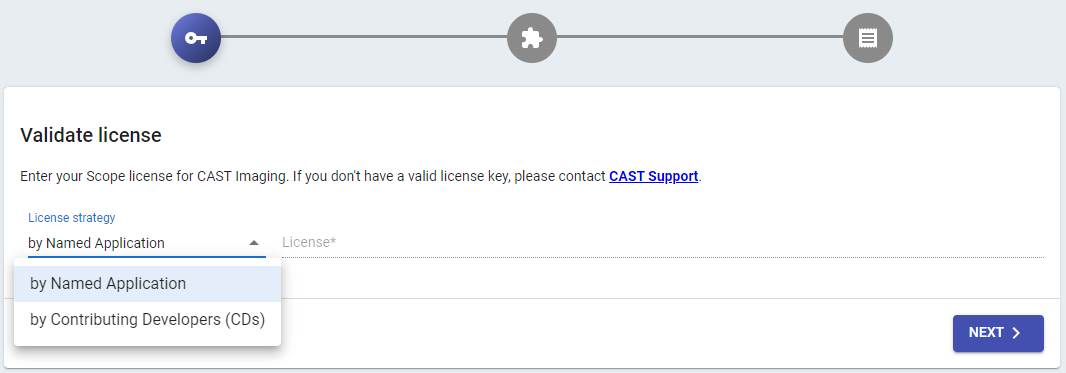
- CAST Extend settings / Proxy settings (if you chose to install Extend Local Server (see Step 4 above) then you now need to input the URL and API key so that CAST Imaging uses it).
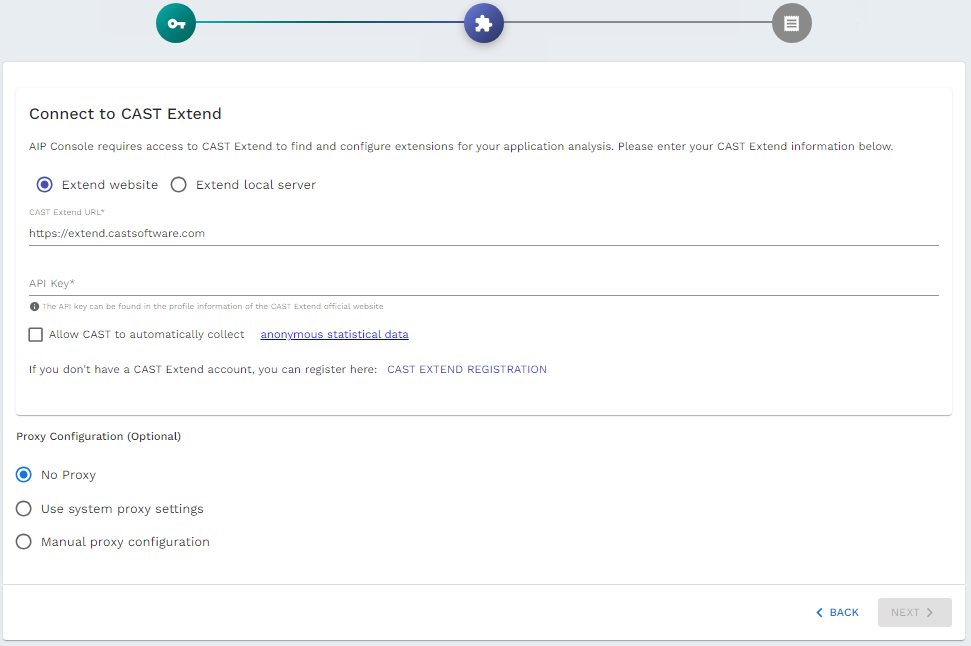
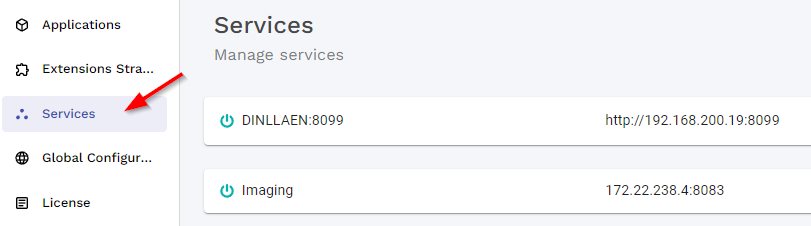
As a final check, browse to the URL below and ensure that you have at least one CAST Imaging Node Service, the CAST Dashboards and the CAST Imaging Viewer components listed:
https://xxxxxxxxxxx.cloudfront.net/admin/services
Step 6 - Configure authentication
Out-of-the-box, CAST Imaging is configured to use Local Authentication via a simple username/password system managed by Keycloak. Default login credentials for CAST Imaging are provided (admin/admin) with the global ADMIN profile so that installation can be set up initially.
CAST recommends configuring CAST Imaging (via the Keycloak component) to use your on-premises enterprise authentication system such as LDAP or SAML Single Sign-on instead before you start to onboard applications. To access the Keycloak UI to configure your authentication system, use the kcadmin account. See Authentication for more information.
Updating the Keycloak admin service account password post installation
Out-of-the-box Keycloak is provisioned with a service account used for intra-component communication with the credentials admin/admin. If you need to change this password post-installation, follow the steps below:
Change the password via the UI
- Navigate to the Keycloak account security page using the following URL (replace
<public-external-url>with your installation’s external URL):
https://<public-external-url>/auth/realms/master/account/account-security/signing-in
- Log in with the default credentials (
admin/admin) - Update the password through the account settings interface
Update the password in the Helm Chart
After changing the password in the Keycloak UI, you must update the Helm chart configuration to match.
- Encode your new password in base64 format. On a Linux machine, run:
echo -n "my-new-password" | base64
The -n flag prevents adding a newline character to the encoded output.
- In your cloned Git repository containing the CAST Imaging Kubernetes installation files, open:
values.yaml
- Locate this line:
KeycloakAdminPassword: <default-password>
- Replace the defined password with your base64-encoded password:
KeycloakAdminPassword: <your-base64-encoded-password>
- Example: If your base64 output is
bXktbmV3LXBhc3N3b3Jk, the line should read:
KeycloakAdminPassword: bXktbmV3LXBhc3N3b3Jk
Apply changes
Run Util-ScaleDownAll.bat and helm-upgrade.bat to restart CAST Imaging and apply the changes.
How to start and stop CAST Imaging
Use the following script files (located at the root of the cloned Git repository branch) to stop and start CAST Imaging:
Util-ScaleDownAll.bat|shUtil-ScaleUpAll.bat|sh
Optional setup choices - Use an external PostgreSQL instance
If you do not want use the PostgreSQL instance preconfigured in this helm chart, you can disable it and configure an Amazon RDS for PostgreSQL database instead.
-
Setup your Amazon RDS for PostgreSQL database
- PostgreSQL 15 - 8GB RAM minimum recommended
- Instance must be configured with “Self managed” credentials
-
In
values.yaml:- Set
CastStorageService.enabletofalse(will disable the embedded PostgreSQL installation) - Set
CustomPostgres.enabletotrue - Set
CustomPostgres.hostandCustomPostgres.portto match your custom database host name and port number - Set
CustomPostgres.adminloginandPostgresDbPasswordto match the superuser login name and password of your custom database
- Set
-
Proceed with the CAST Imaging installation described above
Kubernetes storage location information
For information about storage locations used across the containers in a CAST Imaging Kubernetes deployment (for example persistent volumes, ConfigMap-backed configuration files, Secrets, and ephemeral (in-memory) volumes), see Kubernetes storage location information.