In-place component update for Microsoft Windows
Overview
This guide provides instructions for running an in-place update to a new release of CAST Imaging, i.e. using com.castsoftware.imaging.console installed on Microsoft Windows:
- on one single machine
- or via a distributed deployment (multiple machines)
This process will update the following installed components and retain all existing data (applications, results, etc.):
imaging-servicesimaging-vieweranalysis-nodedashboards
Supported update paths
| Source | Target | Supported? |
|---|---|---|
| 3.2.0-funcrel | ≥ 3.3.0-funcrel | ✅ |
| 3.1.0-funcrel | ≥ 3.2.0-funcrel | ✅ |
| 3.0.0-funcrel | ≥ 3.1.0-funcrel | ✅ |
Requirements
- Local administrator privileges (ability to
Run as administrator) - All existing services should be left running during the update (the update script will stop and restart them automatically)
- Sufficient local disk space for the installer package
- A previous CAST Imaging installation should exist on the target machines
- In a distributed deployment scenario all components MUST be updated to the same new release (i.e. you cannot update just the
analysis-nodecomponent or just theimaging-servicescomponent) - It is not possible to change the TCP port number of any service, nor any
HOSTNAME_xxxtype installation variable as part of the update process.
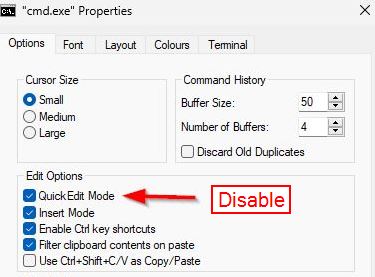
For Microsoft Windows, CAST recommends disabling Quick Edit mode in your command (CMD) window before running the update. This mode (if enabled) will pause the batch script if there is any interaction with the command window (e.g. a mouse click) during the process and will not re-start the script until a key is pressed:
Update process
Step 1 - Download and extract the installer
- Download the latest release of the CAST Imaging installer
- Extract the ZIP file to any location on your local disk. For distributed deployments, repeat this download and extraction on each machine that requires updating
Step 2 - Configure the *.conf file
- Locate the relevant
*.conffile at the root of the extracted files - Open with a text editor. For example:
- single machine installation: edit
config-all.conf - distributed installation: edit
config-imaging-services.conf,config-imaging-viewer.conforconfig-analysis-node.confto match the component installed on the current machine
- single machine installation: edit
- Modify the file to ensure that all parameters EXACTLY match those that were used in the same file when installing the previous release. You can find an explanation of the parameters in Microsoft Windows installation variables.
Step 3 - Run the update
Navigate to the root of the extracted files, open a CMD window with elevated permissions (right click, Run as administrator) and run the appropriate command based on your deployment type:
For single machine deployment
cast-imaging-update.bat package=all
For distributed deployment
cast-imaging-update.bat package=imaging-services
cast-imaging-update.bat package=imaging-viewer
cast-imaging-update.bat package=analysis-node
In a distributed installation, components can be updated in any order.
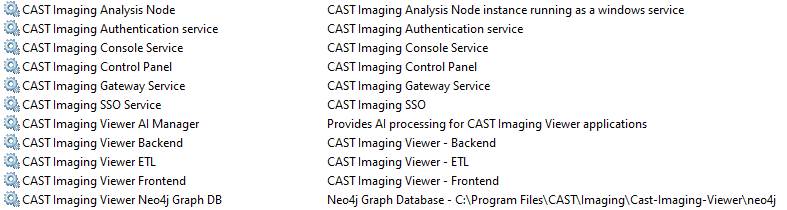
Step 4 - Verify update success
- Check all Microsoft Windows services are up and running (the screenshot below is for a single machine installation):
- Verify services in the CAST Imaging admin panel:
- Navigate to the Services settings page
- Confirm all services show green status indicators:

Next steps
If you need to update applications to a new release of CAST Imaging Core (if provided), see In-place core and application update.