Created by James Hurrell, last modified on Nov 30, 2021
Creating Connection Profiles |  |
 Note that if you have installed the CAST Storage Service and CAST Server Manager in the same setup execution, the Connection Profile for the CAST Storage Service should be immediately available and there is no need to manually create it.
In order to establish a connection with your chosen database server or CAST Storage Service, you need to create a profile. This can be done with the Add/Edit Connection Profile dialog box.
To access this dialog box:
Creating a Profile
To create a profile:
- Enter the required information in the appropriate fields
- Click the Test button to verify that the connection to the server can be established
- Click OK to save the Profile.
When you have entered all the required information, tested the connection and clicked OK, the Profile will be stored by the application. In addition, the Profile will be automatically displayed in the Open Profile Connection dialog box.
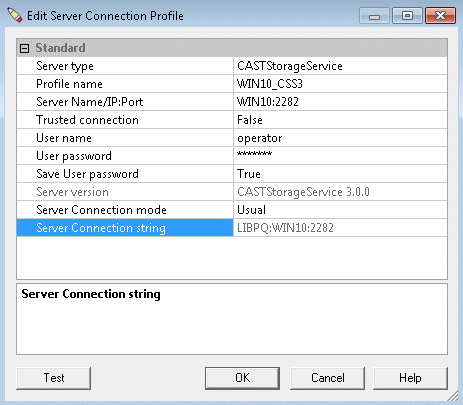
The majority of fields can be altered - some are read only however (gray text).
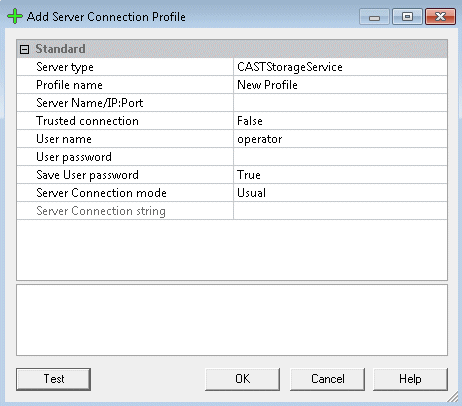
 Standard
This section governs the parameters used to connect to the server of your choice. | Server type | This option enables you to select the type of server you want to establish a connection with. Certain other server specific options will then become available. | | Profile name | The name of your profile can be entered here. CAST recommends entering the name of the server as a profile name, to enable easy recognition. A profile name must not contain characters such as commas ',' or parentheses '(' or ')'. | | Server name/IP:port | Enter the server's Netbios/DNS name followed by the TCP/IP port number (if no port number is defined, CAST Server Manager will presume that that the port is set to 2278). For example- <HOST_NAME/IP_ADDRESS>:2282
- <HOST_NAME/IP_ADDRESS>:2280
If you are using AIP Core ≥ 8.3.40 and connecting to a custom database (i.e. a database other than the default "postgres"), then use the following syntax - <HOST_NAME/IP_ADDRESS>:<PORT>,<custom_database_name>
| | Trusted connection (MS SQL Server only) | Select True or False: - True > This flags the connection as trusted (i.e. uses the current Windows user to establish a connection)
- False > The connection is flagged as non-trusted - you must specify a user name and corresponding password to establish a connection.
Notes - When Trusted connection is set to True:
- do not enter a username and password, these are not passed to the server and the connection may fail if you do
- your current Windows user name must be declared in the target MS SQL Server, otherwise the connection will fail
- and if you are using a defined ODBC data source for your target server, you must ensure that the With Windows NT authentication using the network login ID option is set to "True" in the ODBC data source, and that your current Windows user name is declared in the target MS SQL Server (this is because the "Login ID" and "Password" defined in the ODBC data source are not provided to the connectivity layer when Trusted connection is set to True).
| | User name | Enter a user name that corresponds to an existing login on the server with appropriate privileges for the data you want to exploit. For the CAST Storage Service, the field will be pre-populated with the default login "operator". | | User password | Type the password that corresponds to the above login user name. | | Save User password | Select either True or False as required. If you select False, you will be prompted to supply a password every time you attempt to establish a connection with the server. | | Server connection mode | Select the connection type you want to use:- Usual > Uses the standard connection method defined in the options above
- Connection string > Uses a connection string specified in the option below
| | Server connection string | Only available if you select the Connection string method in the Server connection mode option. Enter a connection string to the server you want to establish a connection with, for example:- LIBPQ:<HOST_NAME/IP_ADDRESS>:<PORT>,<custom_database_name>
|
|
Notes
- This help page will be displayed if you click the Help button in the Edit Knowledge Base Connection Profile dialog box. More information about this specific dialog box can be found in Database/Schema Installation:
See Also
Removing Connection Profiles | Open Profile Connection dialog box | Server-side privileges | Database/Schema Installation
