Introduction
Out of the box, CAST Imaging offers two languages for the display of labels and other UI items via the Preferred Language option in the Preferences panel:
- English (en_US) - default
- Chinese (zh_CN)
Instructions below explain how to add your own custom language.
Step 1 - Translate and rename the default file
Locate the en.json file on the machine running your CAST Imaging installation (this file contains all the UI label text in English):
%PROGRAMFILES%\CAST\ImagingSystem\nginx\html\locales\en.json
Copy this file somewhere else on your local machine so that you can modify it for your own custom language. Use an auto translate service such as https://translate.i18next.com/ which is designed to accept .json files as input. Now rename the file to match your custom language, for example fr.json for French.
Step 2 - Add your custom language to your install
Locate the app-config.js file in your CAST Imaging installation:
%PROGRAMFILES%\CAST\ImagingSystem\nginx\html
Find the following line and add in your custom language (French in this example):
languages: [{ 'Chinese': 'ch' },{ 'French': 'fr' }], // Add new languages e.g., [{LanguageName: languageCode}, {'': '' }]
Where:
- LanguageName (e.g., 'French') is the name of the language as it will appear in the UI - this must match the locale used in the languageCode entry.
- languageCode (e.g., 'fr') represents the language. This must match the name of the corresponding .json file, e.g. fr.json.
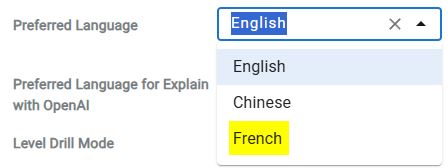
Step 3 - Enable the custom language in the UI
Finally, restart the following Microsoft Windows service to ensure your changes are taken into account:
- CAST Imaging Frontend Service
You may also need to empty your browser cache before the new language option appears: