Created by James Hurrell on Apr 16, 2021
Log Window |  |
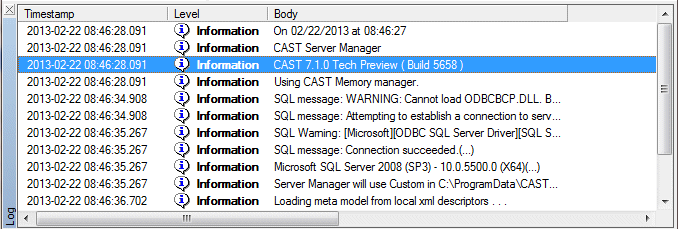
The Log Window will launch automatically when you first start the application. This window logs any messages or error messages sent from the server or the application. This logging of messages can help localize a problem very quickly. CAST can also use the log file to diagnose serious errors.

How does it work?
Each time a warning or an error (i.e. from the server) is received a new message is displayed in the Log Window - in other words a new line will be created. For each message displayed in the list, information will be provided via a variety of different columns. The information displayed in the Log Window is stored in temporary files (*.tmp) on your hard drive, on a "per-application" basis in the default log location (see Messages and Errors tab).
The contents of this folder is associated to each session created by each CAST application that has been executed on the workstation by the specific user. You can delete the contents of this temporary folder if you need to free up space on your hard disk, however, make sure that you kill all CAST applications before doing so.
 Using the Log Window
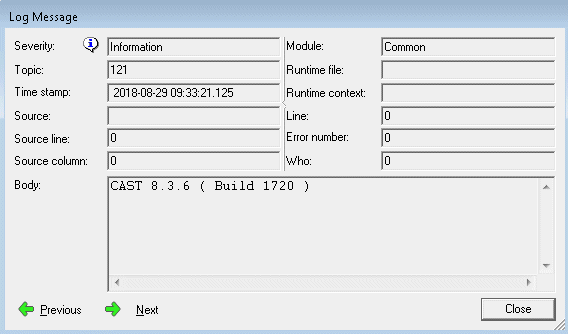
| In default mode, messages are displayed in the Log Window in a single row with various pieces of information in a variety of columns. To receive a summarized view of the message, double click it. This will launch the Log Message dialog box: 
This dialog box displays the same information that can be found in the various columns in the Log Window. Use the Previous and Next buttons to scroll through the list of messages displayed in the Log Window. |
 Shortcut menu
The Log Window has a right click shortcut menu that provides an extensive list of functions enabling you to modify the display of messages. Each option is explained below: | Icon | Shortcut Key | Name | Description |  | - | Information | Provides information regarding the Log Window: - Number of rows (Rows)
- Number of selected rows (Selected)
- Position of selected row in the list (Current)
|  | CTRL+A | Select All | Selects all messages in the Log Window. |  | CTRL+F | Find | Launches a Find dialog box enabling you to search for any character string within the Log Window. All columns are included in the search. |  | CTRL+C | Copy | Copies selected message body and places it in the clipboard. |  | ALT+E | Export selection... | Allows you to save the selected message as a .TXT, a .CSV or as an .XML file. | | | | Use visible columns only | - Activated: when copying messages (using the Copy option) or searching for messages (using the Find option), only the column headings that are visible in the Log Window will be used.
- Deactivated: when copying messages (using the Copy option) or searching for messages (using the Find option), all column headings will be used.
|  | - | Column Picker... | Launches the Column Picker. |  | ALT+C | Configure View... | Launches the Log Configuration dialog box. |  | F5 | Refresh | Refreshes the Log Window. | | - | ALT+R | Show as Report | Toggles the display mode. The default mode is activated - Activated: shows a summarized view of the warning and error messages with one message per line.
- Deactivated: shows messages in traditional "raw" form. A row is retained at the top of the dialog box to summarize a selected message.
| | - | ALT+H | Show Header | Toggles the display of the column header. - Activated: column names will be displayed
- Deactivated: column names are hidden
| | - | ALT+P | Show Preview | Toggles the display mode. The default mode is deactivated. - Activated: the message body is displayed in traditional "raw" form.
- Deactivated: the message is shown in contracted form.
| | - | SPACE | Follow Mode | Toggles the way the messages are scrolled: - Activated: each time a message appears in the log, the list will scroll down.
- Deactivated: the list never scrolls down. Messages are appended without scrolling.
|  | Del | Clear | Clears the entire contents of the Log Window. |  | - | Open... | Opens the log file. | |
 Log Configuration dialog box
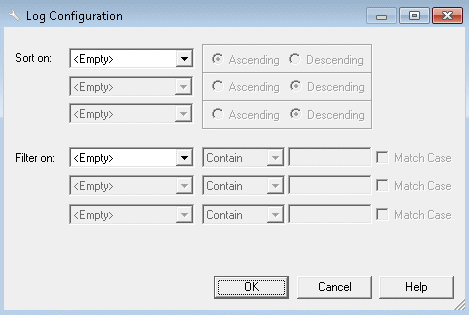
The Log Configuration dialog box enables you to configure sort orders and filters for the Log Window. To launch it: - Use the Configure View option from the right click shortcut menu
- Or use the shortcut key ALT+C

Sort on Use this section to create a sort order for the various columns. You can sort messages on up to three columns in ascending or descending order. Filter on Use this section to create a filter for the various columns: - Specify the column you want to apply the filter on
- Choose a specifier (Contain, Not Contain, Not Empty)
- Enter the character string and specify if you want to match the case
 Notes Notes
- Please note that if you configure two or more conditions in this dialog box, they will be treated as OR conditions, i.e. Condition1 OR Condition2, and not Condition1 AND Condition2.
|
 Columns
Those marked (default) are displayed by default, others can be selected using the Column Picker. You can also remove existing columns from the Log Window by dragging and dropping them into the Column Picker. | Timestamp (default) | Marks the time the message arrived at the application. | | Level (default) | Severity level of the message. | | Topic | A character string that automatically describes the nature of subject of the message. Allows you to easily identify the context in which the error was caused. | | Error Number | Number of the associated message. Not all messages have error numbers - in which case, their value will equal zero (0). | | Line | Indicates the line number of the file in the Log "engine" that generated the message. This file is known as the "runtime file". | | Runtime File | Indicates the name of the file in the Log "engine" that generated the message. | | Source | Indicates the name of the function in the runtime file that caused a problem to be generated. | | Module | Name of the individual module (dll or exe) in which the error message was generated. | | Body (default) | Represents the body of the displayed message. E.g.: Error has been detected during the analysis. | | Source Line | Identifies the line in the external file that is being analyzed (not valid for all CAST applications). The external file is the file that the CAST application is currently analyzing. E.g.: If the client requests the synchronization of a procedure "server.database.object_name", then the displayed number will correspond to this line of script in the procedure. | | Runtime Context | Identifies the full name of the file or script being analyzed. E.g.: "server.database.object_name" | | Who | This number allows CAST to identify the module that sent the message. In general, this number represents the process id or the thread id. | | Source Column | Identifies the column in the external file that is being analyzed (not valid for all CAST applications). The external file is the file that the CAST application is currently analyzing. E.g: If the client requests the synchronization of a procedure "server.database.object_name", then the displayed number will correspond to this column of the script in the procedure. | |
 Column Picker
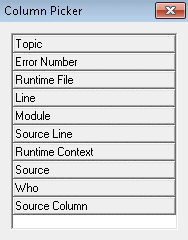
| The Column Picker enables you to specify which columns you want to display in the Log Window (and thus what information is also displayed). By default, several columns are displayed in the Log Window supplying a variety of information. There are however other available columns that can be added to the Log Window. To do so: - Right click in the Log Window
- Select Column Picker from the shortcut menu:
 - This dialog box contains a list of the columns that are not already displayed in the Log Window.
- Select the column you want to add to the Log Window.
- Drag it into the Log Window and release at the appropriate position
 Notes Notes
- Please note that you can also remove columns from the Log Window by dragging them in to the Column Picker.
|
 Log File
| The Log Window has an associated Log File that automatically records the contents of the Log Window for viewing at a later date. If you want to find out more about how to configure this, click here. |
 Deactivating the Log Window
| You may need to deactivate the Log Window if you reach the limit of available disk space. When the Log Window is deactivated, all messages sent by the application and/or server will be written to the Log File instead and will no longer be displayed in the Log Window. If required, you can still open the log file and view the contents in the Log Window. To deactivate the Log Window, please add the following information to the local application .INI file (i.e.: for Server Manager > ServMan.INI). [Messages & Errors]deactivate_logwnd_on_startup = off Where ON = activate the Log Window and OFF = deactivate the Log Window. All values are case insensitive. |
See Also
Messages & Errors tab


