How to restore an Oracle schema dump performed with the Cast Support Tool.
Release | Yes/No |
|---|---|
| 8.2.x | |
| 8.1.x | |
| 8.0.x | |
| 7.3.x |
RDBMS | Yes/No |
|---|---|
| Oracle Server | |
| Microsoft SQL Server | |
| CSS2 | |
| CSS1 |
Make sure you have 32 bit Oracle client installed in the machine where you are running the restoration process.
Any other installation will lead to connection issue.
Use the "Administrator" installation, then use the attached tnsnames.ora file (to be installed in <ORACLE CLIENT INSTALL FOLDER>\client\network\admin\tnsnames.ora). Edit the tnsnames.ora to match with your Oracle server name
1.Create an Oracle user, below are the sql command run it sequentially.
Create Tablespace CB811_7284_SFR_LOCAL_DATA Nologging Datafile 'D:\CB811_7284_SFR_LOCAL_DATA.DBF' Size 500M Reuse Autoextend On Next 250M MaxSize Unlimited Extent Management Local Segment Space Management Auto
Create User CB811_7284_SFR_LOCAL Identified By CB811_7284_SFR_LOCAL Default Tablespace CB811_7284_SFR_LOCAL_DATA Quota Unlimited On CB811_7284_SFR_LOCAL_DATA Quota Unlimited On SYSTEM
Grant Connect, Create Table, Create Procedure, Create Sequence, Create Synonym, Create Trigger, Create Database Link, Create View, Select Any Dictionary To CB811_7284_SFR_LOCAL With Admin Option
2. Launch the restore process :
CASTSupportTool.exe -restore <schema.shk> -host <oracle server> -port 1521 -user <schema> -password <password> -schema <schema> -SID <oracle sid> -oraclebin <oracle installation path>\bin
 -log <log file name>
Sample:
CASTSupportTool.exe -restore C:\CastDBManager\File\import\PLT\KB_IGSS_1.shk -host O11SUP -port 1521 -user CB811_7284_SFR_LOCAL -password CB811_7284_SFR_LOCAL -schema CB811_7284_SFR_LOCAL -SID O11SUP -oraclebin C:\oracle\product\11.2.0\dbhome_1\bin -log C:\catdbmanager\log\KB_IGSS_1_new.import.log
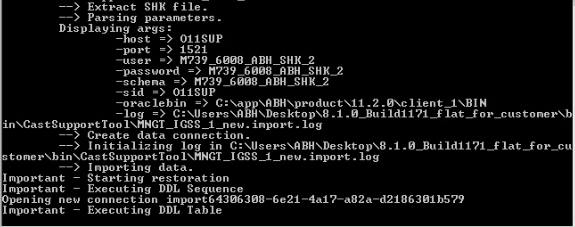
Once you run the above command in the command line you will get the below in the command line:

Open the task manager and check the 7za.exe process and wait till the CPU usage of that process gets 0 which means that 7za has extracted the required files from .shk file, kill this process once the CPU usage is 0, please find the below screen shot:

Once you kill this process the restoration process move further, please find the screen shot below:
The process will finish with the below info in the command line:
