- Introduction
- Preferences
- Landing Page
- Preferred Language
- Preferred Langugage for "Explain with OpenAI"
- Saved views drill mode
- Level Drill Mode
- Preferred graph layout
- Maximum number of views
- Node Limit / Edge Limit
- Notify objects count
- Object Name Limit
- Path finder
- Application walkthrough (animation)
- Tutorial
- Welcome Guide
- Objects export
- Notify for Saving Views
- Advanced Search Configurations
- Download sample tutorial
Introduction
The Preferences option is available in the user menu:

It enables you to set various system wide display preferences as described below:

When you make a change to an option, ensure you use the Update button to save the preferences.
Preferences
Landing Page
Allows you to select the default application landing page. CAST Imaging provides the following landing page options:
- Welcome Page: This is the default setting out of the box providing you with a dedicated "Welcome Page" for your application. The Welcome Page shows details about the application (total number of objects, LOC value, number of transactions etc.) and provides buttons to load tailored views of the items in the application (e.g. : all Database Tables, all Modules etc.).
- Imaging Menu: This option will direct you to the application detail whenever the application name is selected, therefore bypassing the Welcome Page.

Preferred Language
Allows you to select a system wide language. Out of the box, CAST Imaging will use English (en_US) as the default language display option for all menu options and texts. CAST Imaging also provides the following language options:
- English (en_US)b
- Chinese (zh_CN)

Preferred Langugage for "Explain with OpenAI"
Allows you to select the language in which you prefer to view the OpenAI Explanation. CAST Imaging will use English (en_US) as the default language display option. The following languages are supported: English, Chinese, Italian, German, and French. This feature is available for both OpenAI and Azure AI.

Saved views drill mode
This option governs how Saved views are accessed:

| List mode | In List mode, Saved views are listed in the drop down to the left of the main view:
|
|---|---|
| Graph mode | In Graph mode, Saved views are displayed in vignettes in the main view:
|


Level Drill Mode
This option governs how the double-click drill down action behaves for Level 5 views:

| Children only (default) | This option is the default drill down behaviour. Only direct children of the selected node will be displayed at Objects level. Note that if child objects can be "grouped by communities" then this layout will always be used, i.e. the direct children of the selected node will be grouped together by community. |
|---|---|
| Children + caller/callee | When selected, direct children of the selected node and any objects calling or called by the selected node will be displayed at Objects level. Note that if the child objects and their caller/callees can be "grouped by communities" then this layout will always be used, i.e. the direct children of the selected node and their caller/callees will be grouped together by community. |
Preferred graph layout
Allows you to select the preferred default graph layout mode all scopes and views

When set, the corresponding option in the User Guide - GUI - Investigate panel will reflect the change (in the example below, the preferred layout is set to Force:

| Item | Description |
|---|---|
| Automatic (available in ≥ 2.17) | The default option (in ≥ 2.17) for all scopes and views, but can be overridden:
The left hand User Guide - GUI - Investigate panel will indicate when an Automatic layout is being used:
|
| Sequential | Default option for ≤ 2.16. Positions nodes and objects in sequence horizontally:
|
| Force | Positions nodes and objects in so that all the links are of more or less equal length and there are as few crossing links as possible, by assigning forces among the set of links and objects/nodes, based on their relative positions:
|
| Hierarchical | Positions nodes and objects in sequence vertically:
|
| Grid | Positions nodes and objects in a grid:
|


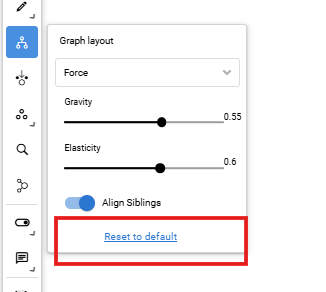
Behaviour in ≥ 2.20.6
The Preferred Graph Layout option has been removed from the Preferences dialog in ≥ 2.20.6 and instead layout selection is managed directly within the graph or workplan view using the Layout action menu item based on the chosen scope. The system will now remember the chosen layout separately for each scope (e.g., Application, Transaction, Data Call Graph etc). If the current layout in the current scope is modified, the customization will persist for that specific scope until a reset is performed using the "Reset to default" option shown below - using this option will:
- Revert the layout to the system default for the current scope.
- Remove any custom changes that were made.
Note that:
- When a default layout is applied, the layout dropdown shows a label prefixed with “Default” (e.g., "Default Sequential). This helps clearly distinguish between system-defined and user-customized layouts.
- Resetting or changing the layout in one scope does not affect other scopes.
Maximum number of views
This option sets the maximum number of views (vignettes) that can be created using the ![]() icon (see User Guide - GUI - Menus and Icons):
icon (see User Guide - GUI - Menus and Icons):
![]()
In releases ≥ 2.16, the options "Maximum number of views" and "Create view" ![]() (available in Saved view and Custom view) are removed.
(available in Saved view and Custom view) are removed.
Node Limit / Edge Limit
A progressive rendering mechanism exists so that very large and complex displays can load in a satisfactory period of time. When accessing a node (double click) which contains more than 1000 child nodes, or more than 2000 edges, the progressive rendering system is invoked in order to avoid situations where the rendering process locks the browser. Portions of the full graph are displayed progressively in steps and when this occurs, a message will be displayed as shown below - you can click this button to stop the progressive loading (you can find out more in User Guide - GUI - Menus and Icons):
| ≥ 2.10.0 |
|
|---|---|
| ≤ 2.9.0 |
|

The options allow you to modify the thresholds at which this progressive rendering system is invoked, if required. They are set by default to:

Notify objects count
This option sets the threshold (default = 10000) at which a popup is displayed when:
- drilling down on a node in any view
- or switching to the Objects view via the Investigate panel
The popup warns that the resulting view contains a large number of objects - i.e. above the threshold - and that the view may take some time to fully load. Various options are then offered:
| Popup | Description |
|---|---|
| In these releases, the popup gives you the opportunity to cancel the action or to either download a .CSV file containing details about the list of objects in the resulting view or to proceed with displaying the view.
Alternatively you can click the Search Objects button to search for and display specific objects from the resulting view. The Search Objects window functions in a similar way to the Global (all application) Search - see User Guide - Search for items: Click to enlarge
|


Object Name Limit
This option helps you to modify the default value of the Object Name Limit. Default value of Object Name Limit is 40 characters, by modifying this value you may view the Object's full name displayed on multiple lines.

The default value of the option is 40, if any object name is greater than 40 characters it would be trimmed on the graph with ellipses.

If the object name length is less than the specified value then the complete object name would be shown in the graph and if the name is long it would go in the next line in the graph for better visibility. To view the full name, hover the cursor over the object.

Path finder
Available only in CAST Imaging ≤ 2.11. In more recent releases, the Path Finder feature is enabled by default.
This option enables/disables the Path Finder feature.
Application walkthrough (animation)
This option toggles the application walkthrough feature. By default, this feature is enabled and when enabled, an animation is displayed when switching between layers. If you do not require this animation, disable the option:
![]()
Tutorial
This option is only visible to users with the ADMIN role and determines only whether a user with the ADMIN role can use the Tutorial feature. If you want to enable the Tutorial for a non-ADMIN user, please see Admin Center - Users panel.
This option enables or disables the Tutorial for ADMIN users. By default it is disabled. When enabled as shown below, the Tutorial will be displayed on login to CAST Imaging:
![]()

In addition the Tutorial menu item will be displayed in the bottom left corner of the screen:

Welcome Guide

The Welcome Guide option works in conjunction with the User Guide - GUI - Welcome Page. When the Welcome Guide option is enabled (default position), navigating from a tile in the Welcome Guide will automatically display an explanation of the selected tailored view in a pop-up in the bottom left corner. When the Welcome Guide option is disabled, the explanation pop-up is never displayed.
For example, when the option is enabled, clicking Frameworks in the Welcome Page displays the explanation of this tailored view in a pop-up in the bottom left corner:


Objects export

Enables the Download button in the global search box allow you to download to .CSV file all the matching items in the list which have a tick in the checkbox. See also User Guide - Search for items:

Notify for Saving Views
Lets you save multiple views when you are using the multiple tabs feature. This option is enabled by default.

If multiple views are opened and you try to logout/change app/admin center/config center, you will be prompted with the following message: `Are you sure you want to perform this action. You can also choose to save your current investigation.

Advanced Search Configurations
In ≥ 2.13.3, changes have been made to the behaviour of the Advanced Configurations options available in all search dialogs:
- Changing an option in one search dialog will make the same change in all the other search dialogs - i.e., enabling the "Regex pattern" option will enable it across all search dialogs.
- Changing an option in a search dialog will override the default options set in the Preferences dialog - i.e., if the "Regex pattern" option is set to "disabled" in the Preferences dialog and if it is subsequently changed to "enabled" in a search dialog, all other search dialogs will also have "Regex pattern" option set to enabled, regardless of the option set in the Preferences dialog.
- Changes made in a search dialog are valid only for the current user's session - as soon as the user logs out the changes revert to the default options set in the Preferences dialog.

This section allows you to set default search options for the following features
The All Application search (see User Guide - Search for items) |
|
|---|---|
The filter search list in the Transaction and Data Call Graph scopes |
|
| Saved view search |
|
| Application to Application Dependencies scope |
|
| Path Finder feature |
|
| Add Linked Objects feature |
|


Changing an option in the Preferences panel will automatically reflect in the All Application search or in the Transaction/Data Call Graph filter search, except where an option has been manually changed in a search dialog (this change will override the option set in the Preferences dialog for the duration of the user session), for example:
| Regex pattern option enabled in Preferences |
In ≥ 2.19 To optimize regex, a new full-text index based search query is introduced. This search query expects the regex keyword expression in a different pattern from generic regular expression. To get the desired results, you need to create regex keyword expressions using the following ways.
The "AND/OR" between filters will work between the advanced filters. The combination of advanced filters will be applied to the regex search result, leading to an "AND" case result between the filter combination and regex search result. |
|---|---|
| Regex pattern option now enabled when using the All Application search | Access All Application search:
Regex pattern now enabled:
|


Download sample tutorial
This option links directly to the CAST Extend entry for the sample tutorial application, allowing you to download this if necessary: https://extend.castsoftware.com/#/extension?id=com.castsoftware.imaging.tutorial&version=latest. See User Guide - Tutorial for more information.