- Introduction
- Step 1 - Determine applications to upgrade
- Step 2 - Determine whether the upgrade path is supported
- Step 3 - Determine the Assessment Model Strategy
- Step 4 - Perform the upgrade
- Step 5 - Check new AIP Core release is registered in AIP Console
- Step 6 - Run analysis and generate a new post upgrade snapshot
- Step 7 - Run analysis and Upload to CAST Imaging
- Post upgrade
Introduction
In what releases is this supported?
| AIP Console | ≥ 1.24 |
|---|---|
| AIP Core | When upgrading to ≥ 8.38. To upgrade to older AIP Core releases, please use an alternative method. |
What actions does CAST Console perform during an upgrade?
The following actions are performed when you run an upgrade using CAST Console:
- An automatic backup of the Application's Management, Analysis and Dashboard schemas is performed automatically - see Administration Center - Applications - Application Details for details of this backup.
- An automatic backup of the Application's Delivery folder is performed automatically - see Administration Center - Applications - Application Details for details of this backup.
- An upgrade of the schemas and the Delivery folder to the new AIP Core release (technically the -MODIFY_COMBINED command line is used to do this).
- Resync CAST Console to ensure that it is aware that the Application has been upgraded.
Automatic backup: use of temporary disk space
When an automatic backup is run as part of the upgrade process, CAST Console will temporarily store data on disk before transferring the successful backup data to the default storage location described in Administration Center - Applications - Application Details. This temporary storage is located on the Node responsible for the application that is being backed up. This location is governed by the CAST_CURRENT_USER_TEMP_PATH variable defined by AIP Core on the Node in question in the %PROGRAMFILES%\CAST\8.x\CastGlobalSettings.ini file, therefore you should ensure that the Node has appropriate free disk space before starting the upgrade. The automatic backup can be disabled, see below.
%TEMP%\CAST\CAST\$CAST_MAJOR_VERSION$.$CAST_MINOR_VERSION$\
Disabling the automatic backup
It is possible to disable the backup process as follows:
- For ≥ 2.5 releases, see Disabling automatic backup during Application and schema upgrade.
- For 1.x releases (≥ 1.28.5) it is possible to disable the automatic backup of the Application schemas and the Delivery folder by setting the backup.aipcore.upgrade.enabled option to false in the aip-node-app.properties file located on each Node.
What about extensions?
When an upgrade is actioned with AIP Console, the following behaviour is applied to extensions:
- extensions shipped with the new release of AIP Core and not already installed will be automatically installed
- any previously installed extensions will not be automatically upgraded, even if a more recent version of an extension is shipped with the new release of AIP Core, or is available on CAST Extend. You should upgrade any extensions post upgrade if required.
What happens if the upgrade fails?
If the upgrade fails for any reason, an automatic roll back of the Application (schemas and delivery folder) will be performed using the backup taken automatically at the start of the upgrade process.
What about AIP Core and extension Assessment Models
The setting chosen in Administration Center - Settings - Assessment Model Strategy under Upgrade Strategy will be used.
Step 1 - Determine applications to upgrade
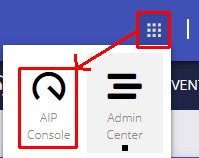
Browse to your AIP Console URL http://<server>:8081/ui/index.html, login to AIP Console with a user that has the ADMIN role and switch to the Admin Center:

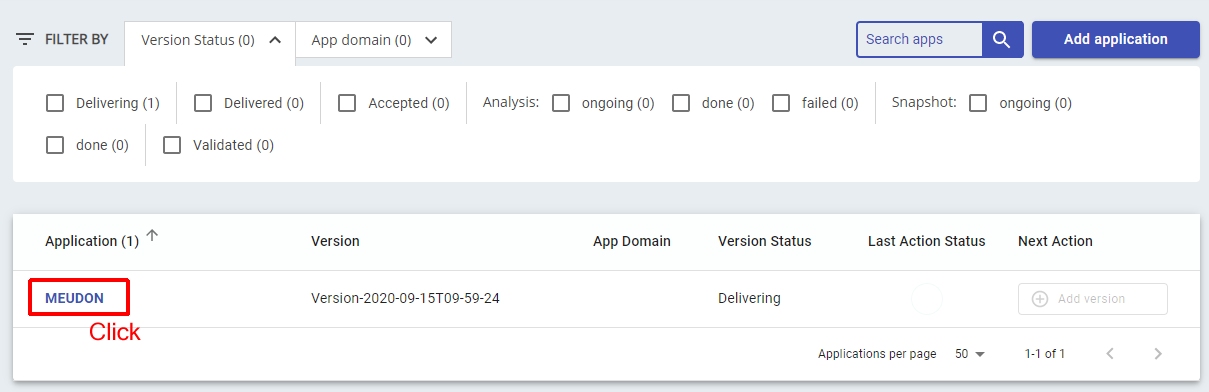
Now move to the Applications panel:
![]()
Any application that is eligible for upgrade will be flagged as follows:
| ≥ 2.x |
Note that applications can only be upgraded when at least one AIP Node registered in AIP Console is using a NEWER release of AIP Core than the release of AIP Core used for the most recent snapshot. |
|---|---|
| 1.x |
Note that applications can only be upgraded when the AIP Node on which the Application is located is installed with a release of AIP Core that is newer than the release of AIP Core used for the most recent snapshot. |


Step 2 - Determine whether the upgrade path is supported
You should now check whether the upgrade path for the eligible applications is supported. You can check this path is supported using the matrix available here: AIP Core - Application - schema upgrade on each AIP Node, and consult the release notes for the target AIP Core release:

Step 3 - Determine the Assessment Model Strategy
Before starting the upgrade, you must choose an option with regard to the handling of the Assessment Model during the upgrade - note by default the Preserve Assessment Model but enable new rules option is selected. See Administration Center - Settings - Assessment Model Strategy for an explanation of the available options.
Browse to the Administration Center - Global Configurations and expand the Administration Center - Settings - Assessment Model Strategy panel to make your choice:

Step 4 - Perform the upgrade
To perform the Application and schema upgrade, use the following option in the Admin Center:
| ≥ 2.x |
|
|---|---|
| 1.x |
|

In AIP Console ≥ 1.25 you can also perform multi-application upgrades:

In ≥ 2.x, if you have multiple AIP Node instances each running a different release of AIP Core, and you choose to perform a multi-application upgrade (instead of a single Application upgrade) using the check boxes, then the available upgrade paths for all the Applications will be determined by the Application(s) running the most recent release of AIP Core. In the example below, there are two Applications (one running 8.3.36 and one running 8.3.37) and two AIP Node instances (one running 8.3.37 and 8.3.38). If you select both Applications for upgrade, then the target AIP Core release will be limited to 8.3.38. In this situation, if you want to choose the specific target release you require, then you should perform a single application upgrade instead.


When you click the option to upgrade, a warning is displayed (see image below) before the upgrade action is started. In ≥ 2.x, you can also choose the target AIP Core release - this drop down box will list all the AIP Core releases available on AIP Nodes managed by AIP Console that are NEWER than the AIP Core release used for the current Application.

The upgrade will then proceed:

Note that if you have the ADMIN role and the Application is eligible for upgrade, if you attempt to start an action on the Application (for example, run an analysis, generate a new snapshot, upload to CAST Imaging), the action will be blocked, but you will be offered the opportunity to perform an upgrade instead:

This behaviour had been altered starting 2.10: when using Standalone deployment mode it is possible to run the Upload to CAST Imaging option even if the Application is eligible for upgrade.
Step 5 - Check new AIP Core release is registered in AIP Console
In Application - Overview check that your Applications are showing the correct release of AIP Core - i.e. which release of AIP Core the schemas are set at - this release number should show the new AIP Core release number you have upgraded to:

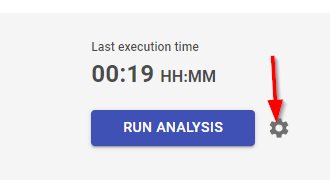
Step 6 - Run analysis and generate a new post upgrade snapshot
Although not mandatory, CAST highly recommends that a new analysis is run and a new snapshot is generated because it provides a way to compare the analysis results of the same source code in two distinct releases of AIP Core. If you don't want to generate a snapshot at this time, you can skip this step.
Pre-snapshot actions for specific technologies
Customers using the Siebel extension
Customers upgrading with legacy BusinessObjects Analyzer results
Customers upgrading from CAST AIP 8.1.0 (baseline) - snapshot validation
If you are upgrading from CAST AIP 8.1.0 (baseline) ONLY, you should check your snapshots for errors that may have occurred during the upgrade of the Measurement Service schema with CAST Server Manager. To do so:
- connect and login to the Health Dashboard from the previous release of CAST AIP (this should still be available).
- navigate through all the Applications that have been upgraded to the new release of CAST AIP and check the list of snapshots in the snapshot selector for each Application:
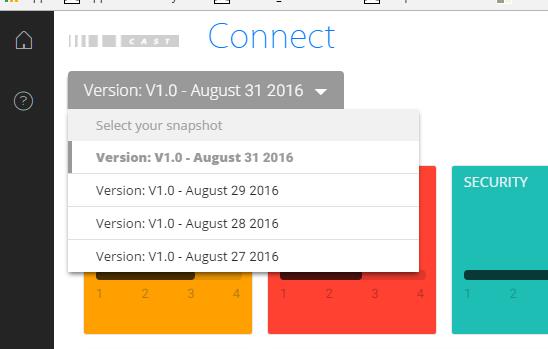
- any snapshot Version name that contains the string "MIGR_ERROR_ALG_xxx_x_x" (for example "MIGRERROR_ALG_1106776204_3_4") was subject to an error that occurred during the upgrade of the Measurement Service schema with CAST Server Manager. It has not been possible to automatically repair this error and therefore the snapshot may produce erroneous data in the Health Dashboard or in the CAST Report Generator.
Resolution
If any existing snapshots are marked as containing an error, you need to perform a specific set of actions to remove and re-consolidate the snapshot (containing the error) in the Measurement Service schema. To do so:
- Launch the AadConsolidation-GUI.exe located in <CAST_AIP_installation_folder>\AAD\GUI:
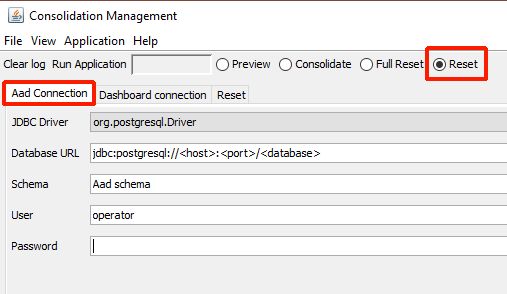
- In the GUI, tick the Reset option as shown above
- Fill in the fields in the AAD Connection tab (as highlighted above) to connect to the Measurement Service schema in which the snapshots with errors have been consolidated. See HD - GUI common fields for more information.
- Move to the Reset tab and fill in the three fields as follows, according to the Version name given to the snapshot that contains an error, for example: "MIGRERROR_ALG_1106776204_3_4"
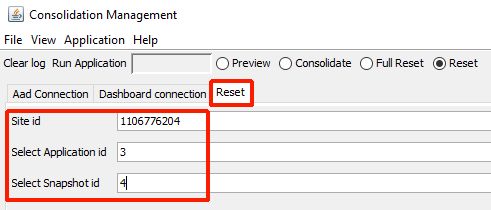
- the first figure, (here 1106776204) represents the site_id
- the second one, (here 3), the application_id
- the third one (here 4) the snapshot_id
- Finally click the Run Application button to start the removal process:
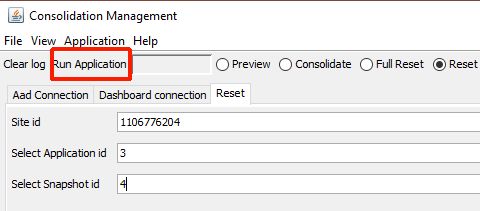
- Repeat this process for ALL snapshots in your upgraded Application that have an error in the Version name.
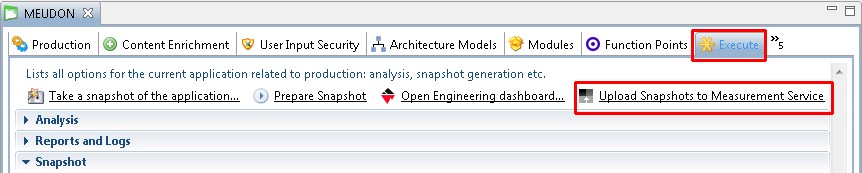
- Finally, open the CAST Management Studio from the new release of CAST AIP, open the Application editor and move to the Execute tab
- Click the Upload Snapshots to Measurement Service option to re-consolidate all snapshots for the current Application. Repeat for each Application as necessary.
Generate a new snapshot
To generate a new snapshot, move to the AIP Console screen if you are not already there:
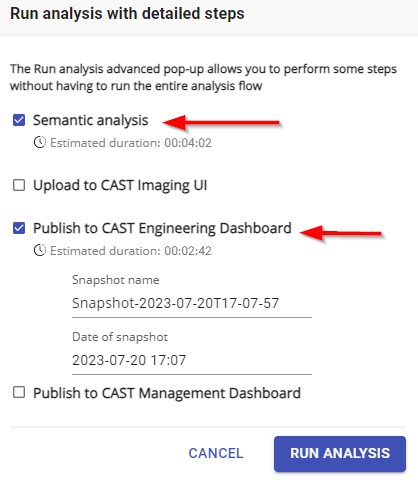
Alternatively you can click the Snapshots icon in the left panel to access the Application - Snapshots page and click the run button in the bottom right corner to choose your options:

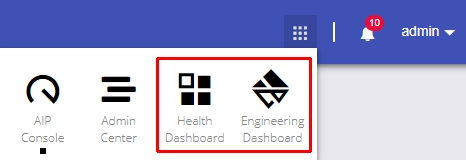
You can check the results using the Engineering Dashboard - this is a quick and easy way to view the results. If you are using "embedded" dashboards, then you can click the Dashboard icons and instantly view the results - otherwise, you will need to log in to your standalone dashboards:
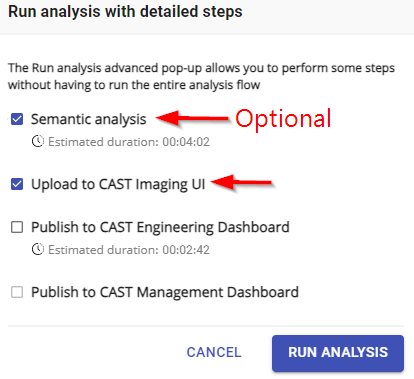
Step 7 - Run analysis and Upload to CAST Imaging
Just as with an analysis/snapshot, you can optionally run a new analysis and upload to CAST Imaging, or simply upload to CAST Imaging (without running a new analysis). To do so move to the AIP Console screen if you are not already there:
Post upgrade
What happens to Assessment Models?
During the upgrade process, the following actions will have been performed:
- Preserve Assessment Model and get new rules for information)
- Note that when there are no new rules available, a duplicate copy of the existing Assessment Model is NOT made.
| Option chosen during upgrade | Assessment Model label in CAST Management Studio | |
|---|---|---|
| "[current label] (upgraded, [version] new rules enabled)" |
| |
| Preserve Assessment Model customizations, leave new rules disabled | "[current label] (upgraded, [version] new rules disabled)" |
|
"Default Assessment Model ([version] + Extensions)" |
|


Unassociated Assessment Models will retain their existing label:


Warning : There are more than 3 Assessment Models declared in the current management base,
this can degrade the performances of CAST Management Studio. You should consider removing those which are no longer needed.
Custom tablespace
If you have configured any of the AIP schemas to use custom tablespace (i.e. tablespace other than pg_default which is automatically used when schemas are installed with AIP Console), following the schema upgrade you may find that some tables will now be using the default tablespace (pg_default) and some will still using the custom tablespace. If you wish to ensure that all your tables are using the same custom tablespace, you can run the following query to generate the required execution statements that will need to be run to do this. Ensure you update the following first:
- <schema_name> = replace with the name of the schema
- <tablespace_name> = replace with the name of the custom tablespace you want to use
SELECT
  query
FROM
  (
    SELECT
      1 as id,
      'Set statement_timeout=0 ; ' as query
    UNION
    SELECT
      2,
      ' ALTER TABLE ' || schemaname || '.' || tablename || ' SET TABLESPACE <tablespace_name>;'
    FROM
      pg_tables
    WHERE
      schemaname ilike '<schema_name>'
      and tablespace is null
    UNION
    SELECT
      2,
      ' ALTER INDEX ' || schemaname || '.' || indexname || ' SET TABLESPACE <tablespace_name>;'
    FROM
      pg_indexes
    where
      schemaname = '<schema_name>'
      and tablespace is null
  ) a
ORDER BY
  a.id;