Created by James Hurrell on Apr 16, 2021
The List Format Editor dialog box enables you to define how objects are displayed in the
User List,
Search in Code List and the
Search In Comment List.  Launching the dialog box
| To launch the List Format Editor: - First make sure you are working in the User List, Search in Code List or the Search in Comment List, then right click anywhere in either to launch the shortcut menu
- Select List Format...
|
Dialog boxes
| There are two types of List Format Editor, that function identically. One is a basic dialog box: 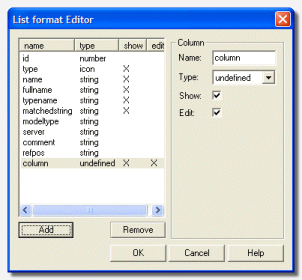
The second dialog box enables you to make more detailed choices: 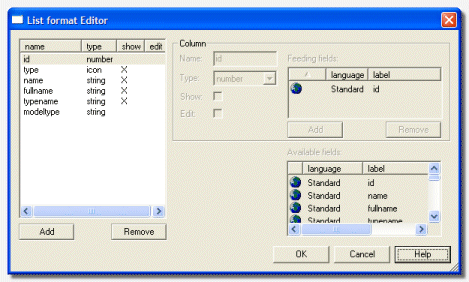
Left hand section The section situated to the left of the dialog box displays a list of columns that can appear in the tab: | Name | Indicates the name of the column that will be displayed in the tab. You can modify this if you require by clicking the entry and then inputting a new name in the Column section. | | Type | Indicates the type of information that the column will display. You can modify this if you require by clicking the entry and then selecting a new type in the Column section. | | Show | A cross next to an entry indicates that the column will be displayed in the tab. You can modify this if you require by clicking the entry and toggling the Show option in the Column section. | | Edit | A cross next to an entry indicates that you can manually modify the resulting entry in the tab. You can modify this if you require by clicking the entry and toggling the Edit option in the Column section.  Notes Notes
- Editing an entry in the tab does NOT modify the information stored in the Knowledge Base, only the entry in the tab is modified for the duration that the object is displayed.
- You can only modify columns that you have already created yourself or the User1, User2 and User3 default columns.
| | Shortcut menu | Right click an entry in this section to launch a shortcut menu that provides various self explanatory options. | | Add/Remove | Click either of these buttons to add a new entry to the tab or to remove an existing entry. | Column section This section enables you to choose what to display in the column depending on the type of object you are working with. | Name/Type/Show/Edit | These options enable you to choose options when modifying an existing column or defining a new column. | | Right hand sections (only available in detailed dialog box) | The lower section displays an exhaustive list of all the object types and references available for selection. The upper section will initially be empty, but using the Add and Remove buttons, you can choose an object type and/or reference (from the lower section) to be associated with the selected column. | | Shortcut menu | Right click an entry in these sections to launch a shortcut menu that provides various self explanatory options. | |
How does it work?
| If you find the default column headings displayed in the tabs insufficient for your needs, you can either add a new column and define what is displayed in it or, alternatively, modify an existing column. Adding a new column - In the left hand section, click Add. A new entry will be added with an Undefined type.
- Next choose Name/Type/Show/Edit to suit your needs.
- Finally choose the reference you require in the right hand lower section. For instance, if you want the new column to display the Business Function of any object listed in the tabs, choose the Common/Business Function entry and click Add to add it to the right hand upper section. You can add as many references as you require.
Notes - Please be aware that the order in which the references are listed in the right hand upper section determines what entry will be displayed in the tabs when an object matches two or more references.
For example, your right hand upper section contains two references in the following order: Common/Business Function and PB/Window Type. If a PB Window type is displayed in the tabs, the column you added to display these features will display the object's Business Function instead of its Window Type. Change the order that the references appear in the Column Fields section to modify this. Modifying an Existing Column You can only modify columns that you have already created yourself or the User1, User2 and User3 default columns. - Select the column in the Column section and make the changes you require
|
Example
| In the following screen shot of the User List, a new column called "business function" was created with the List Format Editor dialog box and the reference Common/Business Function (located in the lower right hand section) associated to it with the Add button. Three Stored Procedures were then appended to the User List (see here for more information on how to do this) and their business functions can be clearly seen. 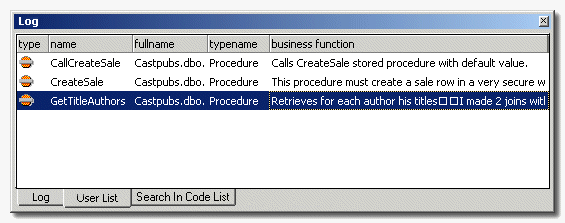
|
User List | Search in Code List | Search In Comment List
